background image

12

Installation

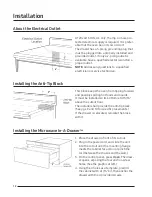
Installing the Anti-Tip Block

This block keeps the oven from tipping forward 

and possibly spilling hot foods and liquids.

It must be installed so its bottom is 14 13/16” 

above the cutout floor.

The installer shall provide the anti-tip block. 

(See pgs. 9 and 10 for specific placements.)

If the drawer is relocated, relocate the block 

with it.

Installing the Microwave In-A-Drawer

1.  Place the drawer in front of its cutout.
2.  Plug in the power cord, and slide the unit 

into the cutout until the mounting flange 

meets the cabinet face. (Do not pinch the 

cord between the chassis and the wall.)

3.  On the control panel, press 

Open

. The draw-

er opens, exposing the four anchor-screw 

holes. (See the graphic at left.)

4.  Using the 4 holes as a template, predrill 

the cabinet with a 1/16” bit, then anchor the 

drawer with the 4 provided screws.

About the Electrical Outlet

A 120 volt 60 Hz, AC only, 15 amp. or more pro-

tected electrical supply is required. It is prefer-

able that the oven be on its own circuit.
The drawer has a 3-prong grounding plug that 

must be plugged into a properly installed and 

grounded outlet. If only a 2-prong outlet is 

available, have a qualified electrician install a 

proper outlet.

NOTE:

 Address any questions to a qualified 

electrician or service technician.

Summary of Contents for Modernist Microwave In-A-Drawer DMR24M977WM

Page 1: ...Installation Instructions Modernist Microwave In A Drawer DMR24M977WM DMR24M977WM DMR30M977WM DMR30M977WM Part No 112242 Rev B...

Page 2: ...ated Equipment Safety 5 Grounding the Microwave In A Drawer 5 Installation Requirements 7 Checklist 7 Design Specifications 8 Clearances and Dimensions 8 Installation 11 Preparing to Install the Micro...

Page 3: ...r product failure due to improper installation Remove all packing material before connecting the electrical supply Observe all local codes in installing the oven Leave this manual with the owner Write...

Page 4: ...e Phone 800 793 0093 x2813 USA Canada Mon Fri 5 00 a m 5 00 p m pacific time Website www dacor com customer care contact us All specifications may change without notice Dacorassumes no liability forsu...

Page 5: ...cord is too short have a qualified electrician or serviceman install an outlet near the appliance Do not use a Ground Fault Circuit Interrupter DANGER ELECTRIC SHOCK HAZARD To avoid risk of electrica...

Page 6: ...ounding through the neutral conductor require a 4 wire branch circuit con nection Improper connection of aluminum house wiring to copper leads can cause an electrical hazard or fire Use only connector...

Page 7: ...Installation Testing the Installation and Customer Service Team lift the unit directly into the cabinet cutout Ensure the electrical conduit reaches to the connection point properly Slide the unit ful...

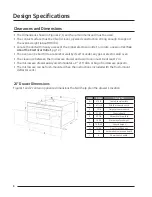
Page 8: ...ce between the microwave drawer and a wall oven must be at least 2 in The microwave drawer easily accommodates a 9 x 13 dish or bag of microwave popcorn The microwave can be flush mounted See the inst...

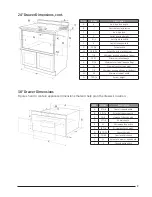
Page 9: ...p allowance top L 36 Nominal countertop height M 1 8 Minimum overlap allowance bottom N 24 Minimum cabinet width O 15 9 16 Cutout height 30 DrawerDimensions Dim Inches Description A 21 5 8 Overall cha...

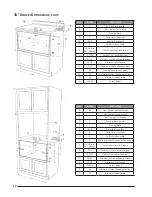
Page 10: ...um overlap allowance bottom N 30 Minimum cabinet width O 15 9 16 Cutout height Dim Inches Description A 84 Nominal wall cabinet height B Optional wall oven cutout C Electrical outlet location D 6 Anti...

Page 11: ...Kit Remove packing material from the drawer Do not remove the waveguide cover which is on the oven chamber ceiling Remove the features sticker Check for damage e g loose bent mis aligned components da...

Page 12: ...t face Do not pinch the cord between the chassis and the wall 3 On the control panel press Open The draw er opens exposing the four anchor screw holes See the graphic at left 4 Using the 4 holes as a...

Page 13: ...Instructions D installation Modernist Micro Onde Tiroir DMR24M977WM DMR24M977WM DMR30M977WM DMR30M977WM...

Page 14: ...urit 5 Related Equipment Safety 5 Grounding the Microwave In A Drawer 5 Conditions D installation 7 Liste de Contr le 7 Les Sp cifications de Conception 8 Clearances and Dimensions 8 Installation 11 P...

Page 15: ...r product failure due to improper installation Remove all packing material before connecting the electrical supply Observe all local codes in installing the oven Leave this manual with the owner Write...

Page 16: ...ithout notice Dacorassumes no liability forsuch changes 2017 Dacor All rights reserved Before You Call ForService Read the BEFORE YOU CALL and operating instruction sections in your User Manual It may...

Page 17: ...r cord is too short have a qualified electrician or serviceman install an outlet near the appliance Do not use a Ground Fault Circuit Interrupter DANGER ELECTRIC SHOCK HAZARD To avoid risk of electric...

Page 18: ...rounding through the neutral conductor require a 4 wire branch circuit con nection Improper connection of aluminum house wiring to copper leads can cause an electrical hazard or fire Use only connecto...

Page 19: ...Installation Testing the Installation and Customer Service Team lift the unit directly into the cabinet cutout Ensure the electrical conduit reaches to the connection point properly Slide the unit ful...

Page 20: ...nce between the microwave drawer and a wall oven must be at least 2 in The microwave drawer easily accommodates a 9 x 13 dish or bag of microwave popcorn The microwave can be flush mounted See the ins...

Page 21: ...ap allowance top L 36 Nominal countertop height M 1 8 Minimum overlap allowance bottom N 24 Minimum cabinet width O 15 9 16 Cutout height 30 DrawerDimensions Dim Inches Description A 21 5 8 Overall ch...

Page 22: ...um overlap allowance bottom N 30 Minimum cabinet width O 15 9 16 Cutout height A 84 Nominal wall cabinet height B Optional wall oven cutout C Electrical outlet location D 6 Anti tip block length E Ant...

Page 23: ...Kit Remove packing material from the drawer Do not remove the waveguide cover which is on the oven chamber ceiling Remove the features sticker Check for damage e g loose bent mis aligned components da...

Page 24: ...t face Do not pinch the cord between the chassis and the wall 3 On the control panel press Open The draw er opens exposing the four anchor screw holes See the graphic at left 4 Using the 4 holes as a...

Page 25: ......

Page 26: ......

Page 27: ......

Page 28: ...Dacor 14425 Clark Avenue City of Industry CA 91745 Phone 800 793 0093 Fax 626 403 3130 www dacor com...

Reviews: