


p
RoduCT
d
imensions
d
esign
s
peCifiCaTions
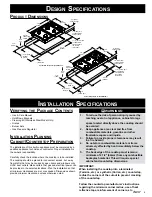
30"
(762mm)
21"
(533mm)
4" (102mm)
Chassis height
1/4" (6mm) Min.
to combustibles
below chassis
27 1/2"
(699mm)
19 7/8" (505mm)
3 1/8"
(79mm)
7 1/2" (191mm) Min.
to combustible
side wall above
the cooktop
(both sides)
Vertical
combustible
surface
Rear
wall
2"
(51mm) Min.
25" (635mm)
Minimum
Cutout Dimensions for the PGM304-1
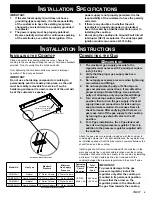
36"
(914mm)
21"
(533mm)
19 7/8"
(505mm)
33 3/4"
(857mm)
4" (102mm)
Chassis height
3 1/8"
(79mm)
1/4" (6mm) Min.
to combustibles
below chassis
7 1/2" (191mm) Min.
to combustible
side wall above
the cooktop
(both sides)
Vertical
combustible
surface
Rear
wall
2"
(51mm) Min.
25" (635mm)
Minimum
Cutout Dimensions for the PGM365-1
Axis2
Axis2
i
nsTallaTion
s
peCifiCaTions
• Use & Care Manual
• Hold Down Brackets
• Cleaning Kit (Stainless Steel Model Only)
• Grates
• Burner Sets
• Gas Pressure Regulator
The installation of this built-in appliance must be completed by a
qualified appliance technician or contractor. Proper installation is
the owner’s responsibility.
Carefully check the location where the cooktop is to be installed.
The cooktop should be placed for convenient access, but away
from drafts that may be caused by open doors and windows or by
HVAC duct outlets. Make certain that gas and electrical power can
be provided in the selected locations. Plan the installation so that
all minimum clearances are met or exceeded. Dimensions shown
provide minimum clearances, unless otherwise noted.
IMPORTANT:
When installing the cooktop into a laminated
(Formica, etc.) or synthetic (Corian, etc.) countertop,
radius the corners of the cutout to prevent cracking
of the countertop.
Follow the countertop manufacturer’s instructions
regarding the minimum corner radius, use of heat
reflective tape, reinforcement of corners, etc.
V
eRifying
The
p
aCkage
C
onTenTs
i
nsTallaTion
p
lanning
C
abineT
/C
ounTeRTop
p
RepaRaTion
1. To reduce the risk of personal injury caused by
reaching over a hot appliance, cabinet storage
WARNINGS:
space located directly above the cooktop should
be avoided.
2. Keep appliance area clear and free from
combustible materials, gasoline and other
flammable vapors and liquids.
3. Failure to provide proper clearances may result
in a fire hazard!
4. Do not store combustible materials or items
adversely affected by heat immediately below the
cooktop.
5. The back edge of the cooktop must remain a
minimum of 2 1/2" (64mm) from any combustible
backsplash material. This will require special
cabinet and countertop dimensions.
Summary of Contents for Preference PGM304-1
Page 2: ......
Page 10: ...NOTES...
Page 11: ...NOTES...
Page 12: ...10 NOTES...
Page 13: ...11 NOTES...
Page 14: ...12 NOTES...
Page 15: ...13 NOTES...


