


wARNINGS:
1. Read all instructions before
using the appliance.
2. If the information in this
manual is not followed exactly,
a fire or explosion may result
causing property damage,
personal injury, or death.
3. Improper installation,
adjustment, alteration,
service, or maintenance can
cause personal injury or
property damage. Refer to
these instructions and the
accompanying Use & Care
Manual. For assistance or
additional information, consult
a qualified installer, service
agency, manufacturer (dealer),
or the gas supplier.
4. what to do if you smell gas:
•
do not try to light any
appliance.
•
do not touch any electrical
switch, do not use any phone
in your building.
•
Immediately call the gas
supplier from a neighbor’s
phone.
•
Follow the gas supplier’s
instructions.
•
If you cannot reach your
gas supplier, call the fire
department.
5. For your safety:
•
do not store or use gasoline
or other flammable vapors and
liquids in the vicinity of this or
any other appliance.
•
do not obstruct the flow of
combustion and ventilation air
to the unit.
•
keep appliance area clear and
free from combustible material.
•
do not use or attempt to use
this appliance in the event of a
power failure.
6. This unit is designed as a
cooking appliance. Never use
it for warming or heating a
room.
7. This appliance must not
be used in combination
with surface (countertop)
ventilation systems. The use
of an overhead hood, or dacor
Raised Vent is recommended
for ventilation.
8. This appliance must be
installed with the gas pressure
regulator supplied with it.
9. disconnect the electrical
supply before installing or
servicing the appliance.
10. This appliance must be
grounded. Connect only to a
properly grounded electrical
supply. Refer to “Electrical
Requirements”.
11. Install or locate this appliance
only in accordance with these
installation instructions.
12. Use this appliance only for
its intended use as described
in this manual. do not use
corrosive chemicals or vapors
in this appliance. This type of
appliance is not designed for
industrial or laboratory use.
13. As with any appliance, close
supervision is necessary
when used by children.
14. do not operate this appliance
if it has a damaged electrical
cord, plug, conduit or wires,
if it is not working properly,
or if it has been damaged or
dropped.
15. Installation of this appliance
must be performed by a
qualified installer, service
agency or the gas supplier.
16. This appliance should be
serviced only by qualified
service personnel. Contact the
nearest dACOR Authorized
Servicer at (800) 772-7778,
or at www.dacor.com for
examination, repair or
adjustment.
NOTE:
1. Some products, such as whole
eggs, and sealed containers,
such as closed glass jars, may
explode and should not be
heated on this cooktop.
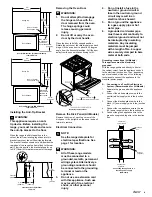
Range data Plate Location
the range data plate specifies the model
number, serial number, electrical supply and gas
supply requirements (if applicable). On models
MRES30 and RSE30 it is located on the left
side wall inside the range storage compartment.
On model RSD30, it is located inside the door
behind the grate at the top.
IMPORTANT SAFETY INSTRUCTIONS
wARNING:
NEVER use this appliance
as a space heater to heat or
warm the room. doing so may
result in carbon monoxide
poisoning and overheating of
the appliance.
wARNING:
NEVER cover any slots, holes
or passages in the oven bottom
or cover an entire rack with
materials such as aluminum
foil. doing so blocks air
flow through the oven and
may cause carbon monoxide
poisoning. Aluminum foil
linings may also trap heat,
causing a fire hazard.
data Plate Location, Models
MRES30, RSE30
data Plate Location, Model RSd30


