


4
5
C
ooktop
o
peratIon
be reduced by operating the burner at a higher flame setting for
a short period of time (normally 60 seconds or less), then
adjusting the control knob down to the “LOW” setting. The
burner will also warm up faster if a utensil is placed on the
grate.
5. The flame should be steady and blue in color. Foreign material
in the gas line, especially in new construction, may cause an
orange flame during initial operation. This will disappear with
further use.
6. The flame should burn evenly around the perimeter of the
burner, except underneath each grate support finger where
the flame height is reduced by the Smart-Flame feature. If the
flame is uneven, ensure that the brass burner ring and porcelain
burner cap are properly positioned, then check for any foreign
material in the burner ring or on the burner cap. Remove any
foreign material with a straightened paper clip, wire, or needle.
Do not use a toothpick to remove clogs, as it could break off.
Do not damage the brass or distort the shape of the burner ring
ports.
7. Never light the burners with a match or other open flame. If a
burner does not ignite, refer to the Troubleshooting Guide.
s
ettInG
the
b
Urner
f
laMe
Setting the proper burner flame height for the desired cooking
process and selected utensil will result in superior cooking
performance, while also saving time and energy. Follow these
recommendations for best results:
1. Use low or medium flame heights when cooking in utensils that
are poor conductors of heat, such as glass, ceramic, and cast
iron cooking vessels. Reduce the flame height until it covers
approximately 1/3 of the utensil diameter. This will ensure even heating
within the utensil and reduce the likelihood of burning or scorching of
food.
. Reduce the flame if it is extending beyond the bottom of the utensil. A
flame that licks along the sides of the utensil is potentially dangerous,
heats the utensil handle and kitchen instead of the food, and wastes
energy.
3. Reduce the flame height to the minimum level necessary to
perform the desired cooking process. Remember that food cooks
just as quickly at a gentle boil as it does at a vigorous, rolling boil.
Maintaining a higher boil than is necessary wastes energy, cooks
away moisture, and causes a loss in food flavor and nutrient level.
U
sInG
the
s
IMMer
p
late
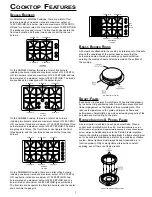
The Simmer Plate has been specifically designed for simmering
and holding food at the lowest safe temperature.
The Simmer
Plate is to be used by setting the burner to its
lowest
setting
. The Simmer Plate has been specifically designed for
simmering only
. The Simmer Plate
must be removed when
cooking.
To install your Simmer Plate locate the five feet on the bottom,
align with the five longest fingers on the cooktop grate then set
the plate on top of the grate. When correctly installed, the Simmer
Plate will rest about 1/ inch above the top surface of the grate
and will be locked in place to prevent turning.
Simmer
Plate
Stabilizer Feet
Grate
Simmer Plate
NOTE:
Non-stick coatings
if used at high
temperatures can be
harmful to birds. Avoid
keeping pets (birds)
in your kitchen during
cooking.
•
Always use utensils with flat, smooth bottoms and tight-fitting
lids to retain heat and moisture.
•
Minimize the amount of liquid or fat to reduce cooking times.
•
Select cookware of the proper size, material and construction
for the cooking process being performed.
•
Adjust the flame height to fit the utensil size.
•
After liquid reaches a boil, reduce the heat to maintain a
simmer rather than a rolling boil.
•
Use a timer rather than repeatedly removing the lid to check
food.
•
Thaw foods prior to cooking to reduce cooking time.
•
Wok Ring (AWR) - the wok ring is a safe, convenient way to
stir fry. Just place it on top of the grate, aligning the wok ring
feet with the grate fingers. It will hold most standard sized
wok.
•
Griddle (AG11 or AG13) - The AG11 and AG13 easy clean
griddles are coated with a non-stick finish. Wonderful for
pancakes, eggs and various other foods. It is designed
to sit on top of your cooktop burner grates. A maximum
setting of medium is recommended to avoid damage to the
cooktop. See instructions included in griddle carton for further
information.
To avoid electrical shock or burns, turn off all controls and ensure
the cooktop is cool before cleaning.
IMPORTANT:
Do not use harsh or abrasive cleaning agents, waxes, polishes, or
commercial cooktop cleaners to clean the cooktop.
Read and follow the
CARE AND CLEANING INSTRUCTIONS
to ensure that proper cooktop operation and appearance will
be maintained throughout the lifetime of the product. Several
materials and finishes are used in the cooktop. Each material
and finish must be properly cleaned according to the following
recommendations. Failure to follow these recommendations may
result in permanent damage to the cooktop.
e
nerGy
s
aVInG
t
Ips
a
CCessorIes
(o
rder
s
eparately
)
WARNING
Your Simmer Plate has a non-stick coating for easy cleaning. Take
care in using abrasives on the non-stick coating, as it will scratch.
Some wearing may occur on top of the Simmer Plate offset
fingers, this is normal with use.