background image

- 4 -

K9 2400 

K9 2440

2. GENERAL SAFETY INFORMATION

This symbol means ATTENTION! 

YOUR SAFETY IS INVOLVED. 

The message that follows the sym-

bol contains important information 

about safety. Carefully read the mes-

sage.

BEFORE SERVICING AND REPAIRING

1. Read all safety instruction in this manual and 

be aware of safety decal locations on your 

machine. 

2. Thoroughly clean your work area and the 

machine.

3. Make sure the machine is on firm and level 

ground and that the parking brake is set.

4. Lower the implement to the ground.

5. Stop the engine and remove the key.

6. Disconnect the negative battery cable.

7. Place a "DO NOT OPERATE" tag in the 

operator station.

WORKING SAFETY

1. Do not operate or service the machine while 

under  the  influence  of  alcohol,  medications, 

or other sustances.

2. Never wear loose fitting clothing and always 

use safety equipment appropriate to the job.

3. Never use improvised tools, parts or 

procedures. Use only recommended tools 

appropriate to the work.

4. Extra care should be taken to work safely 

when servicing is done by two or more 

persons.

5. Always support the machine with safety 

stands rated for the weight of the machine. 

Never work under a machine that is 

supported solely with a jack. 

6. Do not touch any rotating or hot parts while 

the engine is running.

7. Escaping fluid (hydraulic oil) under pressure 

can penetrate the skin causing serious 

injury. Relieve pressure before disconnecting 

hydraulic or fuel lines. Tighten all connections 

before applying pressure.

DISPOSE OF FLUIDS PROPERLY

1. Observe relevant environmental protection 

regulations when disposing of oil. NEVER 

pour fluids onto the ground, down a drain, or 

into any body of water.

3. INSTALLATION INSTRUCTION

1.  Park the vehicle on firm and level ground. 

Then, engage the parking brake and stop the 

engine.

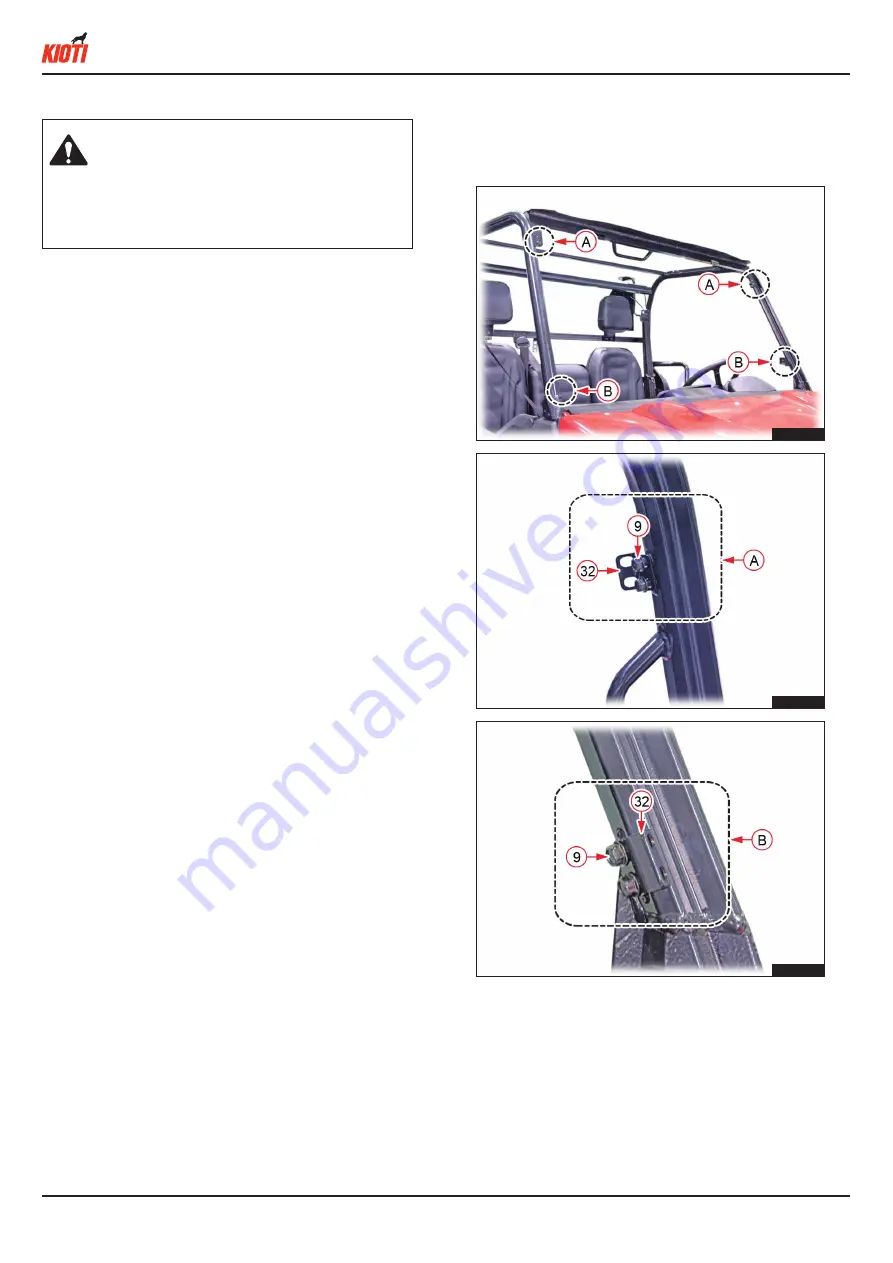
2. Install each upper frame stay (32) (4 EA) to 

the left / right side of the ROPS front frame 

and tighten the flange bolt (9).

U20SH02A

U20SH34A

U20SH34A

Summary of Contents for KIOTI UD28-A901AF

Page 1: ...gongjungang ro 34 gil Nongong eup Dalseong gun Daegu KOREA 42984 Tel 82 53 610 3350 Fax 82 53 610 3359 http www daedong co kr KIOTI TRACTOR DIVISION DAEDONG USA Inc 6300 Kioti Dr Wendell NC 27591 Toll Free 1877 GO KIOTI Tel 1 919 374 5100 Fax 1 919 374 5001 http www kioti com DAEDONG KIOTI EUROPE B V Koerilenstraat 2 3199LR Maasvlakte Rotterdam The Netherlands Tel 31 0 181 35 30 25 http www kioti ...

Page 2: ...1 1 27 U3210 97251 BRACKET FRONT WIPER MOTOR 1 1 28 U3215 97161 CROSS RECESSED HEAD MACHINE SCREW 2 2 29 UD26 0097A WIRE HARNESS CONNECTING WIPER MOTOR 1 UD26 0017C ASSY WIRE HARNESS CONNECTING WIPER 1 1 30 T4935 54232 SWITCH WIPER FR 1 1 UD26 0036A SWITCH WIPER FR LED 1 31 UD27 0022A GANISH CLIP 7 7 32 UD28 5966A UPR FRAME STAY 4 4 33 UD28 5968A ELEC COVER 1 1 34 UD28 5975A COVER LWR 1 1 35 UD28 ...

Page 3: ...7 15 40 16 23 26 27 28 28 13 36 1 17 20 21 6 18 42 9 3 2 14 12 48 41 33 14 55 24 43 ASS Y 7 8 10 12 15 19 22 26 32 38 40 45 9 32 3 29 46 30 25 31 39 8 3 38 32 35 7 23 53 53 50 52 51 49 9 3 32 43 34 45 44 37 3 17 3 54 56 3 54 U20SH01I ...

Page 4: ...ob 3 Never use improvised tools parts or procedures Use only recommended tools appropriate to the work 4 Extra care should be taken to work safely when servicing is done by two or more persons 5 Always support the machine with safety stands rated for the weight of the machine Never work under a machine that is supported solely with a jack 6 Do not touch any rotating or hot parts while the engine i...

Page 5: ...nel with a hole cutter 39 optional U20SH37A U20SH38A 1 Fit the grommet 16 to the upper hole of the windshield Then fit the collar 10 and cushion A 19 to the screw 5 and insert it to the glass hole from the outside of the windshield Finally fit the cushion B 20 from the inside of the windshield and install the wiper motor bracket 26 U20SH39A 2 Install the wiper motor 23 to the wiper motor bracket T...

Page 6: ... 13 from the inside of the glass install the hinge brackets 37 2 EA and tighten the flange nut 3 U20SH42A U20SH42A 4 Fit the collar 10 and cushion A 19 to the screw 4 and insert it to the left right hole on the lower section of the glass Then fit the cushion B 20 to install the side glass grip 21 22 TEMPERED LAMINATED GLASS SUB ASSEMBLING ...

Page 7: ...lling the side glass grip to the left right side of the lower frame B fit the head pin 18 and secure it with the snap ring 6 U20SH46A U20SH47A 6 Install the window brush 15 and washer liquid hose 36 to the wiper arm 40 Pass the washer liquid hose through the grommet to pull it out in the driver s seat Install the wiper arm to the wiper motor shaft and tighten the flange nut 3 ...

Page 8: ...S frame to secure pull it out and secure it with a clamp U20SH49A 8 Install the wiper motor cover 27 and tighten the screw 28 Install the wire harness cover 33 and tighten the flange bolts 14 U20SH22A U20SH23A 9 Pass the wiper wire harness and washer liquid hose to the front floor cover through the hole it bored in Step 4 and pull it out from the inside of the hood ...

Page 9: ... t t h e w i p e r w i r e harness 29 connector and washer liquid hose B to the motor of the washer liquid tank U20SH33B 10 For K92400 Connect the main harness connector A to the connector of wiper motor 29 For K92440 Connect the main harness connector B to the wiper wire harness 29 FOR K92400 B U20SH54A FOR K92440 U20SH32A FOR K92400 U20SH24A FOR K92400 K92440 ...

Page 10: ... 14 to install the washer washer liquid tank 12 U20SH51A FOR K92400 LOW BEAM BRAKE LAMP PARKING BUZZER SAFETY START STARTER 55 Fuse Puller 5A 15A 5A 15A 20A 20A 10A 5A 5A 5A 20A 5A 5A 20A 25A 10A 5A 15A 10A Start SW Horn Flasher Horn Flasher Fog Lamp Option Work Lamp Option Dump Option Beacon Lamp Option Parking Buzzer Wiper Washer Option Alternator USB Socket Heater Option Reverse Buzzer Option P...

Page 11: ...n the thrust head screws 7 5 EA on the lower frame ass y Then fit the caps 11 4 EA 14 For K92400 Connect the vehicle main wire harness connector A to the motor switch 30 and install the switch on the panel For K92440 C o n n e c t t h e w i p e r w i r e harness 29 connector to the motor switch 30 and install the switch on the panel ...

Reviews: