background image

4-7

LUBRICATION SYSTEM

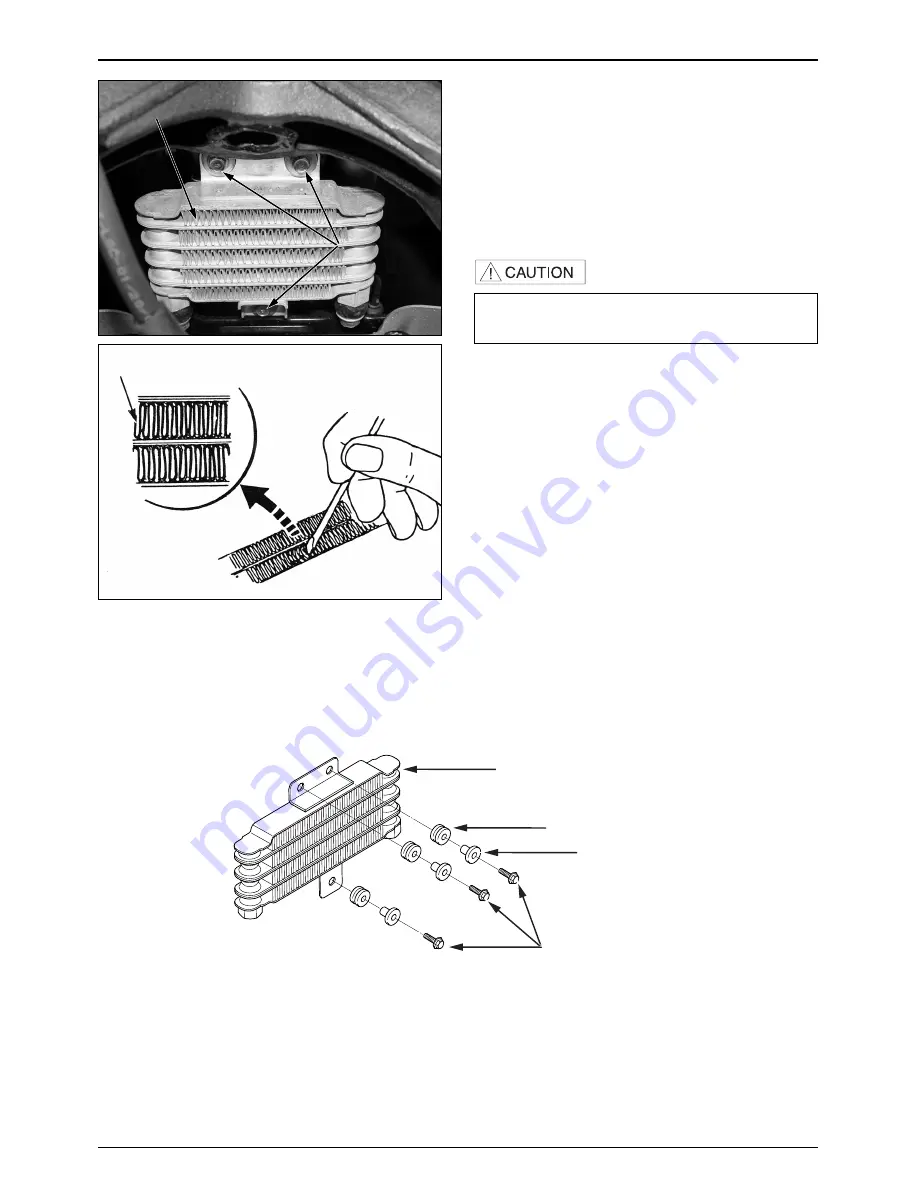
RADIATOR

REMOVAL

Remove the front cover. 

(

3-5)

Remove the front wheel. 

(

12-4)

Loosen the 2 oil bolts and the 4 drain cock packings
from the main pipe bracket.

Loosen the 3 flange bolts securing the radiator.

Remove the radiator.

INSPECTION

Check the oil line connections for leaks.

Check the oil cooler for bent or collapsed fins.
Straighten the bent or collapsed fins with a suitable,
small, blade-type screw driver if necessary.

Check the air passages for clogging or restriction. Blow
dirt out from between core fins with compressed air or
wash off dirt with water.

After installing, start the engine and check for leak. Stop
the engine and check the oil level. 

FIN

OIL RADIATOR

RADIATOR RUBBER

RADIATOR COLLAR

FLANGE BOLT

Be careful not to damage the radiator when removing it.

Pay attention not to turn over the vehicle.

FLANGE BOLTS

FLANGE BOLTS

FLANGE BOLTS

FLANGE BOLTS

FLANGE BOLTS

FLANGE BOLTS

FLANGE BOLTS

FLANGE BOLTS

FLANGE BOLTS

FLANGE BOLTS

FLANGE BOLTS

FLANGE BOLTS

FLANGE BOLTS

FLANGE BOLTS

FLANGE BOLTS

FLANGE BOLTS

FLANGE BOLTS

FLANGE BOLTS

RADIATOR

RADIATOR

RADIATOR

RADIATOR

RADIATOR

RADIATOR

RADIATOR

RADIATOR

RADIATOR

RADIATOR

RADIATOR

RADIATOR

RADIATOR

RADIATOR

RADIATOR

RADIATOR

RADIATOR

RADIATOR

Summary of Contents for S2 125

Page 1: ......

Page 2: ...ms service information and troubleshooting guide Contents of this manual and specifications are subject to change without prior notice for improvement of vehicle quality No part of this publication ma...

Page 3: ......

Page 4: ...ays put on the protection gears because the engine or the muffler is hot right after engine stops 4 Gasoline is extremely flammable Maintenance must performed in the place free of the open fire or ele...

Page 5: ...e bigger diameter to the smaller one from inside to outside and diagonally with the specified torque 5 Clean the parts after the overhaul and before the test and remove the cleaning oil with compresse...

Page 6: ...rection in case of the single sided sealed ball bearing Install the open direction or double sided sealed bearing in the way that the face marked with manufacturer and size should direct to the outer...

Page 7: ...ll the oil seal so that the manufacturer marked surface directs outer surface direction not covered with oil Pay attention not to bend or damage the lip Apply the grease to the lip 20 Connect the tube...

Page 8: ...er in case of water proof coupler Recheck the condition of contact securing and continuity of each part after maintenance When connecting the battery the plus terminal must be connected first After co...

Page 9: ...following When disconnecting the coupler disconnect it while holding the coupler body Pull while holding the wire harness cord and do not remove the coupler connection Release the lock by inserting t...

Page 10: ...ng T start broaden the groove of T start using the wiring driver and release the torque Connect the harness and the hose to T start and then insert until the groove is locked When removing T start fro...

Page 11: ...ess not to be pulled or expended when the handle is turned to the right or the left completely Avoid excessive bending or chewing and interference with the engine Prior to using the tester please read...

Page 12: ...1 9 SERVICE INFORMATION SERIAL NUMBER LOCATION ENGINE SERIAL NUMBER LOCATION FRAME SERIAL NUMBER LOCATION ENGINE SERIAL NUMBER LOCATION FRAME SERIAL NUMBER LOCATION...

Page 13: ...er Filter 14 0 kgf 550 rpm 5 BTDC 14 ABDC 18 BBDC 1 BTDC 0 12 0 12 mm 0 12 0 12 mm OVERALL LENGTH OVERALL WIDTH OVERALL HEIGHT WHEEL BASE SEAT HEIGHT GROUND CLEARANCE DRY WEIGHT GROSS WEIGHT TYPE FRON...

Page 14: ...10W 4 12V 21 5W 14V 3W 14V 3W 2 12V 2W 2 14V 1 4W 12V 5W TYPE VENTURI BORE MODEL MARK CHOKE TYPE MAIN JET PILOT SCREW INITIAL SETTING FLOAT LEVEL IDLE SPEED CLUTCH TYPE PRIMARY REDUCTION SECONDARY RED...

Page 15: ...ND BOLT SIDESTAND PIVET SEREW SIDESTAND PIVET NUT FRAME ITEM REFERENCE TORQUE VALUE THREAD DIA mm Q TY 1 1 kgf m 2 5 kgf m 0 8 kgf m 1 0 kgf m 5 5 kgf m 7 5 kgf m 5 5 kgf m 1 0 kgf m 1 2 kgf m 5 5 kgf...

Page 16: ...rnings or cautions MEANING Indicates dangerous area Serious accident may result if instructions are not followed The following symbols indicate oil adding oil change or parts MEANING Add oil If there...

Page 17: ...LH SEAT LOCK CABLE SEAT LOCK CABLE AUTO CHOKE WIRE WIRE CLIP LH SEAT LOCK CABLE THROTTLE CABLE HAZARD SW WIRE DOMESTIC USE ONLY WIRE CLIP FUEL UNIT CORD FUEL UNIT COUPLER LH SEAT LOCK CABLE SIDE STAND...

Page 18: ...EARTH CABLE ACG CORD HOSE CLAMP RR BRAKE HOSE CABLE GUIDE WINKER SW CORD THROTTLE CABLE SEAT LOCK CABLE HAZARD SW WIER DOMESTIC USE ONLY COMBI METER COUPLER FUEL SUPPLY TUBE FUEL BREATHER TUBE TUBE CL...

Page 19: ...WIER CLIP ACG CORD START MAGNETIC SW START MOTOR CABLE EARTH CABLE START MAGNETIC SW CORD REG RECTIFIER CORD BATTERY CABLE HEAD LIGHT RELAY WINKER RELAY EARTH CABLE BATTERY BOX COUPLER NOTE WHITE COL...

Page 20: ...E CLIP ACG WIRE TO FUEL TANK ACG CORD TUBE CLIP TUBE CLIP TO INSULATOR FUEL PUMP TO CARBULATOR TUBE CLIP START MOTOR CABLE START MAGNET SW ASS Y BATTERY CABLE FRAME BODY COMP BATTERY CABLE 12V 10AH BA...

Page 21: ...MEMO...

Page 22: ...PLAY 2 6mm SPARK PLUG CR8EH 9 SPARK PLUG GAP 0 8 0 9mm IN 0 12 0 02mm EX 0 12 0 02mm CARBURETOR IDLE SPEED 1 700 100rpm CYLINDER COMPRESSION PRESSURE 14 2kgf 550rpm VALVE CLEARANCE COLD TIRE PRESSURE...

Page 23: ...2 INSPECTIONS ADJUSTMENTS TORQUE VALUES SPARK PLUG 1 1kgf m CYLINDER HEAD COVER BOLTS 1 0kgf m VALVE ADJUSTING NUTS 1 1kgf m TIMING HOLE CAP 0 6kgf m TOOLS WRENCH 8X9mm ADJUST WRENCH COMPRESSION GAUG...

Page 24: ...ed out by authorized maintenance shops dealers or other designated repair shops NOTE 1 After the odometer reading exceeds 12 000km repeat maintenance service at intervals indicated in the table 2 Afte...

Page 25: ...djustment loosen the lock nut and turn adjuster After adjusting tighten lock nut After adjustment is completed recheck the throttle grip free play For simple adjustment use the adjuster under the thro...

Page 26: ...olvents for cleaning parts may result in a fire or explosion TIMING CHECKING RH SHROUD Inspect and adjust the valve clearance when the engine is cool under 35 C 95 F Remove the cylinder head cover Tur...

Page 27: ...the engine Remove the plug maintenance cover Stop engine and remove the spark plug cap and spark plug Install a compression gauge Open the throttle completely and crank the engine with the starter mo...

Page 28: ...for wear or damage Check scheduled maintenance period replace the new drive belt if possible Fill the recommended oil SAE90 GEAR OIL CAPACITY At disassembling 200cc At replacing 180cc Erect the main...

Page 29: ...an impair braking efficiency A leak in the brake system can lead to reduced braking effiency and possible loss of braking ability BRAKE SYSTEM Check the front brake hose for cracks or damage If any le...

Page 30: ...uspension Loose or worn suspension parts will lead to deterioration in the vehicle s safety and operation efficiency SIDE STAND Erect the main stand Pull the lower end of the side stand and see if it...

Page 31: ...Check all nuts and bolts of the frame during the regular maintenance to check if they meet the prescribed torque value Check all pins clips hose clamps and cable stays FRONT WHEEL 2 00 200 2 00 200 R...

Page 32: ...EXTERNAL PARTS 3 SERVICE INFORMATION 3 1 SEAT 3 2 PILLION SEAT 3 2 LUGGAGE BOX TOP COVER 3 2 REAR GRIP 3 2 LUGGAGE BOX 3 3 CENTER COVER 3 3 BODY SIDE COVER 3 3 BODY COVER 3 4 REAR FENDER 3 4 FLOOR SI...

Page 33: ...ease the seat lock by turning the main switch key to open seat Pull the pillion seat forward and remove it Install in the reverse order of removal FLANGE NUTS FLANGE NUTS FLANGE NUTS FLANGE NUTS FLANG...

Page 34: ...Remove the air duct cover in dissembling LH body side cover SEAT CATCH SEAT CATCH SEAT CATCH SEAT CATCH SEAT CATCH SEAT CATCH SEAT CATCH SEAT CATCH SEAT CATCH SEAT CATCH SEAT CATCH SEAT CATCH SEAT CA...

Page 35: ...er of removal REAR FENDER Remove the body cover Loosen the 4 washer bolts and remove the Rr fender Install in the reverse order of removal FLOOR SIDE COVER Remove the center cover Loosen the 3 body co...

Page 36: ...the 4 special screws R L 2Ea for each to remove the under cover Install in the reverse order of removal HANDLE COVER Loosen the washer screw and tapping screw securing the under handle cover Loosen t...

Page 37: ...al FRONT UNDER COVER A Remove the front cover and windscreen Loosen the 7 tapping screws securing the inner cover Install in the reverse order of removal FRONT UNDER COVER B Loosen the 2 flange bolts...

Page 38: ...be clip Remove the breather tube Loosen the 3 screws securing the inner cover Remove the bag holder Loosen the 2 tapping screws securing the speedometer cover Install in the reverse order of removal S...

Page 39: ...curing Ex pipe comp Loosen the 3 bolts securing the Rr Fork Remove the Ex muffler comp REAL WHEEL MUDGUARD Loosen the 2 flange bolts of RH Loosen the flange bolt securing the air cleaner and mudguard...

Page 40: ...EN CAP 1 5 f m OIL FILTER COVER BOLT 1 1 f m OIL PUMP MOUNTING BOLT 1 1 f m OIL DRAIN PLUG BOLT 2 5 f m 4 SERVICE INFORMATION 2 1 TROUBLESHOOTING 2 2 ENGINE OIL LEVEL INSPECTION 2 3 ENGINE OIL CHANGE...

Page 41: ...ption External oil leaks Worn piston ring or incorrect piston ring installation Worn valve guide or seal Oil contamination Oil or filter not changed often enough Faulty head gasket Worn piston rings L...

Page 42: ...fter opening oil filter cap of cylinder head cover OIL CAPACITY 1 1 After disassembly 0 9 After Oil change with Oil in the Oil hose removed 0 8 After Oil filter change 0 75 After Oil change API servic...

Page 43: ...shion lower bolt 13 7 Muffler 3 8 Rear swing arm 13 7 Rear caliper 13 3 Shroud 8 2 Cooling fan 8 2 A C generator 8 2 RH crankcase cover 8 4 Starter driven gear 8 7 Reduction gear 8 5 Starting clutch a...

Page 44: ...ith fresh cleaning oil OIL PUMP INSPECTION Assemble the inner and outer rotors to the oil pump body Measure the pump body clearance SERVICE LIMIT 0 23mm TOOL FEELER GAUGE Measure the pump side clearan...

Page 45: ...e oil pump to the RH crankcase Install the following parts Oil pump drive gear and driven gear Starting clutch assembly 8 8 Starter driven gear and reduction gear 8 5 8 7 A C generator 8 2 RH crank ca...

Page 46: ...tween core fins with compressed air or wash off dirt with water After installing start the engine and check for leak Stop the engine and check the oil level FIN OIL RADIATOR RADIATOR RUBBER RADIATOR C...

Page 47: ...filler hole gradually Tighten the drain cock packings and oil bolts TORQUE VALUE 3 2kgf m Install the front wheel 12 4 Install the front cover 3 5 FLANGE BOLTS FLANGE BOLTS FLANGE BOLTS FLANGE BOLTS F...

Page 48: ...r sliding parts not shown here add oil or grease CONTROL CABLE LUBRICATION Remove and clean the upper assembly of the throttle cable and apply oil If the cable has expanded replace it FRONT BRAKE LEVE...

Page 49: ...MEMO...

Page 50: ...with new ones when disassembled If it is desired to store a vehicle for a period longer than 1 month drain gasoline out of the carburetor float chamber Gasoline left in the float chamber will be dete...

Page 51: ...perly Air screw is adjusted improperly Compression pressure is low Air Fuel mixture is either too lean or rich Carburetor is blocked Mis firing occurs when driving at high speeds Ignition system is da...

Page 52: ...he fuel tank be sure to close the fuel tank cap Gasoline is extremely flammable Avoid fire during work and pay particular attention to electric sparks Furthemore the evaporated gasified gasoline is hi...

Page 53: ...HOLDER NEEDLE HOLDER NEEDLE HOLDER NEEDLE HOLDER NEEDLE HOLDER NEEDLE HOLDER NEEDLE HOLDER NEEDLE HOLDER NEEDLE HOLDER NEEDLE HOLDER NEEDLE HOLDER NEEDLE HOLDER NEEDLE HOLDER NEEDLE HOLDER NEEDLE HOLD...

Page 54: ...at for scores scratches clogging and damage Replace if necessary Check the float valve operation Remove the main jet main jet holder holder washer jet screw jet washer needle jet slow jet pilot jet wa...

Page 55: ...der main jet and slow jet Tighten the pilot jet until it seats lightly then turn it out as much as the number recorded during removal Install the pilot jet rubber CARBURETOR BODY PLUNGER ASS Y DIAPHRA...

Page 56: ...arburetor body Install the diaphragm spring Install the diaphragm cover with its cutout aligned with the hole in the tab of diaphragm Install the auto bystarter wiring plate to the diaphragm and tight...

Page 57: ...the luggage box 3 2 INSPECTION Check the carburetor insulator O ring for wear or damage CABURETOR INSULATOR REMOVAL Remove the luggage box 3 2 Remove the center cover 3 3 Remove the air cleaner 2 5 R...

Page 58: ...uretor is overhauled or a new pilot screw is installed Before adjusting the pilot screw check the following items Fuel system electrical system for troubling Spark plug for cleaning and gap adjusting...

Page 59: ...MEMO...

Page 60: ...body TRANSMISSION SECTION 11 STARTING CLUTCH SECTION 8 OIL PUMP SECTION 4 A C GENERATOR SECTION 8 STARTER MOTOR SECTION 16 CONTINUOUSLY VARIABLE TRANSMISSION SECTION 7 CYLINDER HEAD CYLINDER PISTON S...

Page 61: ...or wiring cable Remove the battery earth cable from the RH shroud groove Disconnect the high tension cord from the engine Remove the bleeder tube from the cylinder head cover Loosen the parking brake...

Page 62: ...of removal TORQUE VALUE ENGINE HANGER BOLT FRONT 4 5 f m REAR 4 5 f m Check the following after the engine is installed Engine oil Electric systems Adjust of the parking brake free play Inspection of...

Page 63: ...7 0 LH CRANKCASECOVER CONTINUOUSLYVARIABLE TRANSMISSION LH CRANKCASE COVER...

Page 64: ...EFACEBUSHINGINNERDIAMETER 24 000 24 013mm 24 05mm DRIVE FACE BOSS OUTER DIAMETER 23 980 23 993mm 23 96mm DRIVE BELT WIDTH 22mm 20 50mm WEIGHT ROLLER OUTER DIAMETER 19 95 20 02mm 19 50mm CLUTCH OUTER I...

Page 65: ...sket and dowel pin INSTALLATION Install the new gasket and dowel pin after removing the gasket of the crankcase surface Tighten the LH crankcase cover bolts Align the bolts to uniform the tightening l...

Page 66: ...driven pulley from the drive shaft Remove the driven pulley sub assembly with the drive belt in place Remove the drive belt from the driven pulley groove and drive pulley groove Loosen the drive face...

Page 67: ...LT INSTALLATION Temporarily install the driven pulley sub assembly on the drive shaft Put the drive belt over the movable drive face Install the drive face to the LH crank shaft and install the kick s...

Page 68: ...AL Remove the LH crankcase cover Xh X g V Xg V X f V Xf hfV X e hf V Xe N1e J5e hf W Ye eW Y e W Yf W Y f W Yg Y g Yh 7 2 Hold the drive face using the drive face holder and remove the nut TOOL DRIVE...

Page 69: ...t is exceeded Measure the I D of the drive face Replace it if the service limit is exceeded Movable drive face boss outer diameter SERVICE LIMIT 23 960mm Movable drive face inner diameter SERVICE LIMI...

Page 70: ...nut to the specified torque TORQUE VALUE 7 0 8 0 kgf m TOOL DRIVE FACE HOLDER Install the LH crankcase cover Xh X g V Xg V X f V Xf hfV X e hf V Xe N1e J5e hf W Ye eW Y e W Yf W Y f W Yg Y g Yh 7 2 T...

Page 71: ...n pulley sub assembly from the drive shaft Remove the drive belt DISASSEMBLY Install a clutch spring compressor on the pulley assembly and tighten the tool to gain access to the nut Hold the clutch sp...

Page 72: ...ve the guide pins and guide pin rollers and the movable driven face Remove the O ring and oil seals from the movable driven face Remove the movable driven face SEAL COLLAR OIL SEAL OIL SEAL O RINGS O...

Page 73: ...r race fits securely Replace the bearing if necessary Movable Driven Face Spring Inspection Measure the free length of the driven pulley spring and replace if the service limit is exceeded SERVICE LIM...

Page 74: ...ng into place with the sealed end toward the outside Install the snap ring securely If the driven face has an oil seal at inner bearing side remove the oil seal first If a ball bearing is used on the...

Page 75: ...iven pulley spring and clutch in the clutch spring compressor Compress the assembly by turning the tool handle until the lock nut can be installed Clamp the clutch spring compressor in a vise and tigh...

Page 76: ...Xe N1e J5e hf W Ye eW Y e W Yf W Y f W Yg Y g Yh 7 3 Install the drive face Xh X g V Xg V X f V Xf hfV X e hf V Xe N1e J5e hf W Ye eW Y e W Yf W Y f W Yg Y g Yh 7 5 Install the LH crankcase cover Xh...

Page 77: ...8 0 A C GENERATOR STARTER CLUTCH FLYWHEEL STATOR COMP RH SHROUD COOLING FAN...

Page 78: ...IONS TORQUE VALUES FLY WHEEL BOLT 5 5 kgf m STARTER CLUTCH LOCK NUT 9 5 kgf m RH CRANKCASE COVER BOLT 1 1 kgf m TOOLS SPECIAL SOCKET 12 7 x 28 x 120 A C G ROTOR PULLER 8 SERVICE INFORMATION 8 1 SHROUD...

Page 79: ...2 Body cover 3 4 Center cover 3 3 Engine 6 2 RH shroud comp 8 2 SHROUD REMOVAL Remove the following parts Luggage box 3 2 Center cover 3 3 Engine 6 2 Remove the A C G wiring coupler and connector con...

Page 80: ...g pan screws remove the stator TOOLS A C G ROTOR PULLER UNIVERSAL HOLDER DRIVE FACE HOLDER FLANGE NUT UNIVERSAL HOLDER A C G ROTOR PULLER FLYWHEEL PAN SCREWS PAN SCREWS Insert the puller shaft and rem...

Page 81: ...he wire harness and install the wiring with the clamp Insert the battery earth cable to the shroud groove Install the rear cushion under bolt Install the RH floor side cover 4 7 Install the center cov...

Page 82: ...wear or damage and replace with a new one as necessary STARTER REDUCTION GEAR REMOVAL Remove the starter reduction gear and shaft INSPECTION Check the reduction gear for wear or damage Measure the inn...

Page 83: ...swing arm 13 7 RH crankcase cover 8 4 Remove the LH crankcase cover and hold the drive face with the drive face holder Loosen the starter clutch lock nut with a special socket TORQUE VALUE 9 5 kgf m T...

Page 84: ...r clutch Check the starter driven gear for wear or damage Measure the inner diameter of the starter driven gear SERVICE LIMIT A 32 10 mm B 39 53 mm STARTER CLUTCH INSPECTION Remove the starter driven...

Page 85: ...IVE FACE HOLDER Install the following parts RH crankcase cover 8 2 A C Generator 8 2 Cooling fan 8 2 RH shroud 8 2 Rear swing arm 13 7 Rear caliper 13 3 EX muffler 3 8 RH floor side cover 3 4 LH crank...

Page 86: ...MEMO...

Page 87: ...9 0 CYLINDER HEAD VALVE INLETVALVE ROCKER ARM EXHAVST VALVE ROCKER ARM CAM SHAFT HOLDER CAM SHAFT COMP CARBURETOR INSULATOR CYLINDER HEAD COMP CYLINDER HEAD GASKET INLETVALVE EXHAVST VALVE...

Page 88: ...f m SPARK PLUG 1 2 kgf m CAMSHAFT HOLDER 8mm NUT 2 0 kgf m CAM CHAIN TENSIONER MOUNTING BOLT 1 2 kgf m CAM CHAIN TENSIONER SEALING SCREW 0 4 kgf m CYLINDER HEAD COVER BOLT 0 9 kgf m CYLINDER HEAD BOLT...

Page 89: ...rned or bent valves Incorrect valve timing Broken valve spring Uneven valve seating Cylinder head Leaking or damage head gasket Warped or cracked cylinder head Cylinder piston see section 10 Excessive...

Page 90: ...n is located at the top dead center Make all camshaft lobes face downward If all camshaft lobes face upward rotate the crankshaft to the left for 1 turn 360 and align the T mark with the index mark on...

Page 91: ...haft for wear or damage Measure the inner diameter of the rocker arm SERVICE LIMIT 12 060 mm Measure the outer diameter of the rocker arm shaft SERVICE LIMIT 11 950 mm Check the cam lobes of the camsh...

Page 92: ...emove the cylinder head Manually turn the camshaft bearing outer race and check if it turns smoothly Check the bearing for wear or damage Remove the cylinder head gasket dowel pin and cam chain guide...

Page 93: ...out binding Measure and record the valve stem outer diameter in three places along the valve guide sliding area SERVICE LIMIT IN 4 920 mm EX 4 900 mm Replace the valve with a new one if the service li...

Page 94: ...ed slanted that causes oil leaks from the stem seal and improper valve seat contact and results in the valve seat refacing not able to be performed Rotate the reamer clockwise never counterclockwise w...

Page 95: ...cles Avoid damaging the head when driving the valve guide out Take care not to tilt or lean the reamer in the guide while reaming Otherwise the valve is installed slanted that causes oil leaks from th...

Page 96: ...ALVE SEAT REFACING Reface the worn valve seat by using valve seat cutters and grinders Using a 45 degree cutter remove any roughness or irregularities from the seat Using a 37 degree cutter remove of...

Page 97: ...act area is too low on the valve the seat must be raised using a 55 degree inner cutter Refinish the seat to specifications using a 45 degree finish cutter If the contact area is too high on the valve...

Page 98: ...e slightly when setting it Take precautions not to allow compound to get into the clearance between the stem and guide while the valve is being set Replace the stem seals with new ones whenever a stem...

Page 99: ...r insulator groove Tighten the carburetor insulator with mounting bolts Install the cam chain tensioner and assemble pivot bolts TORQUE 1 0 kgf m Install the spark plug TORQUE 1 2 kgf m Install the cy...

Page 100: ...e the crankshaft counterclockwise and align the T mark of the flywheel with the index mark of the RH crank case cover Check the camshaft assembly for abnormal condition and place it on the cylinder he...

Page 101: ...from the cam chain tensioner lifter Rotate the tensioner shaft clockwise with a small driver and insert the shaft into the body completely Install the cam cover plate Apply engine oil to the threaded...

Page 102: ...sioner shaft clip from the tensioner lifter Assemble the O ring and pan screws to the tensioner lifter TORQUE VALUE 0 4 kgf m Fix the tensioner shaft with a hard clip Assemble a new gasket to the tens...

Page 103: ...10 0 CYLINDER PISTON CYLINDER CYLINDER GASKET PISTON TOP RING SECOND RING OIL RING...

Page 104: ...piston ring Scored or scratched piston or cylinder wall Excessive carbon build up on top of piston 10 SERVICE INFORMATION 10 1 TROUBLESHOOTING 10 1 CYLINDER 10 2 PISTON PISTON RING 10 3 CYLINDER INSTA...

Page 105: ...three levels in both an X and Y axis Take the maximum reading to determine the cylinder wear SERVICE LIMIT 56 100 mm Measure the piston outer diameter Calculate the piston to cylinder clearance Take t...

Page 106: ...the connecting rod Do not let the clip fall into the crankcase Remove the piston pin clip using a pair of pliers Press the piston pin out of the piston INSPECTION Clean carbon deposits from the pisto...

Page 107: ...n outer diameter 90 to the piston pin bore and at the point specified 10mm near the bottom of the piston skirt Replace the piston if the service limit is exceeded SERVICE LIMIT 55 825 mm PISTON PIN IN...

Page 108: ...mark that is stamped on the piston head should be facing the correct direction IN MARK TO INTAKE SIDE EX MARK TO EXHAUST SIDE PISTON PISTON RING INSTALLATION Clean the piston heads ring lands and skir...

Page 109: ...he cylinder head mating surface Do not scratch the surface Install a new cylinder gasket and dowel pins Install the lower part of the cam chain guide to the part of the crankcase and install the cam c...

Page 110: ...MEMO...

Page 111: ...11 0 TRANSMISSION CRANKSHAFT CRANKCASE RH CRANKCASE LH CRANKCASE CRANKSHAFT...

Page 112: ...following parts must be removed prior to changing the LH crank case Follow the removal procedure specified in each section TRANSMISSION SECTION 11 PARKING BRAKE SECTION 14 To assemble the crank case...

Page 113: ...OVER SHAFT REMOVER HEAD SLIDING WEIGHT ASSEMBLY SHAFT TROUBLESHOOTING Engine Noise Connecting rod big and small ends loose Crank pin bearing loose Engine started but unable to move out Transmission da...

Page 114: ...ear brake caliper 13 3 Remove the rear wheel 13 5 Loosen the rear cushion upper bolt Remove the transmission bleeder tube from the mission cover groove Loosen the 8 transmission cover bolts Remove the...

Page 115: ...inal shaft and the counter shaft comp TRANSMISSION INSPECTION Check the drive shaft for wear or damage Check the final shaft for wear or damage Check the counter shaft for wear or damage FINAL SHAFT C...

Page 116: ...the case tightly without play Turn the inner race and check that the bearing turns smoothly and quietly Replace the bearings if necessary Install the bearing to the case with special tools TOOLS DRIVE...

Page 117: ...8 4 Install the rear cushion upper bolt Install the transmission bleeder tube Remove the oil check bolt release the transmission oil filler ACG cap or the LH crankcase until the oil overflow through...

Page 118: ...a plastic hammer CRANKSHAFT REMOVAL Remove the crankshaft from the RH crankcase by using a crankshaft remover If the bearing is left on the RH crankcase use the driver handle and the outer driver to...

Page 119: ...ransmission and crankshaft INSPECTION Check that the bearing outer race fits the case tightly without play Turn the inner race and check that the bearing turns smoothly and quietly Replace the bearing...

Page 120: ...aft bearing and oil seal Remove the countergear bearing Apply clean engine oil to a new bearing and assemble it to the crankcase TOOLS DRIVER HANDLE A DRIVER PILOT OUTER DRIVER Install a new final sha...

Page 121: ...crankcase Install the removed parts Install the engine on the frame 6 2 CRANKCASE INSTALLATION Install the dowel pins and a new gasket Install the cam chain to the LH crankcase Make sure that the gas...

Page 122: ...MEMO...

Page 123: ...12 0 FRONT WHEEL FRONT FORK STEERING BRAKE STEERING HANDLE STEERING STEM FRONT DISK FRONT TIRE FRONT CASTING WHEEL FRONT FORK...

Page 124: ...BER BOLT 1 98 2 45 f m FRONT AXLE NUT 4 41 4 9 f m BRAKE CALIPER BOLT 2 45 3 43 f m 12 SERVICE INFORMATION 12 1 TROUBLESHOOTING 12 2 STEERING HANDLE 12 3 FRONT WHEEL 12 4 FRONT WHEEL BEARING 12 5 SPEE...

Page 125: ...uide bushings Insufficient fluid in forks Loose front fork fasteners Lack of grease in speedometer gear box Brake lever soft or spongy Air in hydraulic system Mixed brake fluid and wet Contaminated br...

Page 126: ...e the throttle grip from the handlebar Remove the handlebar lock nut and take out the bolt Remove the handlebar INSTALLATION Install the handlebar onto the steering stem and install the handlebar coll...

Page 127: ...e actual runout is 1 2 of the total indicator reading SERVICE LIMIT 0 2mm replace if over Adjust the throttle grip free play to the specified range of 2 6mm Install the brake master cylinders by align...

Page 128: ...y sufficient amount of grease to the bearing Insert the right bearing with its seal surface facing outside Do not tilt the bearing Insert accurately Upon assembling the distance collar insert the left...

Page 129: ...GEAR BOX SPEEDOMETER GEAR BOX SPEEDOMETER GEAR BOX SPEEDOMETER GEAR SPEEDOMETER GEAR SPEEDOMETER GEAR SPEEDOMETER GEAR SPEEDOMETER GEAR SPEEDOMETER GEAR SPEEDOMETER GEAR SPEEDOMETER GEAR SPEEDOMETER G...

Page 130: ...rst drain the brake fluid from the hydraulic brake system Disconnect the front stop switch wire connector Remove the brake fluid tube bolt Remove the two bolts securing the brake master cylinder Remov...

Page 131: ...INDER SET MASTER CYLINDER SET MASTER CYLINDER SET MASTER CYLINDER SET MASTER CYLINDER SET MASTER CYLINDER BODY MASTER CYLINDER BODY MASTER CYLINDER BODY MASTER CYLINDER BODY MASTER CYLINDER BODY MASTE...

Page 132: ...SPRING Replace the piston spring cups and snap ring as a set Be sure that each part is free from dust or dirt before reassembly When cleaning with the brake fluid use the specified brake fluid Instal...

Page 133: ...lable Fill the reservoir with DOT 3 or 4 brake fluid up to the upper level Connect the recommended brake bleeder to the bleeder valve Loosen the bleeder valve while pumping the brake lever Repeat this...

Page 134: ...evel is near the lower level If no air leaks out of the bleeder hose operate the brake lever to check the presence of air Tighten the bleeder valve TORQUE VALUE 0 4 0 7 kgf m Be sure that the brake fl...

Page 135: ...caliper with cloth to prevent the piston or brake fluid from leaking Remove the piston from the caliper while blowing the low pressure air in the opening of the brake hose 12 12 FRONT WHEEL FRONT FOR...

Page 136: ...N PISTON PISTON PISTON PISTON PISTON PISTON PISTON PISTON PISTON PISTON PISTON PISTON PISTON PISTON PISTON PISTON PISTON PISTON SEAL PISTON SEAL PISTON SEAL PISTON SEAL PISTON SEAL PISTON SEAL PISTON...

Page 137: ...ghten the oil bolt to the specified torque TORQUE VALUE 3 4kgf m Fill the brake fluid to the upper limit line and bleed air FRONT FORK REMOVAL Remove the following parts Front under cover Front brake...

Page 138: ...lt turns idle but cannot be removed temporarily assemble the spring and the fork tube cap bolt first Hold the bottom case firmly with a vise taking precautions not to distort or damage it SPRING VISE...

Page 139: ...if the deflection is greater than 0 2mm 12 16 FRONT WHEEL FRONT FORK STEERING BRAKE Take precautions not to damage the interior and exterior rim of the bottom case OIL SEAL STOPPER RING OIL SEAL STOPP...

Page 140: ...ew locking agent to the socket bolt thread and assemble the socket bolt to the fork piston TORQUE VALUE 2 0kgf m Apply ATF to a new oil seal Assemble the oil seal to the bottom case Insert the oil sea...

Page 141: ...L STOPPER RING OIL SEAL STOPPER RING OIL SEAL STOPPER RING OIL SEAL STOPPER RING OIL SEAL STOPPER RING OIL SEAL STOPPER RING OIL SEAL STOPPER RING OIL SEAL STOPPER RING OIL SEAL STOPPER RING OIL SEAL...

Page 142: ...ball assembly top cone race and ball race for damage or abnormal and replace as necessary Check the bottom cone race for wear and damage STEERING STEM REMOVAL Remove the following parts Handle cover...

Page 143: ...ring top thread onto the steering head Tighten the top thread to specified torque then loosen the top thread 1 8 turn TORQUE VALUE 0 15 0 25kgf m Recheck that the steering stem moves smoothly without...

Page 144: ...MEMO...

Page 145: ...13 0 REAR WHEEL BRAKE SUSPENSION REAR SWING ARM...

Page 146: ...gned to minimize the hazard caused by airborne asbestos fibers SPECIFICATIONS TORQUE VALUES REAR CUSHION UPPER BOLT 3 5 4 5 f m REAR CUSHION LOWER BOLT 3 5 4 5 f m REAR CUSHION ROD LOCK NUT 3 0 4 5 f...

Page 147: ...re pressure incorrect Faulty tire Bent rim Loose wheel bearing Swing arm bushing worn Wheel out of balance Soft suspension Weak springs Rear damper improperly adjusted oil leakage Hard suspension Rear...

Page 148: ...m leaking Remove the piston from the caliper while blowing the low pressure air in the opening of the break hose DISASSEMBLY Remove the rear break caliper Inspect caliper assembly Remove the pad sprin...

Page 149: ...aliper BRAKE CALIPER ASSEMBLY Clean the piston seal and the dust seal with the brake fluid and install them in the caliper Install the piston in the caliper with the groove side of the piston facing t...

Page 150: ...fler 3 8 Remove the rear brake caliper assembly from the rear swing arm Loosen the 3 rear brake disk bolts remove the rear brake disk from the rear wheel Remove the rear swing arm 13 7 Remove the rear...

Page 151: ...the rear swing arm 13 8 Tighten the rear axle U nut to the specified torque TORQUE VALUE 6 0 8 0 kgf m Install the rear brake caliper assembly to the rear swing arm Install the EX muffler 3 8 Install...

Page 152: ...SHION REMOVAL Remove the luggage box Remove the air cleaner Remove the upper bolt Remove the lower bolt Remove the rear cushion INSTALLATION Install in the reverse order of removal TORQUE VALUE 3 92kg...

Page 153: ...NUT REAR SWING ARM DISASSEMBLY Disassemble the rear wheel outside collar from the rear swing arm Disassemble the oil seal 28 42 7 and radial ball bearing 6302UU Install in the reverse order of remova...

Page 154: ...MEMO...

Page 155: ...G SYSTEM GREEN GREEN REGULATOR RECTIFIER AC GENERATOR YELLOW ENGINE EARTH BATTERY 12V 10AH _ MAIN SWITCH FUSE 15A BLACK RED BLACK CABLE RED YELLOW YELLOW FRAME EARTH REGULATOR RECTIFIER MAIN SWITCH A...

Page 156: ...tedly lose all its charge is repeatedly over charged or if it is left in an un charged state the battery can be damaged its life can be reduced or it can lose some of its strength It is important to n...

Page 157: ...oose broken or shorted wire or connection Loose battery connection Faulty regulator rectifier Faulty A C generator CHARGING SYSTEM Measure battery current leakage Check the regulator rectifier Battery...

Page 158: ...the charger negative cable to the battery negative terminal When disconnecting the battery positive cable do not touch the frame with tool otherwise it will cause short circuit and sparks to fire the...

Page 159: ...erminal and ground cable With the ignition switch off measure the leakage current LEAK CURRENT Not to exceed 0 5A max TOOL DIGITAL TESTER A C GENERATOR INSPECTION AMPERE METER EARTH CABLE BATTERY TERM...

Page 160: ...move the regulator rectifier coupler Measure each terminal Replace the regulator rectifier unit if the resistance value between the terminals is abnormal RESISTANCE VALUE Tester Tester Unit 20 R B Y Y...

Page 161: ...BLUE YELLOW GREEN AC GENERATOR PULSE GENERATOR 12V 10AH BATTERY _ SIDE STAND SWITCH MAIN SWITCH FUSE 15A BLACK WHITE PINK BLACK BLUE YELLOW BLACK YELLOW GREEN GREEN RED RED GREEN TO LIGHT RELAY BATTER...

Page 162: ...moving wiring Connect the same color couplers A faulty ignition system is often related to poorly connected connectors Check those connections before proceeding This manual gives explanations on inspe...

Page 163: ...nnected CDI unit connector 4 Open circuit or poor connection in ground cord of the CDI unit 5 Faulty ignition system control circuit such as side stand switch 6 Faulty peak voltage adaptor 7 Faulty CD...

Page 164: ...0 PVA MEASUREMENT DisconnecttheA Cgeneratorblue yellowwireconnector Connect the peak voltage adaptor probes to the pulse generator wire terminal of the wire harness side connector and ground Crank the...

Page 165: ...If the resistance is open wire disconnect the spark plug cap and measure the secondary coil resistance STANDARD VALUE 17 21 Measure resistance between the primary coil terminal and high tension cord...

Page 166: ...iming is correct if the index mark is set within the advance mark Install in the reverse order of removal SIDE STAND IGNITION CUT OFF SWITCH INSPECTION Remove the floor mat Remove the RH floor side co...

Page 167: ...e the LH floor side cover 3 4 Loosen the side stand switch mounting 2 bolts Release the wire clamps and remove the side stand switch INSTALLATION Install in the reverse order of removal Check the side...

Page 168: ...MEMO...

Page 169: ...BATTERY _ STARTER RELAY M STARTER MOTOR GREEM YELLOW CABLE FUSE 15A BLACK MAIN SWITCH RR STOP SWITCH FR STOP SWITCH GREEN STOP LAMP STARTER SWITCH YELLOW RED GREEN GREEM YELLOW CABLE BATTERY MAIN SWIT...

Page 170: ...en the engine cannot turn over The engine may not be turned over if the stop switch is faulty SPECIFICATION 16 1 Always turn the ignition switch OFF before servicing the starter motor The moter could...

Page 171: ...at starter magnetic switch coupler Faulty starter magnetic switch Disconnect starter magnetic switch coupler and check the starter magnetic switch coil ground wire 17 7 Connect the starter magnetic s...

Page 172: ...sh holder set Check for continuity between and terminals of the brush holder If there is continuity replace with a new one STARTER MOTOR REMOVAL Release the seat lock with the main key Remove the lugg...

Page 173: ...dividual commutator bars and the armature shaft There should be no continuity Check the needle bearing and oil seal Do not rotate smoothly Replace with a new one Damage oil seal Replace with a new one...

Page 174: ...al set and flange nut Align the brush holder set with the rear bracket groove and install the brush holder set Apply grease to both ends of the armature shaft and install the 2 washers REAR BRACKET BR...

Page 175: ...tery cable from the starter magnetic switch terminal Remove the starter motor cable from the starter magnetic switch terminal Disconnect the yellow red connector and green yellow connector from the wi...

Page 176: ...Apply battery voltage between terminals when the yellow red wire is connected to the positive battery terminal and the green yellow wire to the negative battery terminal If there is continuity betwee...

Page 177: ...MEMO...

Page 178: ...these tabs all the way until locked when assembling Carry out continuity test on circuits or parts to diagnose electric systems The continuity test on normal parts can be carried out without removing...

Page 179: ...Remove the headlight Disconnect the connector of handle switch Check for continuity between teminals Remove the Fr cover Remove the coupler wire Test each teminal of handle switch HEADLIGHT SWITCH RED...

Page 180: ...s FUEL UNIT Remove the foor panel Be cover full not to be damaged for the wire Check the base packing for damage Measure the resistance between the fuel unit upper and lower BAT2 HI BLACK BLUE HI COLO...

Page 181: ...e taillight bulb and winker bulb When replacing the bulb be sure not to put finger and contaminated gloves prints on the headlight bulb as they may create hot spots on the bulb and cause is to fail No...

Page 182: ...R PASSING HORN S W LIGHT RELAY CDI HORN Lg 2P MINI 4P RR STOP SW HL HL BAT 2 BAT HI 4 W R L 2 HO BAT B B 9P MINI B SIDE O B Sb Lg Gr COLOR COMB GROUND MARKING R G L Y W P DC CDI UNIT B Y B W B Y B COI...

Page 183: ...SERVICEMANUAL 2004 11 PRINTED 2004 11 PUBLICATION NO COPY...

Page 184: ...01E HEAD OFFICE FACTORY 58 SUNG SAN DONG CHANGWON KYUNGNAM KOREA TEL 82 55 239 7000 FAX 82 55 239 7524 OVERSEAS SALES OFFICE 13 5 SUNG SOO 1DONG 1GA SUNG DONG GU SEOUL KOREA TEL 82 2 498 6465 FAX 82 2...

Reviews: