background image

Instructions for use – Manual Mode 

1. Place the appliance on a solid heat resistant surface. 
2. Insert the mains plug into the socket, the unit will beep to confirm it is 

powered. 

3. Pull the Fryer Drawer (5) out of the unit using the handle (4). 
4. Fill the Fryer Basket (1) with the food to be fried ensuring that the ‘MAX’ 

mark on the basket is not exceeded. 

5. Replace the Fryer Drawer (5) into the Air Fryer. 
6. Press the On/Off control (15) once to operate the Air Fryer. 
7. Set the desired cooking temperature by pressing the Temperature 

Increase (11) and/or Temperature Decrease (11) controls. The set cooking 
temperature will be shown on the Digital Display (16). 

8. Set the desired cooking time by pressing the Time Decrease (13) and/or 

Time Increase (14) controls. The set cooking time will be shown on the 
Digital Display (16).

 NB

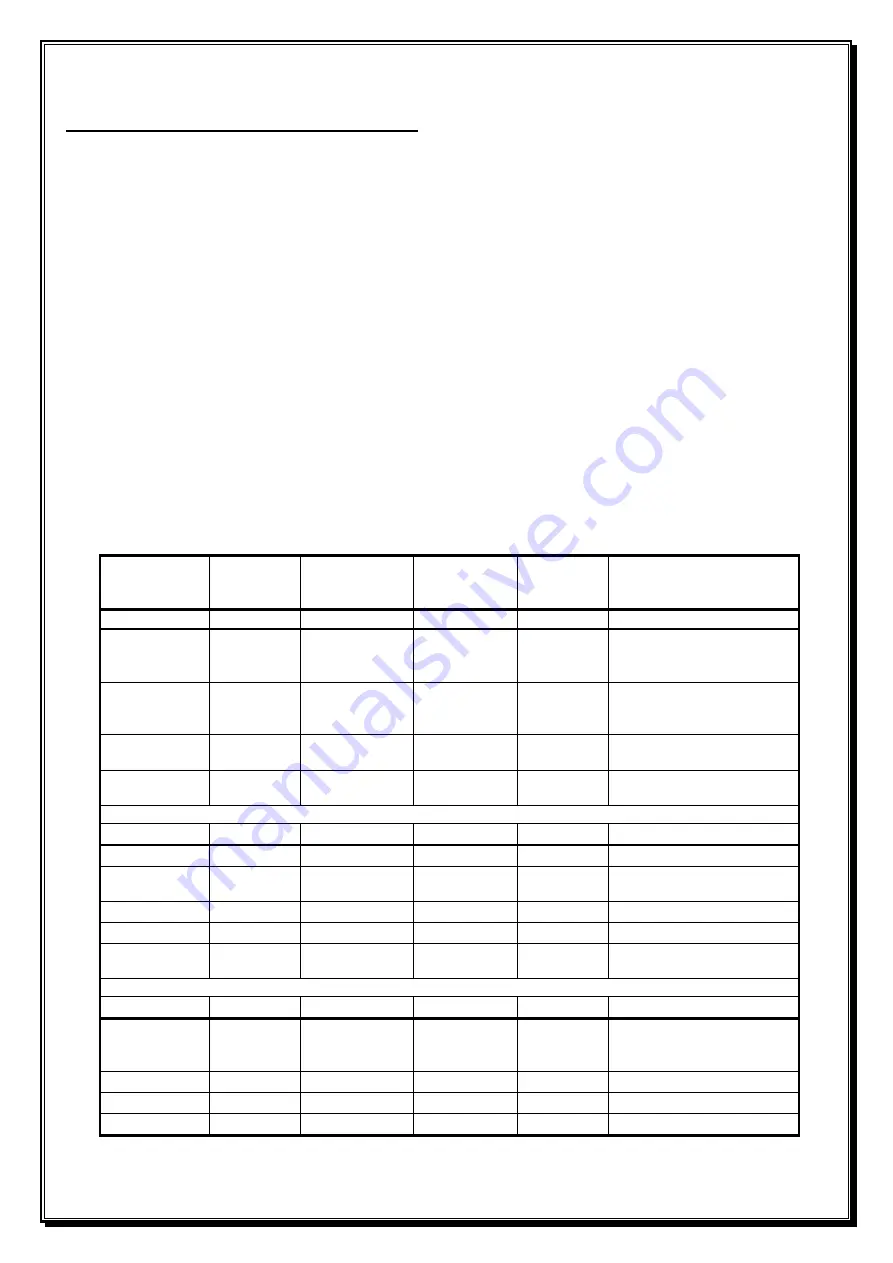
 refer to the Cooking Chart Below: 

Food 

Typical 

Quantity 

Temperature 

Setting 


Cooking 

Time 

Shake Part 

Way 

Through 

Comments 

Chips, etc. 


Standard 
Chips 
(Frozen) 

500g 

200°C 

16min 

Yes 

Add ½ Tablespoon 
Cooking Oil if desired 

Shoestring 
Chips 
(Frozen) 

500g 

200°C 

14min 

Yes 

Add ½ Tablespoon 
Cooking Oil if desired 

Handcut 
Chips 

600g 

180°C 

21min 

Yes 

Add ½ Tablespoon 
Cooking Oil 

Potato 
Wedges 

500g 

180°C 

20min 

Yes 

Add ½ Tablespoon 
Cooking Oil 

 
Meats, etc. 


Drumsticks 

500g 

180°C 

22min 


Sausage 
Rolls 

500g 

200°C 

15min 


Pork Chops 

500g 

180°C 

14min 


Steak 

500g 

180°C 

12min 


Chicken 
Breast 

500g 

180°C 

15min 


Other 


Chicken 
Nuggets 
(Frozen) 

500g 

200ᵒC 

10min 

Yes 


Spring Rolls 

400g 

200°C 

10min 


Fish Fingers 

300g 

200°C 

9min 

Yes 


The above Cooking Chart is for guidance only. Please ensure that the food is thoroughly cooked through. 

Summary of Contents for SDA1132

Page 1: ......

Page 2: ...n a repair centre or contact the supplier if the unit is under warranty If the supply cord is damaged it must be replaced by the manufacturer it s service agent or similarly qualified persons in order...

Page 3: ...E EARTHED Before the first time you use your Digital Air Fryer Please read these operating instructions thoroughly and keep them in a safe place for future reference Remove all packing materials and d...

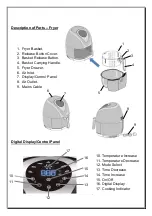
Page 4: ...elease Button 4 Basket Carrying Handle 5 Fryer Drawer 6 Air Inlet 7 Display Control Panel 8 Air Outlet 9 Mains Cable 1 5 2 3 4 6 7 8 9 10 11 12 13 14 15 16 17 10 Temperature Increase 11 Temperature De...

Page 5: ...crease 13 and or Time Increase 14 controls The set cooking time will be shown on the Digital Display 16 NB refer to the Cooking Chart Below Food Typical Quantity Temperature Setting Cooking Time Shake...

Page 6: ...ill beep to confirm it is powered 3 Pull the Fryer Drawer 5 out of the unit using the handle 4 4 Fill the Fryer Basket 1 with the food to be fried ensuring that the MAX mark on the basket is not excee...

Page 7: ...once the oil has been added For crispier chips do not fill the basket to maximum Cleaning and Maintenance Always unplug the Air Fryer from the mains supply and allow to fully cool before cleaning Do...

Page 8: ...on a moulded plug the cover must be refitted to the plug the appliance must not be used without a fuse cover Technical Specification Voltage 220 240V 50 Hz Rated Power 1400W Protection Class I This a...

Page 9: ...wder 1 teaspoon Red chili powder 1 2 teaspoon Peel potatoes and cut into strips Soak potato strips in salt water for at least 20mins and then dry with kitchen paper Mix shallot salt and pepper garlic...

Page 10: ...to preheat the air fryer Pat the chicken for 5 minutes with a knife blade Stir eggs flour olive oil white pepper and a little salt together and then coat the chicken nuggets Allow the nuggets to stan...

Reviews: