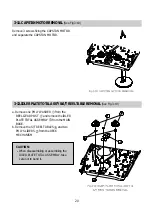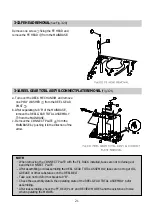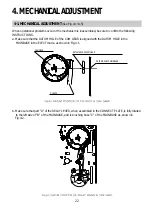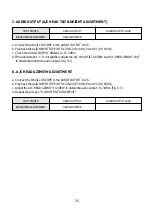
25
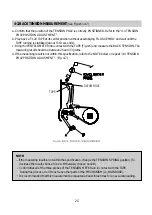
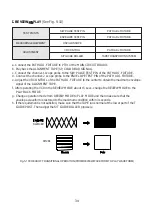
4-2. BACK TENSION MEASUREMENT
(See Fig.4-6~4-7)
a. Confirm that the position of the TENSION POLE is correctly POSITIONED. Refer to the "4-4 TENSION
POLE POSITION ADJUSTMENT ".
b. Play back a T-120 TAPE at its center position without assemblying F/L ASSEMBLY and wait until the
TAPE running is stabilized (about 5~10 seconds).
c. Bring the TENTELOMETER into contact with the TAPE (Fig.4-6) and measure the BACK TENSION. The
measuring result should be between 25 and 33 grams.
d. If the measuring result is not within this specification, refer to the NOTE below or repeat "4-4 TENSION
POLE POSITION ADJUSMENT". (Fig. 4-7)
DATUM HOLE
TAPE
NOTE:
If the measuring result is not within the specification, change the TENSION SPRING position. (To
decrease the result, choose hook A. Otherwise, choose hook B).
Confirm that all of the three probes of the TENSION METER are in contact with the TAPE.
During this process, don't touch any other parts of the MECHANISM (i.e, MAINBASE).
It is recommended that this measurement be repeated at least three times for an accurate reading.
Summary of Contents for GB14H3
Page 5: ...4 CIRCUIT BLOCK DIAGRAM ...
Page 12: ... 11 SCHEMATIC DIAGRAM ...
Page 13: ... 12 SCHEMATIC DIAGRAM ...
Page 14: ...13 EXPLODED VIEW 1 14H3 ...
Page 15: ...14 EXPLODED VIEW 2 14H4 ...
Page 16: ...15 EXPLODED VIEW 3 20H3 ...
Page 17: ...16 EXPLODED VIEW 4 20H4 ...
Page 18: ...17 EXPLODED VIEW 5 21H4 ...
Page 19: ......
Page 20: ......
Page 58: ...3 1 2 1 WIRE DIAGRAM 1 2WIREDIAGRAM ...
Page 62: ...7 2 1 2 PARTS LOCATION OF FRONT LOADING ASS Y A TOP VIEW B FRONT VIEW ...
Page 92: ...37 6 EXPLODEDVIEWANDPARTSLIST 6 1 EXPLODEDVIEWOFDECKASS Y TOPVIEW ...
Page 93: ...38 6 2 EXPLODEDVIEWOFDECKASS Y BOTTOMVIEW ...
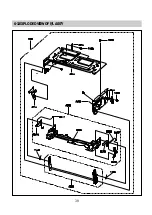
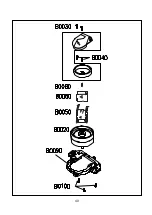
Page 94: ...39 6 3 EXPLODEDVIEWOFF LASS Y ...
Page 95: ...40 ...

