Power Train
Testing And Adjusting
Pinion Depth Check
Tools Needed:
Pinion Depth Gauge (A).
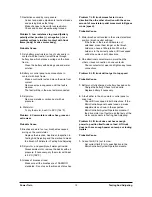
Pinion Depth check
(1) Bearing cap (A) Pinion Depth Gauge
1.
Put the bar and discs of tool (A) in the bearing
bores of the housing assembly as shown. Install
bearing caps (1) and tighten the bolts.
2.
Measure the distance from the end of the pinion
shaft to the bottom of the bar with an inside
micrometer. Record this measurement.
3.
Measure the outside diameter of the bar with an
outside micrometer. Divide this measurement by 2
and add it to the recorded measurement from Step
2. Record this total measurement. This is the
actual mounting distance.
4.
Calculate the required shim thickness to add or
remove as follows: the nominal mounting
ddeviation from nominal (as marked on the
end of the pinion, or - number, in
millimeters) = required mounting distance. The
actual mounting distance (from Step 3) - the
required mounting distance = required shim
thickness to add or remove (added if difference is +,
removed if difference is -).
Example:
78.00 mm (3.071 in.) - nominal mounting distance
- 0.08 mm (0.003 in.) - deviation from nominal
(marked on end of pinion)
77.92 mm (3.068 in.) - required mounting distance
78.10 mm (3.075 in.) - actual mounting distance
from Step 3
-77.92 mm (3.068 in.) - required mounting distance
0.18 mm (0.007 in.) - thickness of shims to be
added or removed
Pinion Bearing Adjustment
Tools Needed:
Pinion Bearing Preload Gauge (A)
Dial Indicator Group (B).
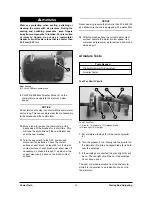
Pinion Bearing Preload Adjustment
(1) Shim pack (2) Bearing cone (3) Locknut (4) Pinion gear
1.
Install tool (A) [or 4.0 mm (.16 in.) of shims] in
place of shim pack (1). Install bearing cone (2), the
washer, lockwasher, and nut (3). Tighten nut (3) to
a torque of 15 to 34 N¥m (11 to 25 lb¥ft.). (NOTE:
See Preload Shim Chart for shim numbers.)
2.
Use tooling (B) to measure the end play of pinion
shaft (4). Record this measurement. Remove nut
(3), the lockwasher, washer, and bearing cone (2).
3.
Remove tool (A) (or shims). Measure the thickness
of tool (A) with an outside micrometer (if shims
were used, measure each shim individually and
add the measurements together). subtract from
this thickness the recorded end play from Step 2.
This is the thickness of shims (1) that are needed
with no bearing preload.
24
Preload Shim Chart
Part No.
Thickness
Part No.
Thickness
924760
0.04 mm (.002 in.)
924761
0.08 mm (.003 in.)
924762
0.12 mm (.005 in.)
924763
0.25 mm (.010 in.)
924764
0.8 mm (.03 in.)
924765
1.6 mm (.06 in.)


