background image


12 


Cyclone Freedom 22.2V Cordless Vacuum 

Cleaner 

FLR00010 

User Manual 

IMPORTANT 

 RETAIN THESE INSTRUCTIONS FOR FUTURE REFERENCE 

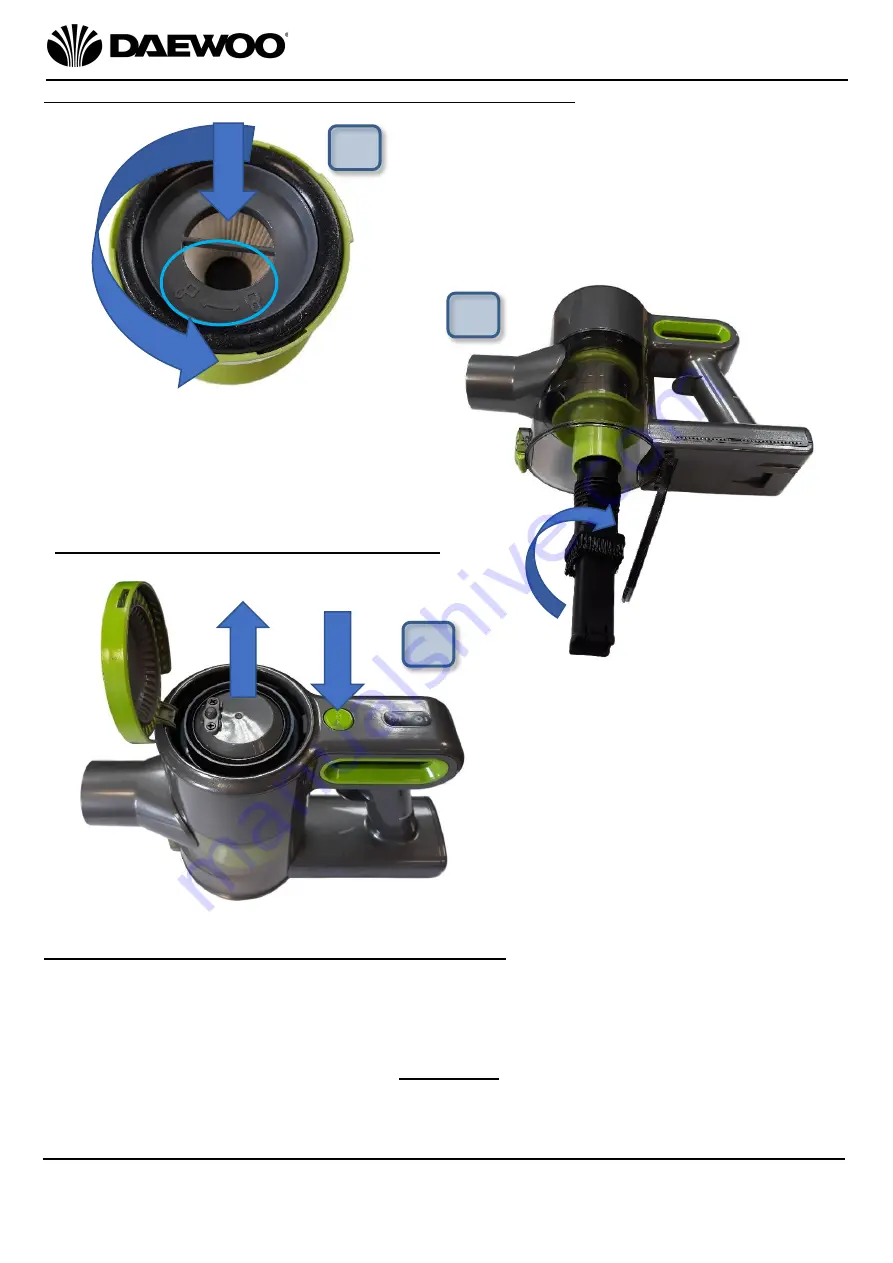
6.


Replace the 

Conical Hepa Filter 

(2) 

inside the Cyclonic Filter, rotate the 
filter anticlockwise towards the 

‘LOCK’ position as shown circled left. 


7.


Replace 

Conical Hepa & Cyclonic Filters


(2) into the vacuum rotating clockwise 
as shown right.   


8. Press the 

Air Outlet Filter Door 

Release Button 

(10) to open the 

Air 

Outlet Filter Door

 (11). Remove the 

air outlet filter and wash in warm 
running water until clean. Allow the 

filter to dry thoroughly for 24 hours 

before reuse. 

Replace the filter and push the 

Air 

Outlet Filter Door 

(11) closed. 


Replacing the Filters in Your Cordless Vacuum Cleaner


Cleaning and Replacing the Outlet Filter


Care and Use of your Cordless Vacuum Cleaner


Always disconnect the cleaner from the mains charger before cleaning.


Clean outside of the cleaner with a clean damp cloth. Never clean with harsh or 
abrasive cleaners.


Do not submerge the cleaner or its charger in water or any other liquids.


Empty the 

Dust Compartment

 (4) as soon as it has reached maximum capacity 

(see above).*


Wash the 

Conical Hepa

Cyclonic Filters

 (2) and the Air Outlet Filter (11) 

regularly 

 see table below.  

Summary of Contents for Cyclone Freedom

Page 1: ...1 Cyclone Freedom 22 2V Cordless Vacuum Cleaner FLR00010 User Manual IMPORTANT RETAIN THESE INSTRUCTIONS FOR FUTURE REFERENCE...

Page 2: ...into the mains visually check that the unit is intact and has not suffered any transit damage Check that the voltage indicated on the data plate corresponds with that of the local network before conne...

Page 3: ...ppliance for anything other than its intended use DO NOT push objects into any openings as damage to the appliance and or electric shock may occur Unplug after each use Grasp the plug not the cord DO...

Page 4: ...be disposed of in an environmentally friendly manner You should now recycle your waste electrical goods and in doing so help the environment This symbol means waste electrical products at the end of...

Page 5: ...please ensure that the internal rechargeable battery is fully charged as follows 10 1 Air Dust Inlet 2 Conical Hepa Cyclonic Filters 3 Dust Release Catch 4 Dust Compartment 5 Charging Battery Indicato...

Page 6: ...Charging Battery Indicators 5 will all light as in c below showing that the internal battery is fully charged and the Mains Charger 16 can be removed The Charging Battery Indicators will go out one a...

Page 7: ...inyl laminate tiled floors etc 1 2 To change the brush type slide the brush retaining catch a right on the underside of the Motorised Floor Tool 13 as shown left The Hard Floor Brush 19 is currently f...

Page 8: ...ace as shown arrowed left The vacuum is now ready to clean carpeted floors 6 2 During use press the On Off Power Button 8 to select between minimum or maximum suction power as follows a The First pres...

Page 9: ...e Motorised Floor Tool 13 and pull the cleaner back by the Handle 7 and start vacuum cleaning 3 4 If the Aluminium Tube 17 is not required the Motorised Floor Tool 13 can be attached directly as shown...

Page 10: ...the Dust compartment 4 fills to the level shown arrowed left it will need emptying and the filters cleaned 2 If the Aluminium Tube 17 is not required attach the Crevice Tool Upholstery Tool 14 direct...

Page 11: ...Crevice Tool 20 into the base of the filter assembly as shown left and rotate anticlockwise to remove the Conical Hepa Cyclonic Filters 2 4 Twist the Conical Hepa filter clockwise in the and the dire...

Page 12: ...water until clean Allow the filter to dry thoroughly for 24 hours before reuse Replace the filter and push the Air Outlet Filter Door 11 closed Replacing the Filters in Your Cordless Vacuum Cleaner Cl...

Page 13: ...pplied Wall Plugs and Screws or alternative appropriate fixings for the wall as follows WARNING Be careful whilst drilling the holes care must be taken not to damage concealed cables and pipes in the...

Page 14: ...e Wall Bracket using a pencil as shown 4 Remove the Wall Bracket and using the marks drill holes in the wall using a suitable 6mm masonry drill bit not supplied 5 After drilling the holes push the two...

Page 15: ...ched on Low suction or poor pick up Dust Compartment is full Filters are clogged Low Power Selected Empty the cylinder Check and clean the filters Press the Min Max Power Button 8 The vacuum is making...

Page 16: ...r domestic purposes It does not cover general wear and tear damage misuse or any consumable parts The guarantee will berendered invalid if the product is re sold or has been damaged through inexpert r...

Reviews: