background image

www.daewoopowerproducts.com

Manufactured under license of 

Daewoo International Corporation

, Korea/

Fabricado bajo licencia de 

Daewoo International Corporation

, Korea

Summary of Contents for DACS1640Li

Page 1: ...red under license of Daewoo International Corporation Korea Fabricado bajo licencia de Daewoo International Corporation Korea www daewoopowerproducts com USER S MANUAL MANUAL DE USO DACS1640Li Lithium...

Page 2: ...LEANING 17 9 TROUBLESHOOTING 19 10 ENVIRONMENTALLY FRIENDLY DISPOSAL 21 WARRANTY 22 NDICE 1 S MBOLOS 23 2 REGLAS GENERALES DE SEGURIDAD 23 3 DESCRIPCI N DE PARTES 27 4 DATOS T CNICOS 28 5 MONTAJE 28 6...

Page 3: ...Keep bystanders away Keep all bystanders away Noise level marking Your tool noise is not more than 103dB 2 GENERAL SAFETY RULES General Power Tool Safety Warnings WARNING Read all safety warnings and...

Page 4: ...k picking up or carrying the tool Carrying power tools with your finger on the switch or energising power tools that have the switch on invites accidents d Remove any adjusting key or wrench before tu...

Page 5: ...the saw chain is not contacting anything A moment of inattention while operating chain saws may cause entanglement of your clothing or body with the saw chain b Always hold the Chain saw with your ri...

Page 6: ...t kickback forces Kickback forces can be controlled by the operator if proper precautions are taken Do not let go of the chain saw b Do not overreach and do not cut above shoulder height This helps pr...

Page 7: ...battery pack Use battery tools only with specifically designated battery packs Use of any other battery packs may create a risk of injury and fire 1 Rear handle 2 Battery pack 3 Front handle 4 Hand gu...

Page 8: ...ng temperature range 0 50 C 5 ASSEMBLY 5 1 Assemble the guide bar and saw chain a Wear gloves before assembly Loosening bar adjustment locking knob 8 counterclockwise one or two full turn b The chain...

Page 9: ...over 9 to the slot 17 and make sure the side cover is securely seated in a fixed way as shown in Fig 4A Fig 4B h Making sure the chain properly seated in guide bar rail and guide bar is fixed then loc...

Page 10: ...hain Fig 6a Fig 6b Fig 6c WARNING For you safety and storage please gather up cutting guard after each operation 5 3 Assemble the battery 1 Insert the battery pack into battery holder Fig 7A 2 Make su...

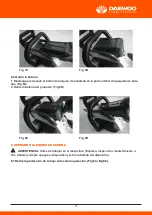
Page 11: ...bottom of the battery pack Fig 8A 2 Remove battery pack from the product Fig 8B 6 OPERATING THE CHAIN SAW WARNING Before working on the device cleaning inspection maintenance or other work always turn...

Page 12: ...fig 9b 6 2 Starting the device Press start button 15 when ON turn on green light and press safety button 10 on the rear handle and also press switch trigger 11 Fig 10A Fig 10B 6 3 LED Please refer to...

Page 13: ...ee times for this circle Alternately alarm Discharge battery and operate after fully charged Battery pack cold hot N A Twinkle two times pending 3 seconds and re twinkle two times for this circle Alte...

Page 14: ...not overreach With the saw at full speed bring the bottom of the guide bar into contact with the branch to be cut Continue cutting using light pressure For larger branches first make a shallow underc...

Page 15: ...to the direction of fall Make the lower horizontal notching cut first This will help to avoid pinching of either the saw chain or the guide bar when the second notch is being made 7 3 2 Felling back...

Page 16: ...Be alert for overhead limbs falling and watch footing 7 3 3 Limbing a tree Fig 15 Limbing is removing the branches from a fallen tree When limbing leave larger lower limbs to support the log off the g...

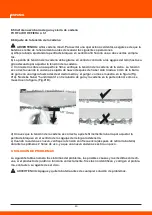
Page 17: ...the finished cut by overbucking to meet the first cut Fig 17 When the log is supported on both ends cut 1 3 of that diameter from the top overbuck Then make the finished cut by underbucking the lower...

Page 18: ...andles Front and rear handles should not have cracks or other damage They should be clean and dry b Hand Guard The hand guard should be free of damage and able to move easily back and forth c Guide Ba...

Page 19: ...e bar mounting stud is not bent stripped or cross threaded and that the bar pad and alignment flange are free of debris and intact c Charger The charger should be clean dry and free of punctures or ot...

Page 20: ...de bar with light force from the middle finger and thumb as shown in figure Fig 21A There should be no sag between the guide bar and the chain on the underside as shown in figure Fig 21B d Once chain...

Page 21: ...minimum operating temperature of 10 F 12 C Motor runs but chain does not rotate Chain not engaging drive sprocket Reinstall the chain making sure the drive links on the chain are fully seated on the s...

Page 22: ...hout electric or electronic components Accumulator disposal Old Accumulators and batteries must not be added to household waste but should be disposed of in accordance with the applicable legislation...

Page 23: ...r more nodes teaser on the surfaces of the cylinder and the piston or destruction of piston rings Also the warranty does not cover failure of the automatic voltage regulator due to incorrect operation...

Page 24: ...ruido de su herramienta no es m s de 103dB 2 REGLAS GENERALES DE SEGURIDAD Advertencias de seguridad de la herramienta el ctrica general ADVERTENCIA Lea todas las advertencias de seguridad y todas la...

Page 25: ...sonales graves b Use equipo de protecci n personal Siempre use protecci n ocular Los equipos de protecci n como m scaras anti polvo calzado de seguridad antideslizante casco o protecci n auditiva util...

Page 26: ...riesgo de incendio cuando se usa con otro paquete de bater as b Use herramientas el ctricas solo con paquetes de bater as espec ficamente dise ados El uso de cualquier otro paquete de bater as puede...

Page 27: ...para cortar pl sticos mamposter a o materiales de construcci n no madereros El uso de la sierra de cadena para operaciones diferentes a las previstas podr a dar como resultado una situaci n peligrosa...

Page 28: ...Nunca abra el cargador de bater a usted mismo Haga reparaciones realizadas solo por un t cnico calificado y solo utilizando piezas de repuesto originales Los carga dores de bater a cables y enchufes...

Page 29: ...0 50 C 5 MONTAJE 5 1 Armar la barra de gu a y cortar la cadena a Use guantes antes del montaje Perilla de bloqueo del ajuste de la barra de aflojamiento 8 en sentido anti horario una o dos vueltas com...

Page 30: ...rta lateral 9 en la ranura 17 y aseg rese de que la cubierta lateral est firme mente asentada de forma fija como se muestra en la Fig 4A Fig 4B h Asegur ndose de que la cadena correctamente asentada e...

Page 31: ...6b Fig 6c ADVERTENCIA Para su seguridad y almacenamiento recoja el protector de corte despu s de cada operaci n 5 3 Armar la bater a 1 Inserte la bater a en el soporte de la bater a Fig 7A 2 Aseg res...

Page 32: ...2 Retire la bater a del producto Fig 8B 6 OPERANDO LA SIERRA DE CADENA ADVERTENCIA Antes de trabajar en el dispositivo limpieza inspecci n mantenimiento u otro trabajo siempre apague el dispositivo y...

Page 33: ...uando ENCENDIDO encienda la luz verde y presione el bot n de seguridad 10 en el mango trasero y tambi n presione el interruptor disparador 11 Fig 10A Fig 10B 6 3 LED Consulte la siguiente tabla para c...

Page 34: ...ulo Alternativamente alarma Descargue la bater a y opere despu s de que est completamente cargada Paquete de bater a fr o caliente N A Brilla dos veces espera 3 segundos y vuelve a centellear dos vece...

Page 35: ...Con la sierra a toda velocidad ponga la parte inferior de la barra de gu a en contacto con la rama que se va a cortar Contin e cortando usando una ligera presi n Para ramas m s grandes primero haga un...

Page 36: ...endicular a la direcci n de ca da Realice primero el corte de muesca horizontal inferior Esto ayudar a evitar pellizcar la cadena de la sierra o la barra de gu a cuando se haga la segunda muesca 7 3 2...

Page 37: ...an y observe el equilibrio 7 3 3 Cortar un rbol Fig 15 Esto es quitar las ramas de un rbol ca do Al podar deje las extremidades inferiores m s grandes para soportar el tronco del suelo Retire las extr...

Page 38: ...umplir con el primer corte Fig 17 Cuando el tronco es compatible con ambos extremos corte 1 3 de ese di metro desde el borde superior A continuaci n realice el corte terminado por debajo del tronzado...

Page 39: ...zar accidentalmente 8 1 Antes de cada uso a Mangos Los mangos delanteros y traseros no deben tener grietas u otros da os Deben estar limpios y secos b Protecci n para las manos la protecci n para las...

Page 40: ...Pi n de transmisi n busque surcos profundos dientes rotos o nudos b rea de montaje de la barra Aseg rese de que el perno de montaje de la barra no est doblado desforrado o con rosca cruzada y que la...

Page 41: ...do tirada a 3 mm de la barra de gu a con una ligera fuerza desde el dedo medio y el pulgar como se muestra en la figura Fig 21A No debe haber hundimiento entre la barra de gu a y la cadena en la parte...

Page 42: ...teral y limpie los desechos Paquete de bater a fr o Deje que la bater a se caliente por encima de la temperatura m nima de funcionamiento de 10 F 12 C El motor funciona pero la cadena no gira Cadena s...

Page 43: ...n componentes el ctricos o electr nicos Eliminaci n del acumulador Los viejos acumuladores y bater as no deben agregarse a los desechos dom sticos sino que deben eliminarse de acuerdo con la legislaci...

Page 44: ...www daewoopowerproducts com Manufactured under license of Daewoo International Corporation Korea Fabricado bajo licencia de Daewoo International Corporation Korea...

Reviews: