5
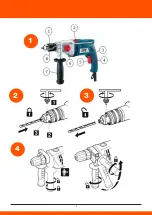
1. DESCRIPTION(FIG.1)
1 Chuck
2 Function Knob
3 L/R Knob
4 Lock-On Button
5 On-off Switch
6 Gear Knob
7 Auxiliary Handle
8 Depth Stop
2. ITEMS SUPPLIED
- Impact Drill
- Chuck
- Chuck Key
- Depth stop
- Auxiliary handle
3. TECHNICAL DATA
Power: 1050 W
No load speed: 0-1200 / 0-3200 rpm
Chuck capacity: 13 mm
Max in steel: 13/8 mm
Max in concrete: 20/13 mm
Max in wood: 40/25 mm Vibration level: 10.6 m/s²
Sound intensity level: 93 dB(A)
Acoustic capacity level: 104 dB(A)
Protection class: II
Noise and vibration values measured according to EN60745
4. SAFETY REGULATIONS
Important! to protect yourself from the risk of electric shock, injury and fire when using an electric
tool. It is imperative to take the following basic safety precautions.
Read and note these instructions before you use the
-
Check the voltage (volt) marked on the rating plate.
-
When using cable drums, run all the cable off the drum. Minimum conductor cross section: 1.0
mm2
-
When using the electric hammer drill outdoors, connecting to the power supply with a type
H07RN-F 3G 1.5mm2 extension cable and rain-water-protected plugs in proper working
order.
-
Make sure of your footing on ladders and scaffolding when drilling free-handed.
-
Use a ling detector to localize lines in walls with concealed electric, water or gasoline. Avoid
touching live components or conductors.
-
Wear ear muffs to protect your hearing. Loss of hearing can be a gradual process!
-
Wear goggles and use a dust mask on jobs generating dust
-
Do not use in areas where there are vapours or flammable liquids
-
Always pull the plug out of the socked before cleaning or making changes to the machine
-
Protect the power cable from damage. Oil and acid can damage the cable
-
Never overload the machine
-
Secure all workpiece sufficiently
-
Important! It is imperative to follow all national safety regulations concerning installation,
operation and maintenance.
-
Chisel bits and drill bits may be flung out of the machine accidentally and cause serious injury.
-
Before starting to work, always check that the chisel or drill bit is properly locked in the chuck.
-
Examine the chuck regularly for sign of wear or damage.
-
Never start up a hammer tool until it pressed against a workpiece(wall, ceiling, etc.)
-
When you are finished, unplug the hammer drill from the electric supply and remove the chisel or
drill bits from the machine.
-
Always disconnect the hammer drill from the electric supply before you change a chisel or drill
bits.
-
Protect your eyes and other workers from flying particles and splinters. Wear a helmet! Set up
partition walls!
-
Wear work gloves to protect fingers from bruising and grazing.
-
Vibrations can injure the hand-arm system. Keep exposure to vibration as short as possible.
-
Always lead the mains cable away backwards from
the device.
-
Store the device where it is inaccessible to children.
-
When carrying out work, always hold the device with both hands and ensure that you have a stable
standing position.
You will find further safety instructions for electric tools in the enclosed booklet.
5. BEFORE STARTING WORK
-
Examine the place where the device is to be used for hidden electrical cables, gas and water pipes
using a pipe finding device.
-
Before connecting to the mains, ensure care that the mains voltage corresponds to the details on
the rating plate.
5.1 Install the drill bit (Fig.2)
The device is equipped with a keyed chuck system.
-
Unplug the tool
- I
nsert the chuck key and twist counterclockwise.
-
Open or close the chuck jaws to a point where the opening is slightly larger than the bit size you
intend to use. Also, raise the front of the drill slightly to keep the bit from falling out of the chuck
jaws.
-
Insert the drill bit.
-
Tighten the chuck jaws securely on the drill bit, using the chuck key provided.
-
Remove the chuck key.
5.2 Remove the drill bit (Fig-3)
-
Unplug the tool
-
Loosen the chuck jaws using the chuck key provided
-
Remove the drill bit.
-
Remove the chuck key.
6. STARTING WORK (FIG.1)
6.1 Switching ON/OFF
-
Switching on: Press the operating switch (5).
-
Continuous duty: Lock the switch (5) with the locking button (4).
-
Switching off: Press the operating switch (5) briefly and let go.
6.2 Handle attachment (Fig-4)
For reasons of safety, only use the hammer drill with auxiliary handle(7).
You will be able to obtain a safe body position when working by rotating the handle attachment.
Loosen and turn the handle attachment in an clockwise direction Then tighten the handle attach-
ment.
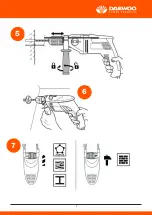
6.3 Depth stop (Fig. 5)
Loosen the handle attachment and place the straight part of the depth stop in the hole. Adjust the
depth stop and re-tighten the auxiliary handle.
6.4 Dust collection device (Fig.6)
Before carrying out hammer-drilling work vertically overhead pull dust collecting device over the drill
bit.
6.5 Drill/Impact Drill function (Fig. 7)
Your Impact drill is equipped with a hammer drilling system. simply by pushing L/R Knob(2)
fitted on top of the drill. It is possible to turn the percussion system on and off, even while the
machine is running and without the risk of causing damage to the mechanism.
HAMMER/DRILL FUNCTION
-
To use the tool as a hammer, move the function knob(2) to the right
-
To use the tool as a drill, move the function knob(2) to the left
Important!
When hammer drilling you will require a low pressure.
Too much pressure will place unnecessary load on the motor.
Check the drill bits regularly. Re-sharpen or replace blunt drill bits.
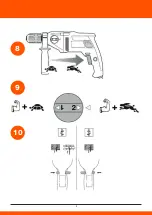
6.6 Speed Control (Fig. 8)
The rotational speed of the drill can be controlled by varying the amount that the trigger switch(5) is
depressed. Speed is low when the trigger switch is depressed slightly and increases as the trigger
switch is depressed more.
6.7 Two Gear System(Fig. 9)
Your impact drill is equipped with two-gear system.
Set Gear Knob(6) to desired speed
! Actuate the gear selector while tool is running slowly
1=LOW SPEED
- high torque
- for drilling large diameters
- for tapping thread
2=HIGH SPEED
- lower torque
- for drilling small diameters
6.8 Direction of Rotation(Fig. 10)
Your impact drill can run in both clockwise and counterclockwise. To set the desired direction by
pushing the L/R Knob(3) .
- When L/R Knob is not properly set in position, the On-off Switch can not be activated.
! Change direction of rotation only when the tool is at a complete standstill.
7. MAINTENANCE
-
Remove the mains plug from the socket before carrying out any work on the device.
-
Keep your machine clean at all times.
-
Never use caustic agents to clean the plastic parts.
-
At the end of your work, to prevent dust deposits you should use compressed air (max. 3 bar) to
clean out the ventilation slots.
-
Check the carbon brushes regularly (dirty or worn carbon brushes result in excessive sparking and
speed faults).
8. ORDERING REPLACEMENT PARTS
Please quote the following data when ordering replacement parts:
-
Type of machine
-
Article number of the machine
-
Identification number of the machine
-
Replacement part number of the part required

