ENGLISH
8
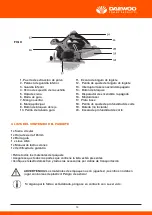
3. PACKAGE CONTENT LIST
1 x Circular Saw
1 x 165mm Saw Blade
1 x Guide Bar
1 x Allen Key
1 x lnstruction Manual
1 x Warranty Certificate
• Remove ali packing materials
• Ensure ali parts on the contents listare present
• Check the appliance, and ali accessories for transportation damages
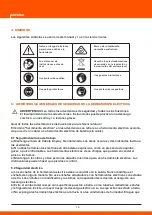
4. SYMBOLS
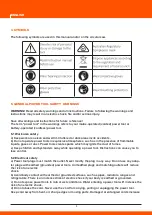
The following symbols are used in this manual and/or on the circular saw.
5. GENERAL POWER TOOL SAFETY WARNINGS
WARNING!
Read all safety warnings and all instructions. Failure to following the warnings and
instructions may result in an electric shock, fire andlor serious injury.
Save all warnings and instructions for future reference!
The term "power tool" in the warnings refers to your mains-operated (corded) power tool ar
battery-operated (cordless) power tool.
5.1 Work area safety
a) Keep work area clean and well lit. Cluttered ar dark areas invite accidents.
b) Do not operate power tools in explosive atmospheres, such as in the presence of flammable
liquids, gases or dust. Power tools create sparks which may ignite the dust of fumes.
e) Keep children and bystanders away while operating a power tool. Distractions can cause you to
lose control.
5.2 Electrical safety
a) Power tool plugs must match the outlet. Never modify the plug in any way. Do not use any adap-
ter plugs with earthed (grounded) power tools. Unmodified plugs and matching outlets wil1 reduce
the risk of an electric
shock.
b) Avoid body contact with earthed or grounded surfaces, such as pipes, radiators, ranges and
refrigerators. There is an increased risk of electric shock if your body is earthed ar grounded.
c) Do not expose power tools to rain or wet conditions. Water entering a power tool wil1 increase the
risk of an electric shock.
d) Do not abuse the cord. Never use the cord for carrying, pulling or unplugging the power tool.
Keep cord away from heat, oil, sharp edges or moving parts. Damaged ar entangled cords increase
the risk of electric shock.
e) When operating a power tool outdoors, use an extension cord suitable for outdoor use. Use of a
cord suitable far outdoor use reduces the risk of electric shock.
lf operating a power tool in a damp location is unavoidable, use a residual current device (RCD)
protected supply. Use of an RCD reduces the risk of electric shock.
5.3 Personal safety
a) Stay alert, watch what you are doing and use common sense when operating a power tool. Do
not use a power tool while you are tired or under influence of drugs, alcohol or medication. A
moment of inattention while operating power tools may result in serious personal injury.
b) Use personal protective equipment. Always wear eye protection. Protective equipment such as
dust mask, non-skid safety shoes, hard hat, ar hearing protection used far appropriate conditions
wil1 reduce personal injuries.
c) Prevent unintentional starting. Ensure the switch is in the off-position before connecting to power
source andlor battery pack, picking up or carrying the tool. Carrying power tools with your finger on
the switch ar energising power tools that hove the switch on invites accidents.
d) Remove any adjusting key or wrench before turning the power tool on. A wrench ar a key left
attached to a rotating part of the power tool may result in personal injury.
e) Do not overreach. Keep proper footing and balance at all times. This enables better control of the
power tool in unexpected situations.
f) Dress properly. Do not wear loose clothing or jewellery. Keep your hair, clothing and gloves away
from moving parts. Loose clothes, jewellery ar long hair can be caught in moving parts.
g) lf devices are provided for the connection of dust extraction and collection facilities, ensure these
are connected and properly used. Use of dust collection can reduce dust-related hazards.
5.4 Power tool use and care
a) Do not force the power tool. Use the correct power tool for your application. The correct power
tool will do the job better and safer at the rate for which it was designed.
b) Do not use the power tool if the switch does not turn it on and off. Any power tool that cannot be
controlled with the switch is dangerous and must be repaired.
c) Disconnect the plug from the power source and or the battery pack from the power tool before
making any adjustments, changing accessories, or storing power tools. Such preventive safety
measures reduce the risk of starting the power tool accidentally.
d) Store the power tools out of reach of children and do not allow persons unfamiliar with the power
tool or these instructions to operate the power. Power tools are dangerous in the hands of untrained
users.
e) Maintain power tools. Check for misalignment or binding of moving parts, breakage of parts and
any other condition that may affect the power tools operation. lf damaged, have the power tool
repaired before use. Many accidents are caused by poorly maintained power tools.
f) Keep cutting tools sharp and clean. Properly maintained cutting tools with sharp cutting edges
are less likely to bind and are easier to control.
g) Use the power tool, accessories and tool bits etc. in accordance with these instructions, taking
into account the working conditions and the works to be performed. Use the power tool for opera-
tions different from those intended could result in hazardous situations.
5.5 Battery tool use and care
a) Recharge only with the charger specified by the manufacturer. A charger that is suitable far one
type of battery pack may create a risk of fire when used with another battery pack.
b) Use power tools only with specifically designated battery packs. Use of any other battery packs
may create a risk of injury and fire.
c) When battery pack is not in use, keep it away from other metal objects, like paper clips, coins,
keys, nails, screws or other small metal objects, that can make a connection from one terminal to
another. Shorting the battery terminals together may cause burns ar a Jire.
d) Under abusive conditions, liquid may be ejected from the battery; avoid contact. lf contact acci-
dentally occurs, flush with water. lf liquid contacts eyes, additionally seek medical help. Liquid
ejected from the battery may cause irritation ar burns.
5.6 Service
a) Have your power tool serviced by a qualified repair person using only identical replacement parts.
This wil1 ensure that the safety of the power tool is maintained.
5.7 Safety instructions for ali saws
a) DANGER: Keep hands away from cutting area and the blade. Keep your second hand on auxiliary
handle, or motor housing. lf both hands are holding the saw, they cannot be cut by the blade.
b) Do not reach underneath the workpiece. The guard cannot protect you from the blade below the
workpiece.
Adjust the cutting depth to the thickness of the workpiece. Less than a full tooth of the blade teeth
should be visible below the workpiece.
d) Never hold piece being cut in your hands or across your leg. Secure the workpiece to a stable
platform. lt is important to support the work properly to minimize body exposure, blade binding, ar
loss of control.
e) Hold power tool by insulated gripping surfaces when performing an operation where the cutting
tool may contact hidden wiring or its own cord. Contact with a "live" wire wil1 also make exposed
metal parts of the power tool "live" and shock the operator.
f) When ripping always use a rip fence or straight edge guide. This improves the accuracy of cut
and reduces the chance of blade binding.
g) Always use blades with correct size and shape (diamond versus round) of arbour holes. Blades
that do not match the mounting hardware of the saw wil1 run eccentrically, causing loss of control.
h) Never use damaged or incorrect blade washers or bolt. The blade washers and bolt were specia-
lly designed far your saw, far optimum performance and safety of operation.
5.8 Causes and operator prevention ol kickback
- Kickback is a sudden reaction to a pinched, bound or misaligned saw blade, causing an uncontro-
lled saw to lift up and out of the workpiece toward the operator;
- When the blade is pinched or bound tightly by the kerf closing down, the blade stalls and the
motor reaction drives the unit rapidly back toward the operator;
- If the blade becomes twisted or misaligned in the cut, the teeth at the back edge of the blade can
dig into the top surface of the wood causing the blade to climb out of the kerf and jump back toward
the operator.
Kickback is the result of saw misuse and or incorrect operating procedures or conditions and can
be avoided by taking proper precautions as given below.
a) Maintain a firm grip with both hands on the saw and position your arms to resist kickback forces.
Position your body to either side of the blade, but not in line with the blade. Kickback could cause
the saw to jump backwards, but kickback forces can be controlled by the operator, if proper
precautions are token.
b} When blade is binding, or when interrupting a cut for any reason, release the trigger and hold
the saw motionless in the material until the blade comes to a complete stop. Never attempt to
remove the saw from the work or pull the saw backward while the blade is in motion or kickback
may occur. lnvestigate and take corrective actions to eliminate the cause of blade binding.
c) When restarting a saw in the workpiece, centre the saw blade in the kerf and check that saw
teeth are not engaged into the material. lf saw blade is binding, it may walk up ar kickback from the
workpiece as the saw is restarted.
d} Support large panels to minimise the risk of blade pinching and kickback. Large panels tend to
sag under their own weight. Supports must be placed under the panel on both sides, near the fine of
cut and near the edge of the panel.
e) Do not use dull or damaged blades. Unsharpened ar improperly set blades produce narrow kerf
causing excessive friction, blade binding and kickback.
f) Blade depth and bevel adjusting locking levers must be tight and secure befare making cut. Jf
blade adjustment shifts while cutting, it may cause binding and kickback.
g) Use extra caution when making a "plunge cut" into existing walls or other blind areas. The pro-
truding blade may cut objects that can cause kickback.
5.9 Safety instructions for lower guard saw
a) Check lower guard for proper closing befare each use. Do not operate the saw if lower guard
does not move freely and clase instantly. Never clamp or tie the lower guard into the open position.
If saw is accidentally dropped the lower guard may be bent. Raise the lower guard with the retrac-
ting handle and make sure it moves freely and does not touch the blade ar any other part, in all
angles and depths of cut.
b) Check the operation of the lower guard spring. lf the guard and the spring are not operating
properly, they must be serviced befare use. Lower guard may operate sluggishly due to damaged
parts, gummy deposits, ar a build-up of debris.
Lower guard may be retracted manually only far special cuts such as "plunge cuts" and "compound
cuts." Raise lower guard by retracting handle andas soon as blade enters the material, the lower
guard must be released. Far all other sawing, the lower guard should operate automatically.
d) Always observe that the lower guard is covering the blade befare placing saw down on bench or
floor. An unprotected, coasting blade will cause the saw to walk backwards, cutting whatever is in
its path. Be aware of the time it takes far the blade to stop after switch is released.
5.10 Residual risks
Although the safety instructions contain extensive instructions on safe working with this circular
saw and despite proper use, additional residual risks may arise when using this mitre saw.
These include:
a) Injuries caused by touching any rotating moving parts.
b) Injuries caused when changing any parts and accessories.
c) Injuries caused by projected parts or tool adapter that break during use.
d) Damage to eyes and hearing if effective protection are not worn.
6. ASSEMBLY
WARNING!
Remove the battery pack before assembly. Do not use grinding discs.
Wear protective gloves, the cutting edges of the saw blade teeth are sharp. The cutting
edges present a s risk of injury.
Never adjust cutting depth and angle while the blade is turning.
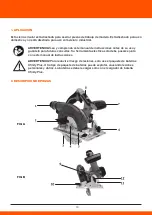
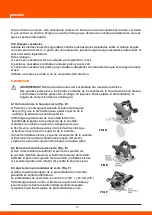
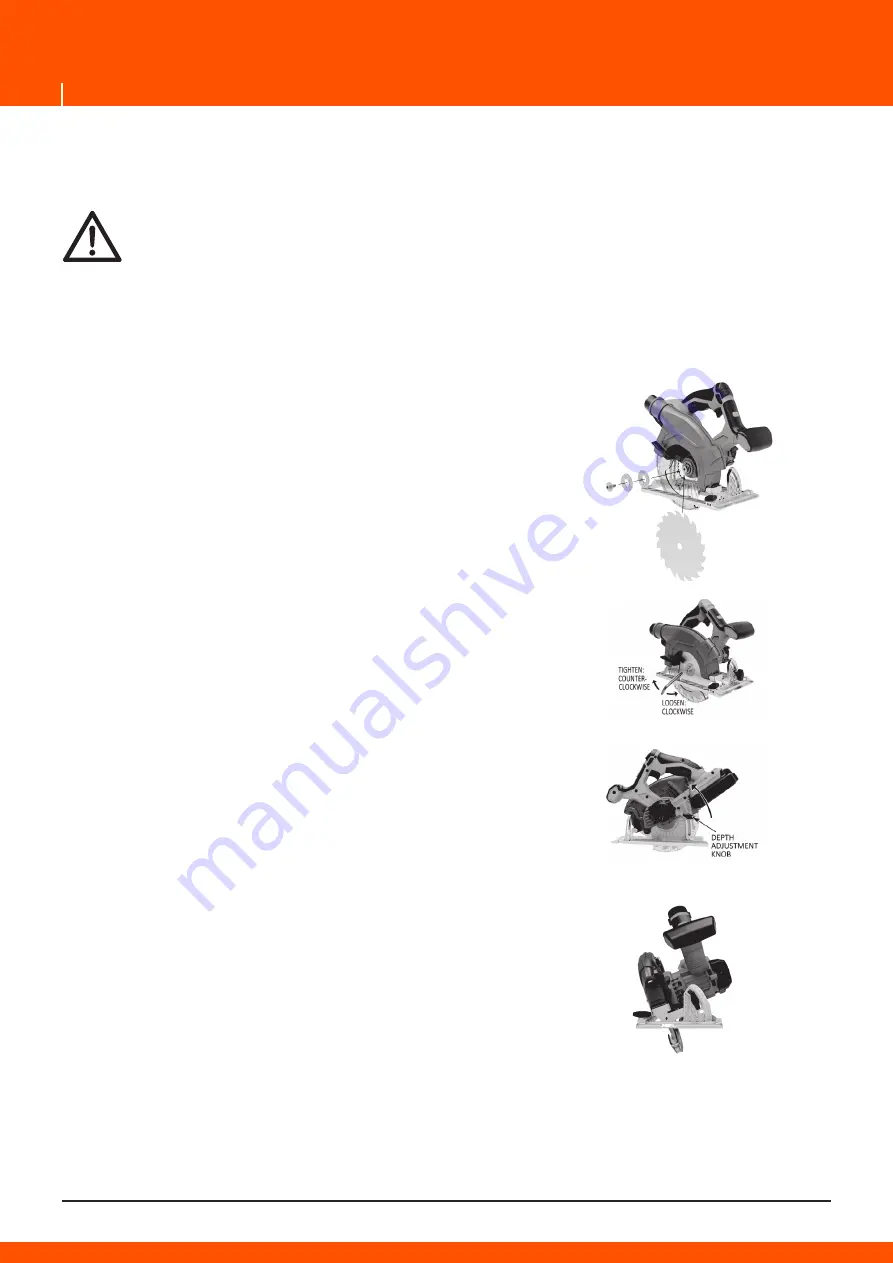
6.1 Attaching the saw blade (Fig. D)
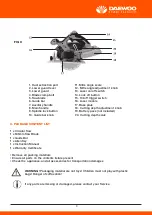
a) Press and hold the spindle lock button (9) and use allen
key to remove blade bolt and outer blade flange.
b) Retract the lower blade guard (3) by raising the blade
guard lever.
c) Slip the blade in position. Ensure arrow on the blade
points in the same direction as the arrow on the upper
blade guard.
d) lnsert the outer flange and blade clamp bolt.
e) Press down the spindle lock button (9) and tighten the
blade clamp bolt with allen key.
6.2 Removing the saw blade (Fig. E)
a) Use the allen key to loasen the blade clamp bolt while
pressing down the spindle lock button.
b) Remove the blade clamp bolt and outer flange.
c) Raise the lower guard (3) and remove the saw blade.
6.3 Adjusting the cutting depth (Fig. F)
a) Loasen the cutting depth adjustment knob (18) by
turning it anti-clockwise. The max. cutting depth is 54mm
(90º) and 40mm (45º).
b) Hold the base piate against the edge of the workpiece
and lift thesaw to the desired cutting depth.
c) Tighten the cutting depth adjustment knob.
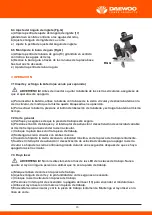
6.4 Setting the mitre angle (Fig.G}
a) Loasen the mitre angle adjustment knob {12) by turning
it anti-clockwise.
b) Adjust the mitre angle of your cut.
e) Tighten the mitre angle adjustment knob.
6.5 Mounting the guide bar (Fig.G}
a) Loasen the guide bar knob {10) by turning it anti-cloc-
kwise..
b) Slide the guide bar through the slots in the base plate to
the desired width.
e) Tighten the guide bar knob.
FIG D
FIG E
FIG F
FIG G


