7
1. DESCRIPTION OF THE SYMBOLS
The use of symbols in this manual is intended to draw your attention to possible risks. The safety
symbols and the explanations that accompany them must be perfectly understood. The warnings in
themselves do not remove the risks and cannot replace correct actions for preventing accidents.
This symbol, marking a point of safety, indicates a caution, warning or danger. Ignoring this
warning can result in an accident to yourself or others. To limit the risks of injury, fire or
electrocution, always follow the recommendations indicated.
Before any use, refer to the corresponding section in this user manual.
WARNING – To reduce the risk of injury, user must read instruction manual.
Conforms to applicable safety standards.
These symbols indicates the requirement of wearing ear protection, eye protection,
respirator and gloves when using the product.
The crossed-out wheeled bin symbol indicates that the item should be disposed of
separately from household waste. The item should be handed in for recycling in accordance
with local environmental regulations for waste disposal. By separating a marked item from
household waste, you will help reduce the volume of waste sent to incinerators or land-fill
and minimize any potential negative impact on human health and the environment.
Class II transformer.
For indoor use only.
Do not expose immerse the battery in or expose to water.
Do not expose battery to flame. They will explode and cause injury.
Do not expose the battery to excessive heat more than 45 °C. Do not charge or stock the
battery where the temperature is below 0° or more than 45 °C.
Li-ion battery.
Recyclable waste.
2. GENERAL SAFETY WARNINGS FOR THE POWER TOOL
WARNING.
Read all safety warnings and all instructions.
Failure to follow the warnings and instructions may result in electric shock, fire and/or a serious
injury.
Keep all warnings and instructions for future reference.
The term “power tool” in the warnings refers to your mains-operated (corded) power tool or
battery-operated (cordless) power.
1. Work area safety
a) Keep work area clean and well lit. Cluttered and dark areas invite accidents.
b) Do not operate power tools in explosive atmospheres, for example in the presence of flammable
liquids, gases or dust. Power tools create sparks which may ignite the dust or fumes.
c) Keep children and bystanders away while operating a power tool. Distractions can cause you to
lose control.
2. Electrical safety
a) Power tool plugs must match the outlet. Never modify the plug in any way. Do not use any adap-
ters plugs with earthed (grounded) power tools. Unmodified plugs and matching outlets will reduce
the risk of electric shock.
b) Avoid any body contact with earthed or grounded surfaces such as pipes, radiators, cookers and
refrigerators. There is an increased risk of electric shock if your body is earthed or grounded.
c) Do not expose power tools to rain or wet conditions. Water entering a power tool will increase the
risk of electrical shock.
d) Do not abuse the cord. Never use the cord for carrying, pulling or unplugging the power tool.
Keep cord away from heat, oil, sharp edges and moving parts. Damaged or entangled cords increa-
se the risk of electric shock.
e) When operating a power tool outdoors, use an extension cable suitable for outside use. Use of a
cord suitable for outside use reduces the risk of electric shock.
f) If operating a power tool in a damp location is unavoidable, use a residual current device (RCD)
protected supply. Use of an RCD reduces the risk of electric shock.
3. Personal safety
a) Stay alert, watch what you are doing and use common sense when operating a power tool. Do
not use a power tool while you are tired or under the influence of drugs, alcohol or medication. A
moment of inattention while operating power tools may result in serious personal injury.
b) Use personal protective equipment. Always wear eye protection. Protective equipment such as
dust masks, non-skid safety shoes, hard hat, or hearing protection used for appropriate conditions
will reduce personal injuries.
c) Prevent unintentional starting. Ensure the switch is in the off-position before connecting to power
source and/or battery pack, picking up or carrying the tool. Carrying power tools with your finger on
the switch or energising power tools that have the switch on invites accidents.
d) Remove any adjustment key or wrench before turning the power tool on. A wrench or a key left
attached to a rotating part of the power tool may result in personal injury.
e) Do not overreach. Keep proper position and balance at all times. This enables better control of
the tool in unexpected situations.
f) Dress properly. Do not wear loose clothing or jewellery. Keep your hair, clothing and gloves away
from moving parts. Loose clothes, jewellery or long hair can be caught in moving parts.
g) If devices are provided for the connection of dust extraction and collection facilities, ensure these
are connected and properly used. Use of dust collection can reduce dust-related hazards.
4. Power tool use and care
a) Do not force the power tool. Use the correct power tool for your application. The correct power
tool will do the job better and safer at the rate for which it was designed.
b) Do not use the power tool if the switch does not turn it on and off. Any power tool that cannot be
controlled with the switch is dangerous and should be repaired.
c) Disconnect the plug from the power source and/or the battery pack from the power tool before
making any adjustment, changing accessories or storing power tools. Such preventive safety mea-
sures reduce the risk of starting the power tool accidentally.
d) Store idle power tools out of the reach of children and do not allow persons unfamiliar with the
power tool or these instructions to operate the power tool. Power tools are dangerous in the hands
of untrained users.
e) Maintain power tools. Check for misalignment or binding of moving parts, breakage of parts and
any other condition that may affect the power tool’s operation. If damaged, have the power tool
repaired before use. Many accidents are caused by poorly maintained power tools.
f) Keep cutting tools sharp and clean. Properly maintained cutting tools with sharp cutting edges
are less likely to bind and are easier to control.
g) Use the power tool, accessories and tool bits etc., in accordance with these instructions, taking
into account the working conditions and the work to be performed. Use of the power tool for opera-
tions different from those intended could result in a hazardous situation.
5. Battery tool use and care
a) Recharge only with the charger specified by the manufacturer. A charger that is suitable for one
type of battery pack may create a risk of fire when used with another battery pack.
b) Use power tools only with specifically designated battery packs. Use of any other battery packs
may create a risk of injury and fire.
c) When battery pack is not in use, keep it away from other metal objects, like paper clips, coins,
keys, nails, screws or other small metal objects, that can make a connection from one terminal to
another. Shorting the battery terminals together may cause burns or a fire.
d) Under abusive conditions, liquid may be ejected from the battery; avoid contact. If contact acci-
dentally occurs, flush with water. If liquid contacts eyes, additionally seek medical help. Liquid
ejected from the battery may cause irritation or burns.
6. Service
a) Have your power tool serviced by a qualified repair person using only identical replacement parts.
This will ensure that the safety of the power tool is maintained.
3. SPECIAL SAFETY INSTRUCTIONS
Wear ear protection. Exposure to noise can cause hearing loss.
Hold power tool by insulated gripping surfaces, when performing an operation where the drilling
accessory may contact hidden wiring or its own cord. Drilling accessory contacting a “live” wire
may make exposed metal parts of the power tool “live” and could give the operator an electric
shock.
Secure the workpiece. A workpiece clamped with clamping devices or in a vice is held more secure
than by hand.
WARNING
Some dust created by power sanding, sawing, grinding, drilling, and other construction activities
contains chemicals known to cause cancer, birth defects or other reproductive harm. Some exam-
ples of these chemicals are:
• Lead from lead-based paints,
• Crystalline silica from bricks and cement and other masonry products, and
• Arsenic and chromium from chemically-treated lumber.
Your risk from these exposures varies, depending on how often you do this type of work. To reduce
your exposure to these chemicals: work in a well ventilated area, and work with approved safety
equipment, such as those dust masks that are specially designed to filter out microscopic particles.
4. SAFETY ADVICE FOR RECHARGEABLE BATTERY AND CHARGER
WARNING!
During the use of tools supplied with batteries, the basic safety measures must
be followed in order to reduce fire hazards, electrolyte leakage and personal injury, including the
following precautions:
Ensure that the battery block is suitable for the tool.
Ensure that outside surface of the battery block is clean and dry before connecting it to the charger.
Ensure that the batteries are charged using the correct charger recommended by the manufacturer.
Incorrect use can create a risk of electric shock, overheating or the leaking of corrosive liquid from
the battery.
If there is an electrolyte leak, avoid any contact with the skin. In the event of a leak, wipe with a rag.
If the liquid comes into contact with the skin, rinse abundantly with water. In the event of a reaction
or contact with the eyes or mucous membranes, consult a doctor.
Ensure that the appliance is properly switched off before inserting the battery into the appliance.
Inserting a battery into a appliance while it is switched on can cause accidents.
Use the appliance only with the type of battery indicated in the instructions. Using another type of
battery can create a serious risk of injury and cause a fire
.
When the battery is not in use, keep it away from metal objects such as trombones, coins, keys or
other small metal objects that can create a connection between one terminal and the other.
Short-circuiting the terminals of batteries can cause burns to the user and cause a fire.
Dispose of batteries
Ensure that the battery is properly disposed of:
1. Do not throw it away
2. Do not to burn it
3. Do not throw it in a river
4. Dispose of it in the designated collection containers (ask your retailer).
5. INTENDED USE
The machine is intended for hammer drilling in concrete, brick and stone. It is also suitable for
drilling without impact in wood, metal, ceramic and plastic. Machines with electronic control and
right/left rotation are also suitable for screwdriving.
The light of this power tool is intended to illuminate the power tool’s direct area of working operation
and is not suitable for household room illumination.
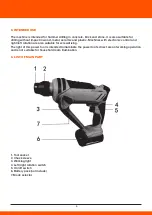
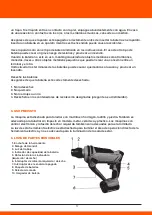
6. LIST OF MAIN PART
1. Tool socket
2. Chuck sleeve
3. Working light
4. Left/right rotation switch
5. On/off switch
6. Battery pack(not include)
7. Mode selector
7. TECHNICAL SPECIFICATIONS
Power: 20 V
No load speed: 0-900 rpm
Impact energy: 1.2 J
Max impact rate: 0-5000 bpm
SDS: 10 mm
Functions: driver and pneumatic hammer, forward and reverse rotation, on-off switch and variable
speed.
Includes: soft grip handle and LED light.
Wear hearing protection!
Vibration total values ah (triax vector sum) determined according to EN 60745-2-6.
Sound level LwA = 95.0 dB (A)
Sound level LpA = 84.0dB (A)
Vibration: ah,HD = 4,366 m²/s
The vibration level given in this information sheet has been measured in accordance with a standar-
dised test given in EN 60745 and may be used to compare one tool with another. It may be used for
a preliminary assessment of exposure.
The declared vibration emission level represents the main applications of the tool. However if the
tool is used for different applications, with different accessories or insertion tools or is poorly main-
tained, the vibration emission may differ. This may significantly increase the exposure level over the
total working period.
An estimation of the level of exposure to vibration should also take into account the times when the
tool is switched off or when it is running but not actually doing the job. This may significantly reduce
the exposure level over the total working period. Identify additional safety measures to protect the
operator from the effects of vibration such as: maintain the tool and the accessories,
keep the hands warm, organisation of work patterns.
8. OPERATION
Preparation
Charging the battery pack
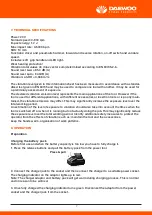
Before first use and when the battery capacity is too low you have to fully charge it.
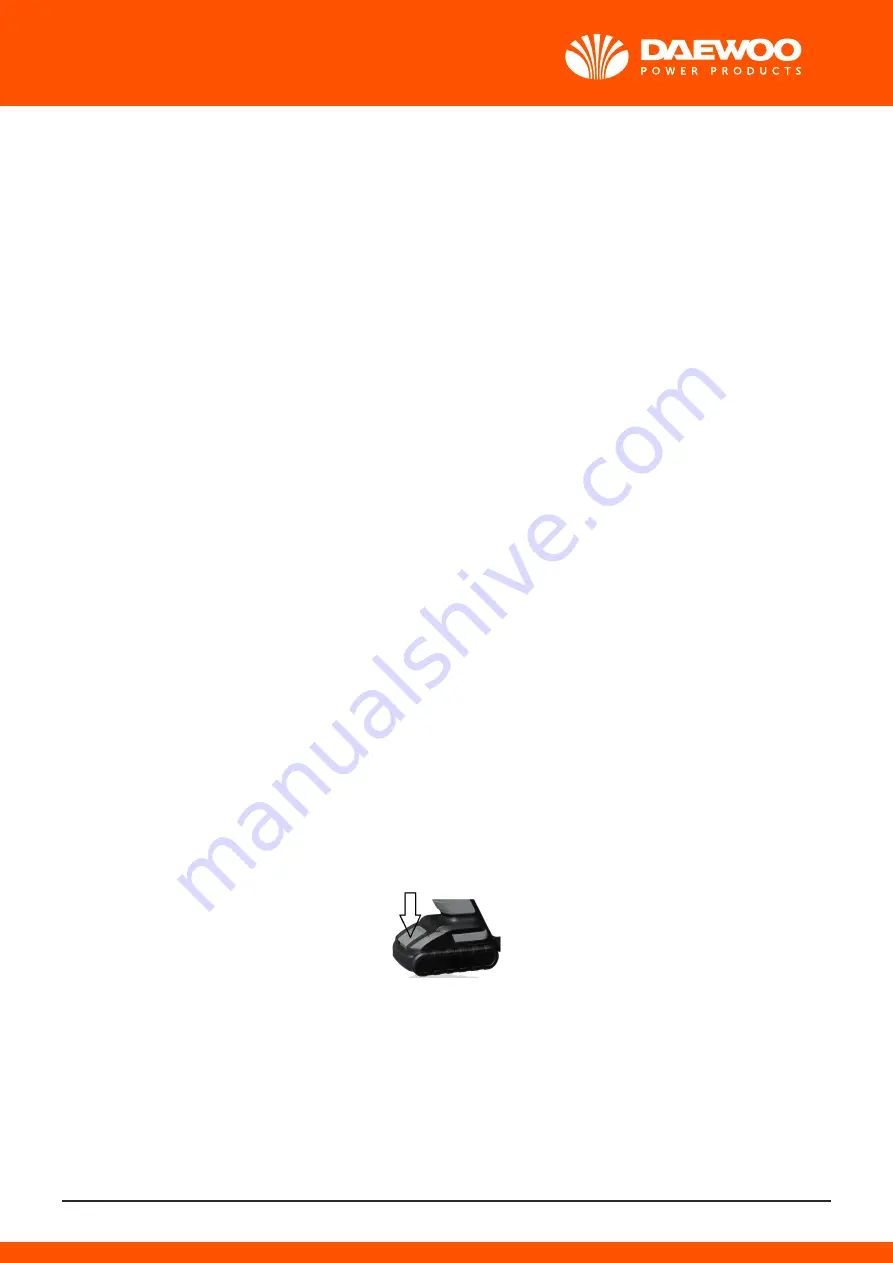
1. Press the release buttons and pull the battery pack from the power tool.
2. Connect the charger jack to the socket and then connect the charger to a suitable power socket.
The charging indicator on the adaptor lights up in red.
Note: The charger adaptor and battery pack will get warm during charging process. This is normal
and no reason to be worried.
3. Once fully charged the charging indicator turns green. Disconnect the adaptor from the power
socket and the charger jack from the socket.
About the charger
Disconnect the feeding before connecting or disconnecting the battery
The charger must be used only with rechargeable battery. Never use un-rechargeable battery.
Do not expose the charger to rain or water.
Application tools
Always use suitable applications tools, e. g. never use a metal drill for drilling into wood.
Note: SDS application tools can directly be inserted to the SDS drill chuck.
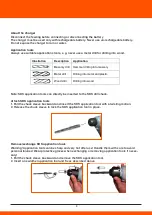
Attach SDS application tools
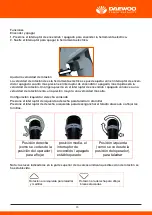
1. Pull the chuck sleeve backward and insert the SDS application tool with a twisting motion.
2. Release the chuck sleeve to lock the SDS application tool in place.
Remove/exchange SDS application tools
Warning! Application tools can be sharp and very hot after use! Handle them with care to avoid
personal injuries! Wear protective gloves when exchanging or removing application tools if neces-
sary!
1. Pull the chuck sleeve backward and remove the SDS application tool.
2. Insert a new/other application tool and fix as described above.
Press & pull
Functions
Switching on and off
1. Press the on/off switch to switch on the power tool.
2. Release the switch to switch off the power tool.
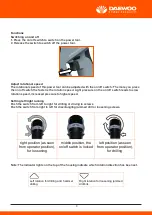
Adjust rotational speed
The rotational speed of this power tool can be adjusted with the on/off switch: The more you press
the on/off switch the faster is the rotation speed. Light pressure on the on/off switch leads to slow
rotation speed, increased pressure to higher speed.
Setting left/right running
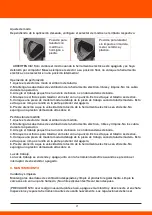
Push the switch from left to right for drilling or driving in screws
Push the switch from right to left for disentangling jammed drill or loosening screws.
Note: The indicator lights on the top of the housing indicate which rotation direction has been set.
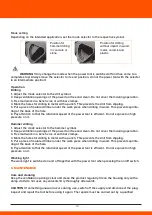
Mode setting
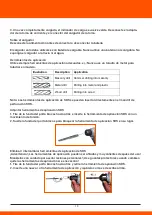
Depending on the intended application, set the mode selector to the respective symbol.
WARNING!
Only change the mode when the power tool is switched off and has come to a
complete stop! Always move the selector to its end position, do not the power tool with the selector
in an intermediate position!
Operation
Drilling
1. Adjust the mode selector to the drill symbol.
2. Keep ventilation openings of the power tool free and clean. Do not cover them during operation.
3. Fix small work in a bench vice or with bar clamps.
4. Mark the holes for drilling in metal with a punch. This prevents the drill from slipping.
5. Put a piece of matured timber under the work piece when drilling in wood. This prevents splinte-
ring at the back of the hole.
6. Pay attention to that the rotational speed of the power tool is efficient. Do not expose too high
pressure on it.
Hammer drilling
1. Adjust the mode selector to the hammer symbol.
2. Keep ventilation openings of the power tool free and clean. Do not cover them during operation.
3. Fix small work in a bench vice or with bar clamps.
4. Mark the holes for drilling in metal with a punch. This prevents the drill from slipping.
5. Put a piece of matured timber under the work piece when drilling in wood. This prevents splinte-
ring at the back of the hole.
6. Pay attention to that the rotational speed of the power tool is efficient. Do not expose too high
pressure on it.
Working light
The work light is switched on and off together with the power tool when pressing the on/off switch.
9. MAINTENANCE
Care and cleaning
Keep the ventilation openings clear and clean the product regularly. Clean the housing only with a
damp cloth-do not uses any solvents! Dry thoroughly afterwards.
CAUTION!
If something unusual occurs during use, switch off the supply and disconnect the plug.
Inspect and repair the tool before using it again. The repairs must be carried out by a qualified
technician.
Repair of the tool must only be carried out by a qualified repair technician. Repair or maintenance
by unqualified personnel can lead to a risk of injury.
Use only identical spare parts for repairing a tool. Follow the instructions in the maintenance section
of this user manual.
CAUTION!
Because of the battery character, if the user charge and discharge the batteries in wrong
way, the battery capacity will be reduced very fast.
Please always fully discharge the batteries before charging.
Please always fully charge the batteries in each charging.
Ensure that the batteries are charged using the correct charger recommended by the manufacturer.
ATTENTION!
After long time storage, the battery capacity will be reduce.
A new battery or one which has not been used for an extended period achieves full performance
only after approx.5 charging and discharging cycles.
Always remove the battery before carrying out any work on the machine.
In order to maintain battery capacity, we recommend the battery to be completely discharged every
month and recharged again. Only store full charged batteries and top-up the charge from time to
time. They should be stored in a dry and frost-free place, the ambient temperature should not
exceed 50ºC.
10. STORING
Store the machine, operating instructions and where necessary the accessories in the original
packaging. In this way you will always have all the information and parts ready to hand.
Pack the device well or use the original packaging in order to avoid transit damage.
Always keep the machine in dry place.


