


6
1. SAFETY INSTRUCTIONS
For electric tools
Caution! Observe the following basic safety precautions when using electric tools in order to protect
yourself against electric shock, danger of injury and fire.
Read and observe these rules before using the unit.
Keep the safety instructions in a safe place.
1. Consider environmental influences
Do not expose electric tools to rain. Do not use electric tools in humid or wet environment. Provide
good lighting. Do not use electric tools near flammable liquids or gases.
2. Protect yourself against electric shock
Avoid contact with earthed objects such as pipes, radiators, stoves, refrigerators.
3. Keep your tools in a safe place
Unused tools should be kept in a dry, locked room out of the reach of children.
4. Do not misuse the cable
Do not carry the tools by the cable and do not use it to remove the plug from the socket. Protect
the cable against heat, oil and sharp edges.
5. Maintain your tools with care
Keep your tools clean to ensure good and safe operation. Follow the maintenance instructions.
Check plug and cable regularly. If defective, have them replaced by a service station or by an autho-
rized dealer. Check the extension cable regularly and replace it , if defective. Make sure the exten-
sion cable is equipped with the prescribed earthing contact. Keep the handles dry and free from oil
and grease.
6. Remove the mains plug
Remove the mains plug when the unit is out of use, before maintenance work and when mounting
accessories.
7. Avoid unintentional start
Do not carry tools which are connected to the mains with your finger on the switch. Make sure that
the switch is off when connecting the unit to the mains.
8. Outdoor extension cable
When working outdoors only use approved and respectively marked extension cables.
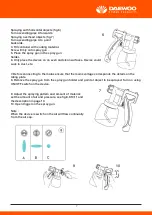
Safety instructions for PLD3030A
-
Please read the operating instructions thoroughly and observe the safety instructions
-
Only coating materials such as paints, enamels, varnishes, etc, with a flash point of 21 (32 in the
United Kingdom) hand above may be sprayed, without additional warming. In Germany these are
coating materials in the danger classes A and A , see paint tin.
-
The device may not be based in work places which are covered by the explosion protection regula-
tions.
-
When spraying, ensure that there are no sources of ignition, e.g. open fire, cigarettes, cigars, and
pipes, sparks, glowing wires, hot surfaces, etc, in the area.
-
Recommendation wear breathing protection when spraying.
-
Caution, danger of injury! Never point the spray gun at yourself or other persons or animals.
-
When working with the device PLD3030A inside and outside care must be taken that no solvent
vapors are sucked into the device.
-
When working outdoors observe wind direction. When working indoors ensure that there is suffi-
cient ventilation.
-
Do not spray at the device.
-
The device only splash-proof when the air hose is correctly connected.
-
Do not let children play with the device. Keep out of reach of children.
-
Care must be taken that the mains cable is not damaged. If damage is observed take it immediate-
ly to an authorized customer service centre to be changed.
-
Remove mains plug from socket when not in use
-
Repairs to electrical parts should only be carried out at an authorized customer service centre.
-
Do not use spray guns to spray flammable liquids.
-
Do not clean spray guns with flammable solvents.
-
Take precautionary measures against potential hazards from spray liquid and follow any instruc-
tions given on containers or laid down by the manufacturer of liquid.
-
Do not spray any liquids of unknown hazard potential.
-
Keep work area clean and will lit.
-
Do not operate power tools in explosive atmosphere, such as in the presence of flammable liquids,
gases or dust.
-
Keep children and bystanders away while operating a power tool.
-
Power tool plugs must match the outlet. Never modify the plugs in any way. Do not use any adapter
plugs with earthed (grounded) power tools.
-
Avoid body contact with earthed or grounded surfaces such as pipes, radiators, ranges and refri-
gerators.
-
Do not expose power tools to rain or wet conditions.
-
Do not abuse the cord. Never use the cord for carrying, pulling or unplugging the power tool. Keep
cord away from heat, oil, sharp edges or moving parts.
-
When operating a power tool outdoors, use an extension cord suitable for outdoor use.
-
Stay alert, watch what you are doing and use common sense when operating a power tool. Do not
use a power tool while you are tired or under the influence of drugs, alcohol or medication.
-
Use safety equipment. Always wear eye protection.
-
Avoid accidental starting. Ensure the switch is in the off position before plugging in.
-
Remove any adjusting key or wrench before turning the power tool on.
-
Do not overreach. Keep proper footing and balance at all times.
-
Dress properly. Do not wear loose clothing or jewellery. Keep your hair, clothing and gloves away
from moving parts.
-
If devices are provided for the connection of dust extraction and collection facilities, ensure these
are connected and properly used.
-
Do not force the power tool. Use the correct power tool for your application.
-
Do not use the power tool if the switch does not turn in on and off.
-
Disconnect the plug from the power source before making any adjustment, changing accessories,
or storing power tools.
-
Store idle power tools out of the reach of children and do not allow persons unfamiliar with the
power tool or these instructions to operate the power tool.
-
Maintain power tools. Check for misalignment or binding of moving parts, breakage of parts and
any other condition that may affect the power tools operation. If damaged, have the power tool
repaired before use.
-
Use the power tool, accessories and tool bits etc, in accordance with these instructions and in the
manner intended for the particular type of power tool, taking into account the working conditions
and the work to be performed
-
Have your power tool serviced by a qualified repair person using only identical replacement parts.
-
Forbidden to spray to the hatch of the the motor and etc.
-
When spraying normally, the motor should not be under the head of the gun and the container
2. TECHNICAL DATA
Max. viscosity: 70 DIN-s
Voltage: 220-240 V 50 Hz
Power consumption; 700 W
Max spraying pressure: 0.1-0.3 bar
Flow Rate
:
1000ml/min
Double insulation:
Mains cable: 2.0 m
Sound pressure level: 81,3 dB(A), k=3,0 dB(A)
Oscillation level: 2.5 m/s2 , k=1,5 m/s2
Air hose length: 3 m
Container contest: 800 ml
Nozzle size
:
φ
2.5 mm
Weight: 4.5 kg
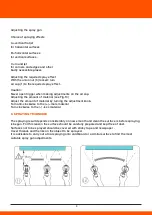
Explanation of the system
The device works according to low-pressure spraying technique. A high volume of air surround the
spray jet being ejected under low pressure. The air cap provides a very fine atomization with the
lowest of spray mist .The coating material is applied to the object quickly and exactly.
Moreover, the air flow shortens the drying time for the coating material .this gives perfect spraying
result with a respective saving of coating material and is therefore good for the environment.
Function description
The motor blower produces a flow of air which flows through the air hose to the spray gun. The air
flow atomizes the coating material at the nozzle and also pressurizes the container. This pressure
pushes the coating material up the ascending pipe to the nozzle. The air and pressure setting can
be adjusted progressively.
Materials which can be used
Solvent containing and water-dilutable enamel paints, vanishes, primers, two-component paints,
clear enamels, motor-vehicle enamels, mordants and wood protectives.
Materials which cannot be used
Wall paints (emulsions) etc., lyes and acid containing coating materials.
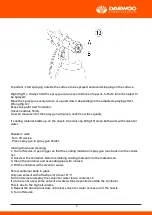
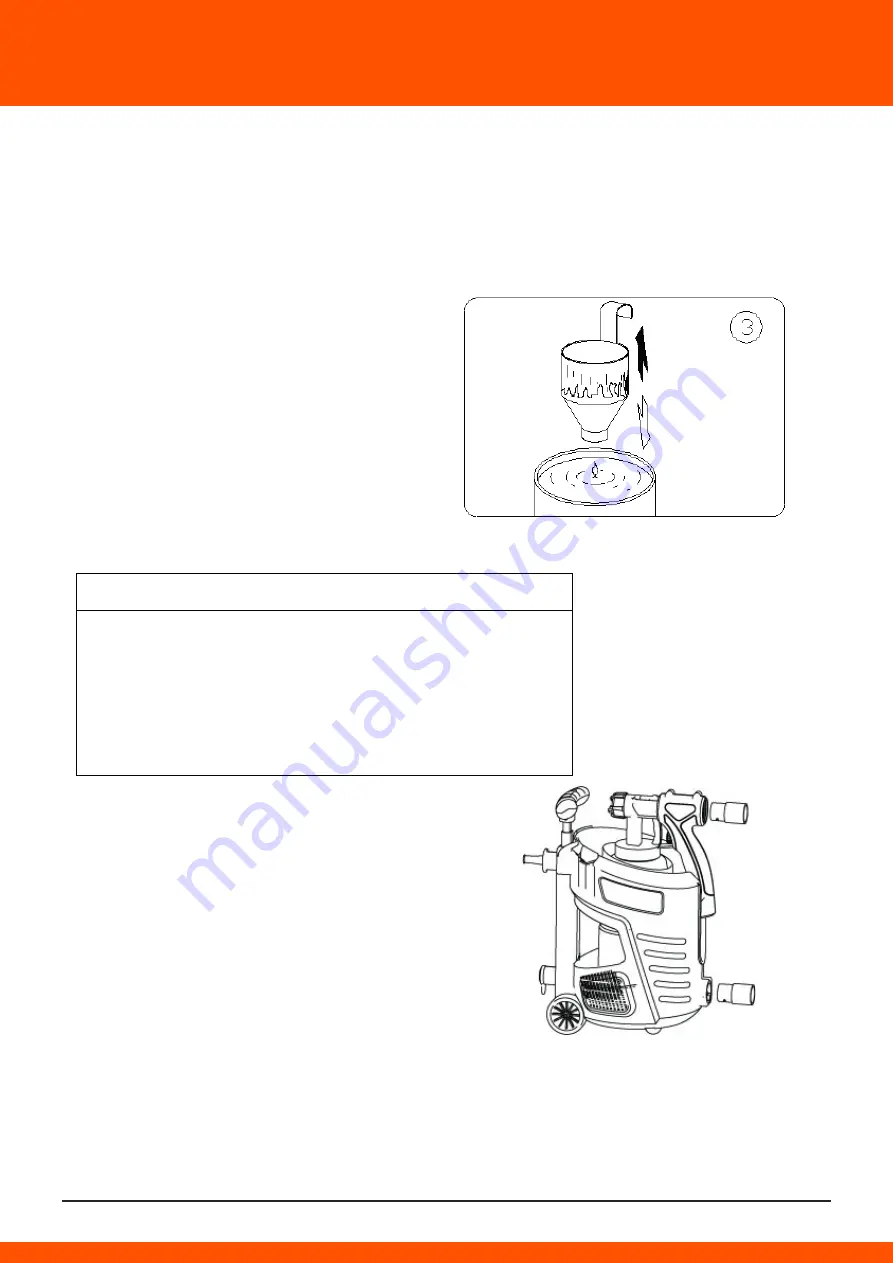
3. EXPLANATORY DIAGRAM
1. Air cap
2. nozzle
3. Spray gun
4. ON/OFFswitch
5. Lock for handle
6. Handle
7. Mains cable
8. knob
9. wheels
10. Air hose
11. Container
12. Trigger
Preparation of the coating material
Information regarding a sprayable dilution is normally not to be found on the material tin.
Therefore , use the viscosity table viscosity =thickness of the coating material page 8
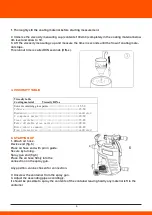
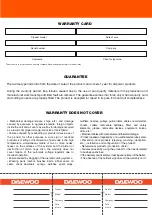
Measuring the viscosity the viscosity measuring cup
1. Thoroughly stir the coating material before starting measurement.
2. Immerse the viscosity measuring cup (contents 100cm3).completely in the coating material below
rim level and allow to fill.
3. Lift the viscosity measuring cup and measure the time in seconds until the flow of coating mate-
rial stops.
This runout time is called DIN seconds (DIN-s).
4. VISCOSITY TABLE
5. STARTING UP
1. Attach air hose .
Device end (fig.5)
Place air hose end with pin in guide.
Secure by turning .
Spray gun end (fig.5)
Place the air hose firmly into the
connection on the spray gun.
Any position can be chosen for connection.
2. Unscrew the container from the spray gun .
3. Adjust the ascending pipe accordingly.
It should be possible to spray the contents of the container leaving hardly any material left in the
container
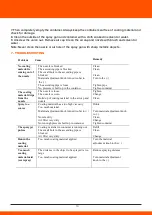
Viscosity table
Coating material Viscosity DIN-s
Solvent containing gloss paints
┈┈┈┈┈┈┈┈┈┈┈
15-50
Primers
┈┈┈┈┈┈┈┈┈┈┈┈┈┈┈┈┈┈┈┈
25-50
Mordants
┈┈┈┈┈┈┈┈┈┈┈┈┈┈┈┈┈┈┈┈
undiluted
2 component paints
┈┈┈┈┈┈┈┈┈┈┈┈┈┈┈
20-50
Clear varnishs
┈┈┈┈┈┈┈┈┈┈┈┈┈┈┈┈┈
15-40
Water-dilutable gloss paints
┈┈┈┈┈┈┈┈┈┈
20-40
Motor-vehicle enamels
┈┈┈┈┈┈┈┈┈┈┈┈┈
20-40
Wood presevatives
┈┈┈┈┈┈┈┈┈┈┈┈┈┈┈
undiluted
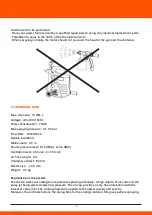
Spraying with horizontal objects (fig.6)
Turn ascending pipe A forwards.
Spraying overhead objects (fig.7)
Turn ascending pipe A to point
backards.
4. Fill container with coating material.
Screw firmly onto spray gun .
5. Place the spray gun in the spray gun
holder.
6. Only place the device on an even and clean surfaces. Device could
suck to dust ,etc.
7. Before connecting to the mains ensure that the mains voltage corresponds the details on the
rating plate.
8. Remove the spray gun from the spray gun holder and point at object to be sprayed. Turn on using
ON/OFF switch on the device.
9. Adjust the spraying pattern and amount of material;
set the amount of air and pressure, see fig.8,9,10,11 and
the description in page 10.
10. Open trigger on the spray gun.
Note :
When the device is switch on the air will flow continually
from the air cap.
5
Adjusting the spray gun
Choice of spraying effects
A =vertical flat jet
for horizontal surfaces
B =horizontal surfaces
for vertical surfaces.
C =round jet
for corners and edges and other
badly accessible places
Adjusting the required spray effect
With the union nut (3) loosed: turn
air cap (1) to the required spray effect.
Caution:
Never open trigger when making adjustments on the air cap.
Adjusting the amount of material (see Fig.10)
Adjust the amount of material by turning the adjustment knob.
Turn anti-clockwise to the (+) –more material
Turn clockwise to the (-) -less material
6. SPRAYING TECHNIQUE
The spraying result depends considerably on now smooth and clean the surface is before spraying
is begun. For this reason the surface should be carefully prepared and kept free of dust.
Surfaces not to be sprayed should be covered with sticky tape and newspaper .
Cover threads and the like on the object to be sprayed.
It is advisable to carry out a trial spraying onto cardboard or a similar surface to find the most
suitable spray gun adjustments.
Important: start spraying outside the surface to be sprayed and avoid stopping on the surface.
Right (fig.11) : Always hold the spray gun at an even distance of approx. 5-15cm from the object to
be sprayed.
Move the spray gun evenly across or up and down, depending on the adjusted spraying effect.
Wrong (fig.12):
Excessive paint mist formation;
Uneven surface finish.
An even movement of the spray gun will give a uniform surface quality
If coating material builds up on the nozzle A and air cap B (fig.13) clean both parts with solvent or
water.
Breaks in work
-
Turn off device.
-
Place spray gun in spray gun holder.
Closing down and cleaning
1. Turn off device. Open trigger so that the coating material in spray gun runs back into the contai-
ner.
2. Unscrew the container. Return remaining coating material into the material can.
3. Clean the container and ascending pipe with a brush.
4. Fill the container with solvent or water.
Screw container back in place.
Only use solvent with a flash point of over 21°C
Turn on device and spray the solvent or water into a container.
If a tube is not used, some solvent or water will be deposited outside the container.
This is due to the high air volume.
5. Repeat the above procedure until clear solvent or water comes out of the nozzle.
6. Turn off device.
7. Then completely empty the container. Always keep the container seal free of coating material and
check for damage.
8. Clean the outside of the spray gun and container with a cloth soaked in solvent or water.
9. Unscrew the union nut. Remove air cap .Clean the air cap and nozzle with brush and solvent or
water .
Note: Never clean the nozzle or air hole of the spray gun with sharp metallic objects .


