9.Use extreme caution when reversing or pulling the lawnmower towards you;10.Stop the blade(s) if
crossing surfaces other than grass, and when transporting the lawnmower toand from the area to
11. Never operate the lawnmower with defective guards, or without safetydevices, for example
12. Do not change the engine governor settings or over speed the engine;13.Disengage all blade
and drive clutches before starting the engine;14.Start the engine or switch on the motor carefully
15. Do not tilt the lawnmower when starting the engine or switching on the motor,except if the lawn-
mower has to be tilted for starting. In this case, do not tilt itmore than absolutely necessary and lift
16. Do not start the engine when standing in front of the discharge chute;17.Do not put hands or feet
18.Never pick up or carry a lawnmower while the engine is running;19.Stop the engine and discon-
moving parts have come to a complete stop and, where a key is fitted removethe key:
-After striking a foreign object. Inspect the lawnmower for damage and makerepairs before restar-
20. Stop the engine and disconnect the spark plug wire, make sure that allmoving parts have come
21. Reduce the throttle setting during engine shut down and, if the engine isprovided with a shut-off
1. Keep all nuts, bolts and screws tight to be sure the equipment is in safeworking condition;
2. Never store the equipment with petrol in the tank inside a building wherefumes can reach an open
4. To reduce the fire hazard, keep the engine, silencer, battery compartment andpetrol storage area
5. Check the grass catcher frequently for wear or deterioration;6.Replace worn or damaged parts
6.For wheeled rotary machines, mow across the face of slopes, never up anddown;
7.Exercise extreme caution when changing direction on slopes;
9.Use extreme caution when reversing or pulling the lawnmower towards you;10.Stop the blade(s) if
crossing surfaces other than grass, and when transporting the lawnmower toand from the area to
11. Never operate the lawnmower with defective guards, or without safetydevices, for example
12. Do not change the engine governor settings or over speed the engine;13.Disengage all blade
and drive clutches before starting the engine;14.Start the engine or switch on the motor carefully
15. Do not tilt the lawnmower when starting the engine or switching on the motor,except if the lawn-
mower has to be tilted for starting. In this case, do not tilt itmore than absolutely necessary and lift
16. Do not start the engine when standing in front of the discharge chute;17.Do not put hands or feet
18.Never pick up or carry a lawnmower while the engine is running;19.Stop the engine and discon-
moving parts have come to a complete stop and, where a key is fitted removethe key:
-After striking a foreign object. Inspect the lawnmower for damage and makerepairs before restar-
-If lawnmower starts to vibrate abnormally (check immediately);
20. Stop the engine and disconnect the spark plug wire, make sure that allmoving parts have come
21. Reduce the throttle setting during engine shut down and, if the engine isprovided with a shut-off
1. Keep all nuts, bolts and screws tight to be sure the equipment is in safeworking condition;
2. Never store the equipment with petrol in the tank inside a building wherefumes can reach an open
4. To reduce the fire hazard, keep the engine, silencer, battery compartment andpetrol storage area
5. Check the grass catcher frequently for wear or deterioration;6.Replace worn or damaged parts
7. If the fuel tank has to be drained, this should be done outdoors.
7. ASSEMBLY
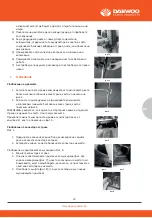
Assembling the handle
1. Fasten the lower handle toThe device by using
two bolts andtwo small knobs on each side as
shown in Fig 2.
46cm cutting witch has one knob on each side)
2.Unfold the upper handle and fix it to lower
handleby using the big knobs and the
blots on each sideas shown in Fig3
NOTE: Make sure the rope guide is on the right
handle, when you stand behind the mower.
Fasten the connection cord with clip
As shown in Fig 4Fix the connection cord
to the lower handle With the cord clip .(supplied)
Assembling the grass bag onto the mower
As shown in Fig 6
1.Lift the rear discharge cover with one hand
andhook in the grass bag.2.Release the rear
discharge cover to secure thegrass bag in position.
Assembling the mulching plug (Fig 8)
1. Remove the grass bag
2. Push the plastic mulchingplug
(Fig 8) into the dischargechute (Fig 9) until it is locked inplace.
(Please pay attention to thelock when assembling.
3. Then release the flap(Fig 10),
it will close Back to cover themulching plug.
Assembling the side discharge chute As shown in Fig 11
clean the blade and the deck.
9. Do not remove grass debris in the mower casing or on the blade by hand orwith your feet. Instead
use suitable tools such as a brush or broom.
Emptying the grass bag
As soon as grass clippings start to trail the lawn mower, it is time to empty the
grass bag.
NOTE: Before taking off the grass bag, switch off the engine and wait untilthe blade has come to a
stop.
1. To take off the grass bag, use one hand to lift up ejector flap and the other to grab onto the carry
handle. The ejector flap automatically falls down after removing the grass bag and closes off the
rear chute opening.
2. Empty the grass debris in the grass bag, and refit grass Bag.
NOTE: If any grass residue is caught in the discharge chute, clean it using a brush. Do not remove
grass debris in the mower casing or on the blade by hand or with your feet. Instead use suitable
tools such as a brush or broom. To ensure that the cut grass can be collected into grass Bag, the
discharge opening and inside the mower casing must be cleared of any blockage.
10. STORING AND MAINTENANCE
WARNING : Before performing any maintenance or cleaning work, switch Off the engine and wait
until the blade has come to a stop.
Cleaning
General cleaning
The lawn mower should be cleaned thoroughly every time after it has been used. Always clean your
lawnmower immediately after use. Do not allow grass cuttings and other debris to become dry and
hard on any of the mower surfaces. Dried grass remnants and dirt may impair the mowing opera-
tion. Check that the grass chute is free of any residual grass. Remove any such residue. Check the
underside of the lawn mower and the blade mount. for this purpose ,tilt the Lawn mower onto its left
side (opposite the oil filler neck)
NOTE: Before placing the lawn mower on its side , fully drain the fuel tank using a petrol extraction
pump. Do not tilt the lawn mower by more than 90 degrees.
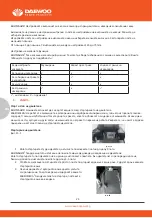
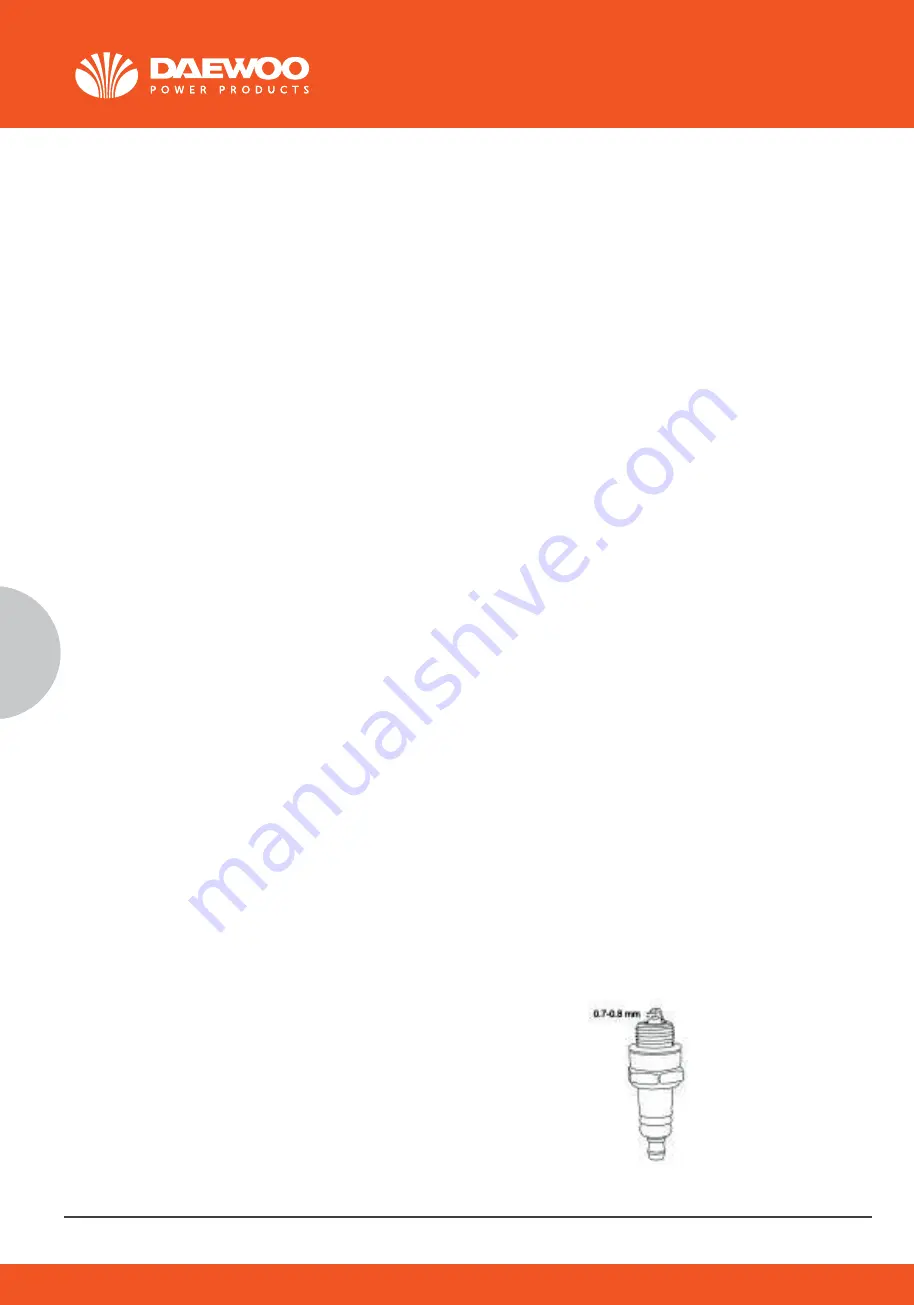
Maintenance of the spark plug.
As shown in Fig 22
1. Once the engine has cooled, pull off the spark plugwith a twist.
2. Remove the spark plug using a spark plug wrench3.Clean the spark plug with a wire brush (not
supplied ).4.Using a feeler gauge set the gap to 0.75mm
5. Install the spark plug carefully by hand to avoid cross-threading.
6. After the spark plug is seated tighten with thespanner to compress the washer.
How to Service the Air Filter As shown in Fig 23Soiled air filters reduce the engine output by supply
too little air to the carburetor. if the air contains a lot of dust , the air filter should be checked more
frequently.
WARNING
1. Remove the air cleaner outside cover (A). Be carefulto prevent dirt and debris from falling into the
aircleaner assembly.
2. Separate the Air Filter (A) from the Air Filter Housing (B).
3.Inspect the air filter. Clean dirty air filter with warmwater and mild soap. Allow air filter to dry
thoroughly before re-installation4.Install the air filter assembly onto the carburetor and secure with
screw.
Note: Do not use pressurized air or solvents to clean the filter. Pressurized air can damage the filter
and solvents will dissolve the filter.
Changing the engine oil Tilt the lawnmower towards the oil filler, have a container ready to catch the
oil and remove the dipstick. Once the oil has been emptied, replace the dipstick and wipe clean any
spillages. Refill with 500ml SAE30 oil or equivalent, i. e. SAE 5W/30, SAE10W/30.
Refill with 500ml SAE30 oil or equivalent i. e SAE5W/30, SAE10W/30. When the dipstick is rested on
the filler pipe (i. e . not turn in pace ), the oil level must be between the min and max marks on the
dipstick.
See “Checking the engine oil level and filling with engine oil” Start the engine and allow it to run
briefly.
Stop the engine, wait one minute and check the oil level. Top up if necessary. Note! see more in
engine manual.
Replacing the blade
For safety reasons you should only ever have your blade sharpened, balanced and mounted by an
authorised service workshop. For optimum results it is recommended that the blade should be
inspected once a year.
WARNING! Before you remove the grass collection bag, stop the engine and wait until the blade
stops completely.
WARNING! You will need garden gloves (not provided) and a spanner wrench(not provided) to
remove the blade.
NOTE! Don't invert the mower. Tip it slightly towards the oil filler pipe and reach under the deck.
WARNING! Always handle the blade with care, sharp edges could cause injury USE GLOVES. Renew
your metal blade after 50Hrs mowing or 2yrs whichever is sooner regardless of condition.
WARNING: Never open the ejector flap when the grass bag has been detached (to be emptied) and
the engine is still running. The rotating blade can cause serious injuries!
1. Select your required setting.
2. Start the engine and allow it run, and set it to required speed. See “to start theengine”.
3. Keep a firm grip on the upper handle with engine stop/start lever and drivelever (clutch lever)
closed and walk along with it self-propelling to startmowing.
Working advices
1. Walk, never run with the mower, be very careful when mowing uneven orrough ground.
2. Mow across slopes, never up and down.
3. Be careful when changing the direction of the mower on a slope.4.Do not mow excessively steep
slopes.
5. The best result will be achieved if the grass is dry. Wet grass will tend to clogthe blade and the
grass collection system.
6. Grass grows at different rates at different time of the year. Never use thelowest cutting height for
the first cut of the season or in drought conditions.
7. Only about one thirds of the grass height should be cut.
8. When mowing with mulching, to ensure that the cut grass can be scatteredefficiently, do not cut
high or wet grass. When you have been cutting forseveral minutes, please stop the mower, and
General cleaning
The lawn mower should be cleaned thoroughly every time after it has been used. Always clean your
lawnmower immediately after use. Do not allow grass cuttings and other debris to become dry and
hard on any of the mower surfaces. Dried grass remnants and dirt may impair the mowing opera-
tion. Check that the grass chute is free of any residual grass. Remove any such residue. Check the
underside of the lawn mower and the blade mount. for this purpose ,tilt the Lawn mower onto its left
side (opposite the oil filler neck)
NOTE: Before placing the lawn mower on its side , fully drain the fuel tank using a petrol extraction
pump. Do not tilt the lawn mower by more than 90 degrees.
Maintenance of the spark plug.
As shown in Fig 22
1. Once the engine has cooled, pull off the spark plugwith a twist.
2. Remove the spark plug using a spark plug wrench3.Clean the spark plug with a wire brush (not
supplied ).4.Using a feeler gauge set the gap to 0.75mm
5. Install the spark plug carefully by hand to avoid cross-threading.
6. After the spark plug is seated tighten with thespanner to compress the washer.
How to Service the Air Filter As shown in Fig 23Soiled air filters reduce the engine output by supply
too little air to the carburetor. if the air contains a lot of dust , the air filter should be checked more
frequently.
oil from a warm engine and refill with fresh oil4.Clean the cooling fins of the cylinder and the housing
5.Be sure to clean the entire machine to protect the paint.6.Store the machine in a well-ventilated
place.
Maintenance Schedule
Performing routine maintenance correctly on your lawnmower will ensure you
get years of trouble free use.
Please keep this manual safe for future reference.
It is recommended that the following maintenance schedule is adhered to. This will ensure the
lawn-mower operated correctly and is safe to use.
The Engine oil should be changed after the fist 8 hours.
Transport
Empty the petrol tank
Always let the engine run until it has used up the remainder of petrol in the tank. Empty the engine
oil from the warm engine.
Remove the spark plug boot from the spark plug. Clean the cooling fins of the cylinder and the
housing. Use the original packaging to ship whenever possible.
clean the blade and the deck.
9. Do not remove grass debris in the mower casing or on the blade by hand orwith your feet. Instead
use suitable tools such as a brush or broom.
Emptying the grass bag
As soon as grass clippings start to trail the lawn mower, it is time to empty the
grass bag.
NOTE: Before taking off the grass bag, switch off the engine and wait untilthe blade has come to a
1. To take off the grass bag, use one hand to lift up ejector flap and the other to grab onto the carry
handle. The ejector flap automatically falls down after removing the grass bag and closes off the
rear chute opening.
2. Empty the grass debris in the grass bag, and refit grass Bag.
NOTE: If any grass residue is caught in the discharge chute, clean it using a brush. Do not remove
grass debris in the mower casing or on the blade by hand or with your feet. Instead use suitable
tools such as a brush or broom. To ensure that the cut grass can be collected into grass Bag, the
discharge opening and inside the mower casing must be cleared of any blockage.
10. STORING AND MAINTENANCE
WARNING : Before performing any maintenance or cleaning work, switch Off the engine and wait
until the blade has come to a stop.
Cleaning
General cleaning
The lawn mower should be cleaned thoroughly every time after it has been used. Always clean your
lawnmower immediately after use. Do not allow grass cuttings and other debris to become dry and
hard on any of the mower surfaces. Dried grass remnants and dirt may impair the mowing opera-
tion. Check that the grass chute is free of any residual grass. Remove any such residue. Check the
underside of the lawn mower and the blade mount. for this purpose ,tilt the Lawn mower onto its left
side (opposite the oil filler neck)
NOTE: Before placing the lawn mower on its side , fully drain the fuel tank using a petrol extraction
pump. Do not tilt the lawn mower by more than 90 degrees.
Maintenance of the spark plug.
As shown in Fig 22
WARNING
!
1. Remove the air cleaner outside cover (A). Be carefulto prevent dirt and debris from falling into the
aircleaner assembly.
2. Separate the Air Filter (A) from the Air Filter Housing (B).
3.Inspect the air filter. Clean dirty air filter with warmwater and mild soap. Allow air filter to dry
thoroughly before re-installation4.Install the air filter assembly onto the carburetor and secure with
screw.
Note: Do not use pressurized air or solvents to clean the filter. Pressurized air can damage the filter
and solvents will dissolve the filter.
Changing the engine oil Tilt the lawnmower towards the oil filler, have a container ready to catch the
oil and remove the dipstick. Once the oil has been emptied, replace the dipstick and wipe clean any
spillages. Refill with 500ml SAE30 oil or equivalent, i. e. SAE 5W/30, SAE10W/30.
Refill with 500ml SAE30 oil or equivalent i. e SAE5W/30, SAE10W/30. When the dipstick is rested on
the filler pipe (i. e . not turn in pace ), the oil level must be between the min and max marks on the
dipstick.
See “Checking the engine oil level and filling with engine oil” Start the engine and allow it to run
briefly.
Stop the engine, wait one minute and check the oil level. Top up if necessary. Note! see more in
engine manual.
Replacing the blade
For safety reasons you should only ever have your blade sharpened, balanced and mounted by an
authorised service workshop. For optimum results it is recommended that the blade should be
inspected once a year.
WARNING! Before you remove the grass collection bag, stop the engine and wait until the blade
stops completely.
www.daewoopower.bg
30
BG
3.
Поддържайте
стабилен
захват
върху
горната
дръжка
със
старт/стоп
лоста
и
лоста
на
съдинителя
затворени
и
вървете
напред
с
включен
самоход,
за
да
започнете
косенето
.
Съвети
за
работа
1.
Вървете,
никога
не
тичайте
с
косачката
.
Бъдете
особено
внимателно,
когато
обработвате
неравна
или
твърда
земя
.
2.
Когато
косите
под
наклон
се
движете
напряко
на
склона,
никога
нагоре
или
надолу
.
3.
Внимавайте,
когато
сменяте
посоката
на
косачката
по
склон
.
Не
косете
прекомерно
стръмни
склонове
.
4.
Най-добри
резултати
се
постигат,
когато
тревата
е
суха
.
Мократа
трева
ще
задръства
ножовете
и
системата
за
събиране
на
тревата
.
5.
Тревата
расте
с
различни
темпове
през
различните
сезони
в
годината
.
Никога
не
използвайте
най-ниската
режеща
височина
за
първото
косене
от
сезона
или
при
суша
.
6.
Трябва
да
режете
само
около
1
/
3
от
височината
на
тревата
.
7.
Когато
мулчирате,
за
да
сте
сигурни,
за
да
е
ефикасно,
не
косете
висока
или
мокра
трева
.
Когато
сте
косили
за
няколко
минути,
спрете
косачката
и
почистете
ножа
и
предната
платформа
.
8.
Не
премахвайте
тревата,
останала
в
капака
на
косачката
или
по
ножа
с
голи
ръце
или
крака
.
Вместо
това
използвайте
подходящи
инструменти
като
четка
или
метла
.
Изпразване
на
колекторния
кош
за
трева
Когато
колектора
с
трева
започва
да
тежи
и
да
завлачва
косачката,
трябва
да
го
изпразните
.
ЗАБЕЛЕЖКА
Преди
да
свалите
колектора
за
трева,
изключете
двигателя
и
изчакайте
докато
ножа
спре
напълно
.
1.
Използвайте
едната
си
ръка,
за
да
повдигнете
капака
и
с
другата
да
придържате
носещата
дръжка
.
Изходната
клапа
автоматично
пада,
след
като
махнете
колекторната
торба
и
се
затваря
.
2.
Изпразнете
тревата
и
поставете
обратно
колектора
.
ЗАБЕЛЕЖКА
!
Ако
остане
трева
в
изходния
улей
и
го
задръсти,
почистете
с
четка
.
Не
почиствайте
заседнала
трева
по
косачката,
улеите
и
ножа
с
голи
ръце
или
крака
.
Използвайте
четки
или
метла
.
За
да
сте
сигурни,
че
окосената
трева
се
събира
в
колектора,
трябва
да
се
уверите,
че
всички
улеи
са
свободни
от
задръстване
.
10.
СЪХРАНЕНИЕ И ПОДДРЪЖКА
ВНИМАНИЕ
!
Преди
да
извършвате
каквито
и
да
е
операции
по
почистване
и
поддръжка,
изключете
двигателя
и
изчакайте
ножа
да
спре
напълно
да
се
движи
.
Почистване
Косачката
трябва
да
се
почиства
след
всяко
ползване
.
Не
позволявайте
на
остатъци
от
трева
и
други
отломки
да
засъхнат
върху
части
от
машината
.
Засъхнала
трева
и
наслагвания
могат
да
повлияят
върху
изпълнението
на
машината
.
Проверете
дали
улеят
за
трева
е
свободен
от
остатъчни
отпадъци
.
Премахнете
всякакви
остатъци
.
Проверете
дъното
на
ходовата
част
и
системата
на
ножа
.
За
тази
цел
наклонете
косачката
на
лявата
й
страна
/
обратната
на
тази
с
резервоара
за
масло/.
ЗАБЕЛЕЖКА
!
Преди
да
оставите
косачката
настрани,
изотчете
напълно
резервоара
с
гориво,
като
използвате
пом
-
па
за
източване
на
бензин.
Не
накланяйте
косачката
на
повече
от
90
градуса.
Поддръжка на запалителната свещ
Фиг
. 19
1.
Щом
се
охлади
двигателят,
издърпайте
чрез
въртене
кабела
на
запалителната
свещ
.
2.
Разкачете
я
с
ключ
за
свещи
.
3.
Почистете
с
телена
четка
/не
се
доставя
в
комплекта/.
4.
Измерете
с
луфтомер
дали
разстоянието
е
0,75mm.
5.
Инсталирайте
запалителната
свещ
внимателно
на
ръка,
за
да
избегнете
разминаване
с
резбата
.
6.
След
като
поставите
свещта
затегнете
с
ключ,
за
да
уплътните
.
фиг
.19
14
use suitable tools such as a brush or broom.
As soon as grass clippings start to trail the lawn mower, it is time to empty the
NOTE: Before taking off the grass bag, switch off the engine and wait untilthe blade has come to a
1. To take off the grass bag, use one hand to lift up ejector flap and the other to grab onto the carry
handle. The ejector flap automatically falls down after removing the grass bag and closes off the
2. Empty the grass debris in the grass bag, and refit grass Bag.
NOTE: If any grass residue is caught in the discharge chute, clean it using a brush. Do not remove
grass debris in the mower casing or on the blade by hand or with your feet. Instead use suitable
tools such as a brush or broom. To ensure that the cut grass can be collected into grass Bag, the
discharge opening and inside the mower casing must be cleared of any blockage.
STORING AND MAINTENANCE
WARNING : Before performing any maintenance or cleaning work, switch Off the engine and wait
o a stop.
The lawn mower should be cleaned thoroughly every time after it has been used. Always clean your
lawnmower immediately after use. Do not allow grass cuttings and other debris to become dry and
hard on any of the mower surfaces. Dried grass remnants and dirt may impair the mowing opera-
tion. Check that the grass chute is free of any residual grass. Remove any such residue. Check the
underside of the lawn mower and the blade mount. for this purpose ,tilt the Lawn mower onto its left
side (opposite the oil filler neck)
NOTE: Before placing the lawn mower on its side , fully drain the fuel tank using a petrol extraction
pump. Do not tilt the lawn mower by more than 90 degrees.
Maintenance of the spark plug.
1. Once the engine has cooled, pull off the spark plugwith a twist.
2. Remove the spark plug using a spark plug wrench3.Clean the spark plug with
a wire brush (not supplied ).4.Using a feeler gauge set the
gap to 0.75mm
5. Install the spark plug carefully by hand to avoid cross-threading.
s eated tighten with thespanner to c ompress the w asher.
How to Service the Air Filter As shown in Fig 23Soiled air filt
ers reduce the engine output by
supply too little air to the carburetor. if the air contains a
lot of dust , the air filter should be
Fig 22
NOTE: if the engine won't start after you have Operated the starter several times, the engine may be
flood with excess fuel. Use following procedure to clear and start a flooded engine.
NOTE: Install the spark plug carefully by hand, to avoid cross-threading.After the plug is seated
tighten 1/8 to 1/4 turn with socket spanner of sparkplug to compress the washer.
WARNING: Always observe the strictest safety procedures when using the lawnmower. Carefully
WARNING: Never open the ejector flap when the grass bag has been detached (to be emptied) and
2. Start the engine and allow it run, and set it to required speed. See “to start theengine”.
3. Keep a firm grip on the upper handle with engine stop/start lever and drivelever (clutch lever)
1. Walk, never run with the mower, be very careful when mowing uneven orrough ground.
3. Be careful when changing the direction of the mower on a slope.4.Do not mow excessively steep
5. The best result will be achieved if the grass is dry. Wet grass will tend to clogthe blade and the
6. Grass grows at different rates at different time of the year. Never use thelowest cutting height for
8. When mowing with mulching, to ensure that the cut grass can be scatteredefficiently, do not cut
high or wet grass. When you have been cutting forseveral minutes, please stop the mower, and
clean the blade and the deck.
9. Do not remove grass debris in the mower casing or on the blade by hand orwith your feet. Instead
use suitable tools such as a brush or broom.
Emptying the grass bag
As soon as grass clippings start to trail the lawn mower, it is time to empty the
grass bag.
NOTE: Before taking off the grass bag, switch off the engine and wait untilthe blade has come to a
stop.
1. To take off the grass bag, use one hand to lift up ejector flap and the other to grab onto the carry
handle. The ejector flap automatically falls down after removing the grass bag and closes off the
rear chute opening.
2. Empty the grass debris in the grass bag, and refit grass Bag.
NOTE: If any grass residue is caught in the discharge chute, clean it using a brush. Do not remove
grass debris in the mower casing or on the blade by hand or with your feet. Instead use suitable
tools such as a brush or broom. To ensure that the cut grass can be collected into grass Bag, the
discharge opening and inside the mower casing must be cleared of any blockage.
10. STORING AND MAINTENANCE
WARNING : Before performing any maintenance or cleaning work, switch Off the engine and wait
until the blade has come to a stop.
Cleaning
General cleaning
The lawn mower should be cleaned thoroughly every time after it has been used. Always clean your
lawnmower immediately after use. Do not allow grass cuttings and other debris to become dry and
hard on any of the mower surfaces. Dried grass remnants and dirt may impair the mowing opera-
tion. Check that the grass chute is free of any residual grass. Remove any such residue. Check the
underside of the lawn mower and the blade mount. for this purpose ,tilt the Lawn mower onto its left
side (opposite the oil filler neck)
NOTE: Before placing the lawn mower on its side , fully drain the fuel tank using a petrol extraction
pump. Do not tilt the lawn mower by more than 90 degrees.
Maintenance of the spark plug.
As shown in Fig 22
1. Once the engine has cooled, pull off the spark plugwith a twist.
2. Remove the spark plug using a spark plug wrench3.Clean the spark plug with a wire brush (not
supplied ).4.Using a feeler gauge set the gap to 0.75mm
5. Install the spark plug carefully by hand to avoid cross-threading.
6. After the spark plug is seated tighten with thespanner to compress the washer.
How to Service the Air Filter As shown in Fig 23Soiled air filters reduce the engine output by supply
too little air to the carburetor. if the air contains a lot of dust , the air filter should be checked more
frequently.
oil from a warm engine and refill with fresh oil4.Clean the cooling fins of the cylinder and the housing
Summary of Contents for DLM4600SPL
Page 19: ...www daewoopower bg 19 BG 1 20 2 21 3 22 4 22 5 22 6 23 7 25 8 27 9 28 10 30 11 33 12 34 13 41...
Page 40: ...www daewoopower bg 40 BG 10 6 M5x30 10 6 M5x30...
Page 43: ...www daewoopower bg 43 BG 24 6 6 12 6...
Page 44: ...www daewoopower bg 44 BG 1 1 2022 6 6...
Page 45: ...www daewoopower bg 45 BG...
Page 46: ...www daewoopower bg 1784 1 51 359 2 81 77 600 359 2 81 77 601...


