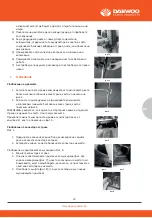
Wipe away any spilt oil.)
4. Align the ribs of the cap with the groove of the filler neck. then rotate
1/4 turn to secure it.
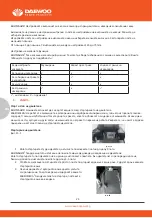
Filling with engine fuel As shown in Fig 15
CAUTION! Always use clean, fresh unleaded petrol. Purchase fuel in quantities that can be used
within 30 days. Never mix oil with petrol.
CAUTION! Do not fill into the base of neck to allow for fuel expansion. Do not overfill the fuel tank.
CAUTION! WARNING! Petrol is highly flammable and extreme precaution must be taken when
handling or working with it. Keep out of reach of children.
CAUTION! To prevent engine damage the engine is shipped without oil or petrol. The engine must be
filled with the correct grade of oil and petrol before starting the engine.
WARNING! Refuel in a well-ventilated area with the engine stopped. Do not smoke or allow flame or
sparks in the area where the engine is refueled or where petrol is stored. Avoid repeated or prolon-
ged contact with skin or inhalation of vapour.
1. Clean the area around the petrol filler capbefore removing the cap. Remove thewarning tag, check
the fuel level.
2. Refill the tank if the fuel level is low.3.Refuel carefully to avoid overfilling or
spilling fuel. There should be no fuel in thefiller neck.
4. Clean up any overflow or splashes of petrolbefore starting the engine.
5. Tighten the filler cap after filling, fingertight on.
8. ADJUSTMENT
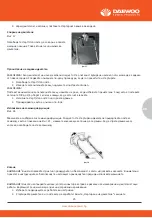
Setting the cutting height As shown in Fig 17
CAUTION! Adjust the cutting height only when the engine is switch off the spark plug Boot has been
pulled.
The cutting height is centrally adjusted with Cutting height adjusting handle. Different cutting
Heights can be selected.
Pull the adjusting handle out and select the desired cutting height. The handle snaps onto the
desired position.
From position 1 to position 7. The cutting height range from 25mm to 75 mm.
Setting required function
NOTE: This lawn mower has four functions. These functions can be converted by changing acces-
sory setting. Please see the following chart for detail setting.
Wipe away any spilt oil.)
4. Align the ribs of the cap with the groove of the filler neck. then rotate
1/4 turn to secure it.
Filling with engine fuel As shown in Fig 15
CAUTION! Always use clean, fresh unleaded petrol. Purchase fuel in quantities that can be used
within 30 days. Never mix oil with petrol.
CAUTION! Do not fill into the base of neck to allow for fuel expansion. Do not overfill the fuel tank.
CAUTION! WARNING! Petrol is highly flammable and extreme precaution must be taken when
handling or working with it. Keep out of reach of children.
CAUTION! To prevent engine damage the engine is shipped without oil or petrol. The engine must be
filled with the correct grade of oil and petrol before starting the engine.
WARNING! Refuel in a well-ventilated area with the engine stopped. Do not smoke or allow flame or
sparks in the area where the engine is refueled or where petrol is stored. Avoid repeated or prolon-
ged contact with skin or inhalation of vapour.
1. Clean the area around the petrol filler capbefore removing the cap. Remove thewarning tag, check
the fuel level.
2. Refill the tank if the fuel level is low.3.Refuel carefully to avoid overfilling or
spilling fuel. There should be no fuel in thefiller neck.
4. Clean up any overflow or splashes of petrolbefore starting the engine.
5. Tighten the filler cap after filling, fingertight on.
See “Checking the engine oil level and filling with engine oil” Start the engine and allow it to run
Stop the engine, wait one minute and check the oil level. Top up if necessary. Note! see more in
engine manual.
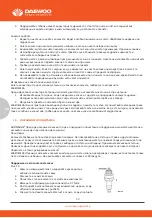
Replacing the blade
For safety reasons you should only ever have your blade sharpened, balanced and mounted by an
authorised service workshop. For optimum results it is recommended that the blade should be
inspected once a year.
WARNING! Before you remove the grass collection bag, stop the engine and wait until the blade
stops completely.
WARNING! You will need garden gloves (not provided) and a spanner wrench(not provided) to
remove the blade.
NOTE! Don't invert the mower. Tip it slightly towards the oil filler pipe and reach under the deck.
WARNING! Always handle the blade with care, sharp edges could cause injury USE GLOVES. Renew
your metal blade after 50Hrs mowing or 2yrs whichever is sooner regardless of condition.
1. Remove the air cleaner outside cover (A). Be carefulto prevent dirt and debris from falling into the
3.Inspect the air filter. Clean dirty air filter with warmwater and mild soap. Allow air filter to dry
thoroughly before re-installation4.Install the air filter assembly onto the carburetor and secure with
Note: Do not use pressurized air or solvents to clean the filter. Pressurized air can damage the filter
Changing the engine oil Tilt the lawnmower towards the oil filler, have a container ready to catch the
oil and remove the dipstick. Once the oil has been emptied, replace the dipstick and wipe clean any
Refill with 500ml SAE30 oil or equivalent i. e SAE5W/30, SAE10W/30. When the dipstick is rested on
the filler pipe (i. e . not turn in pace ), the oil level must be between the min and max marks on the
See “Checking the engine oil level and filling with engine oil” Start the engine and allow it to run
Stop the engine, wait one minute and check the oil level. Top up if necessary. Note! see more in
For safety reasons you should only ever have your blade sharpened, balanced and mounted by an
authorised service workshop. For optimum results it is recommended that the blade should be
WARNING! Before you remove the grass collection bag, stop the engine and wait until the blade
WARNING! You will need garden gloves (not provided) and a spanner wrench(not provided) to
NOTE! Don't invert the mower. Tip it slightly towards the oil filler pipe and reach under the deck.
WARNING! Always handle the blade with care, sharp edges could cause injury USE GLOVES. Renew
your metal blade after 50Hrs mowing or 2yrs whichever is sooner regardless of condition.
www.daewoopower.bg
32
BG
ЗАБЕЛЕЖКА
!
Поддържайте
ножа
наточен,
когато
косите
.
Ако
ножът
се
износи
и
стане
затъпен
и
захабен,
трябва
да
бъде
подменен
или
наточен
.
От
това
колко
добре
е
наточен
ножа
зависи
добрата
работа
на
косачката
.
За
ваша
безопасност
препоръчваме
подмяната
и
заточването
на
ножа
да
се
извършва
от
квалифицирано
лице
или
оторозиран
сервиз
.
Хванете
ножа
и
развийте
болта
по
посока,
обратна
на
часовниковата
стрелка
като
използвате
гаечен
ключ
.
Свалете
гайката
и
ножа
.
Поставете
нов
нож
или
заточете
сваления
.
Поставете
ножа
обратно
на
мястото
му
и
завийте
отново
гайката
с
ножа
.
Уверете
се,
че
ножът
е
коректно
поставен
и
тогава
здраво
притегнете
болта
.
Не
пренатягайте
.
Горната
част
на
ножа
трябва
да
се
постави
в
отделението
на
двигателя
.
Съхраняване на косачката за кратки периоди
Косачката
може
да
се
съхранява
за
кратки
периоди
от
време
(по-малко
от
15
дни)
без
специални
процедури
по
поддръжка
.
Преди
да
я
оставите
за
съхранение,
винаги
проверявайте
следното
:
-
Позволете
на
двигателя
да
се
охлади
-
Уверете
се,
че
колектроната
торба
е
празна
-
Почистете
всички
наслагвания
от
платформата
на
косачката
-
Съхранявайте
на
равна
и
стабилна
повърхност
.
-
Съхранявайте
на
място,
недостъпно
за
деца
или
хора,
които
не
са
запознати
с
устройството
и
управлението
на
косачката
.
Съхраняване на косачката за дълги периоди
Ако
ще
съхранявате
косачката
за
периоди,
по-дълги
от
15
дни,
трябва
да
предприемете
няколко
действия
по
подготовка
.
Ако
не
приложите
следващите
стъпки,
при
последваща
употреба
на
косачката
може
да
не
стратира
правилно
или
да
не
бъде
в
изправност
.
ВНИМАНИЕ
!
Не
източвайте
резервоара
за
бензин
в
затворено
помещение,
близо
до
открити
пламъци
или
искри
.
Бензинът
и
изпаренията
му
са
силно
запалими
и
може
да
възникне
пожар
или
експлозия
.
1.
Изпразнете
резервоара
за
гориво
с
помпа
за
източване
на
бензин
.
2.
Стартирайте
двигателя
и
го
оставете
да
работи,
докато
всички
остатъци
от
бензин
бъдат
изразходвани
.
3.
Сменяйте
маслото
в
края
на
всеки
сезон
.
За
да
го
направите,
първо
източете
останалото
моторно
масло
от
топлия
двигател
и
напълнете
с
ново
.
4.
Почистете
охлаждащите
отвори
на
цилиндъра
и
по
капака
.
5.
Уверете
се,
че
сте
почистили
машината,
за
да
защитите
капака
й
.
6.
Съхраявайте
на
сухо
място,
добре
проветрено
.
Таблица по поддръжката
Извършвайки
рутинни
процедури
по
поддържка
правилно,
можете
да
удължите
живота
на
машината
си
и
да
гарантирате
добрата
й
работа
.
32
WARNING! If the blade is cracked or damaged replace it with a new one
WARNING! Don't hold the blade by hand directly.
NOTE! Maintain the sharpness of the blade when cutting grass. If the blade has worn excessively
and become pitted and blunt, it should be replaced or sharpened. The sharpness of the blade will
affect the performance of the lawnmower.
For safety reasons we recommend that the blade only be changed by someone qualified and autho-
rized to do so.
Hold the blade and unscrew the blade bolt counterclockwise using a spanner wrench. Remove the
washer and the blade.
Fit a new blade or re-sharpen the blade, locate the blade on the two studs on the blade flan and
then replace the washer and bolts. Make sure the blade is correctly located, and then firmly tighten
the bolt. Do not over tighten. The up turn of the blade must project into the motor compartment.
Storing the Lawnmower for Short Periods
The lawnmower can be stored for short periods of time (less than 15 days) without performing any
storage maintenance. Before placing the lawnmower into storage always carry out the following:
1.Allow the engine to fully cool.2.Ensure the grass bag is empty.
3. Clean all debris from under the mower deck.
4. Store the lawnmower on flat and level surface with the mower upright.
5. Store in a safe place which is not accessible by children or people who are notfamiliar with opera-
tion.
Storing the Lawnmower for Extended Periods
If the lawnmower is to be place into storage for more than 15 days, storage maintenance must be
performed on the lawnmower. If the following steps are not carried out, when you next operate the
lawnmower it may not start correctly and may need to be serviced.
CAUTION! Do not empty the petrol tank in enclosed areas, near fire or when smoking. Petrol fumes
can cause explosions and fire
1. Empty the petrol tank with a petrol suction pump if available.
2. Start the engine and let it run until any remaining petrol has been used up.3.Change the oil at the
end of every season. To do so, remove the used engine
Fig
24
фиг
.21
Summary of Contents for DLM4600SPL
Page 19: ...www daewoopower bg 19 BG 1 20 2 21 3 22 4 22 5 22 6 23 7 25 8 27 9 28 10 30 11 33 12 34 13 41...
Page 40: ...www daewoopower bg 40 BG 10 6 M5x30 10 6 M5x30...
Page 43: ...www daewoopower bg 43 BG 24 6 6 12 6...
Page 44: ...www daewoopower bg 44 BG 1 1 2022 6 6...
Page 45: ...www daewoopower bg 45 BG...
Page 46: ...www daewoopower bg 1784 1 51 359 2 81 77 600 359 2 81 77 601...


