6.For wheeled rotary machines, mow across the face of slopes, never up anddown;
EN
www.daewoopower.bg
4
EN
www.daewoopower.bg
4
EN
20
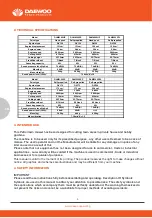
2. TECHNICAL SPECIFICATIONS
3. INTENDED USE
This Petrol lawn mower has been designed for cutting lawn areas in private house and hobby
gardens.
The machine is to be used only for its prescribed purpose . any other use is Deemed to be a case of
misuse. The user/operator and not the Manufacturer will be liable for any damage or injuries of any
kind caused as a result of this
Please note that our equipment has not been designed for use in commercial , trade or industrial
applications . our warranty will be voided if the machine is used in commercial , trade or industrial
businesses or for equivalent purposes.
4. SAFETY INFORMATION
IMPORTANT
Please read these instructions fully before assembling and operating. Description Of Symbols
Symbols are used in this manual to attract your attention to possible risks. The safety symbols and
the explications which accompany them must be perfectly understood. The warning themselves do
not prevent the risks and cannot be a substitute for proper methods of avoiding accidents.
Model
DLM4300HP
DLM4300SP
DLM4600HP
DLM4600SP
Drive type
Hand push
Self-propelled
Hand push
Self-propelled
Egnine type
DV98
DV98
DVO140
DVO140
Engine displacement
98cm³
98cm³
141 cm³
141 cm³
Engine power
1.3kw
1.3kw
2.5kw
2.5kw
Engine speed
3000rpm
3000rpm
2800rpm
2800rpm
Cutting width
410mm
410mm
460mm
460mm
Cutting height
25-75mm
25-75mm
25-75mm
25-75mm
Front/Rear wheel:
7/8inch
7/8inch
7/8inch
7/8inch
Grass bag capacity
45L
45L
55L
55L
Sound pressure level(LpAm)
72 dB(A)
72 dB(A)
74 dB(A)
74 dB(A)
Sound power level (LWA)*
94dB
94dB
96dB
96dB
Mass(kg)
23kg
29.5kg
30.5kg
34kg
Mass vibration
Model
DLM5100SP
DLM5300SP
DLM5300SPL
Drive type
Self-propelled
Self-propelled
Self-propelled
Egnine type
DV173
DV173
DV196
Engine displacement
173 cm³
173 cm³
196 cm³
Engine power
3.3kW
3.3kW
3.8kW
Engine speed
2800rpm
2800rpm
2800rpm
Cutting width
508mm
530mm
530mm
Cutting height
25-75mm
25-75mm
25-75mm
Front/Rear wheel:
8/10inch
8/10inch
8/10inch
Grass bag capacity
65L
65L
65L
Sound pressure level(LpAm)
76 dB(A)
76 dB(A)
76 dB(A)
Sound power level (LWA)*
98dB
98dB
98dB
Mass(kg)
38.5kg
44kg
45.5kg
Mass vibration
7.38m/s²,K=1.5
7.38m/s²,K=1.5
This manual is valid to the moment of its printing. The producer reserves the right to make changes without
notice. All graphics and schemes are illustrative and may be different from your machine.
Model
DLM4300HP DLM4300SP DLM4600HP
Drive type
Hand push Self-propelled Hand push Self-propelled
Egnine type
DV 130
DV130
DV150
DV150
Engine displacement
131 cm³
131cm³
150 cm³
150 cm³
Engine power
2.4 kw
2.4kw
2.6kw
2.6kw
Engine speed
28 00rpm
2800rpm
2800rpm
2800rpm
Cutting width
410mm
410mm
460mm
460mm
Cutting height
25-75mm 25-75mm 25-75mm
25-75mm
Front/Rear wheel:
7/8inch
7/8inch
7/8inch
7/8inch
Grass bag capacity
45L
45L
55L
55L
Sound pressure level(LpAm)
72 dB(A) 72 dB(A)
74 dB(A)
74 dB(A)
Sound power level (LWA)*
96dB
96dB
96dB
96dB
Mass(kg)
24kg
28.5kg
30.5kg
34kg
Mass vibration
Model
DLM5100SP
DLM5300SP
DLM5300SPL
Drive type
Self-propelled
Self-propelled
Self-propelled
Egnine type
DV170
DV173
DV224
Engine displacement
173 cm³
173 cm³
224 cm³
Engine power
3.0kW
3.3kW
4.4kW
Engine speed
2800rpm
2800rpm
2800rpm
Cutting width
510mm
530mm
530mm
Cutting height
25-75mm
25-75mm
25-75mm
Front/Rear wheel:
8/10inch
8/10inch
8/10inch
Grass bag capacity
65L
65L
65L
Sound pressure level(LpAm)
76 dB(A)
76 dB(A)
76 dB(A)
Sound power level (LWA)*
98dB
98dB
98dB
Mass(kg)
38.5kg
44kg
45.5kg
Mass vibration
7.38m/s²,K=1.5
7.38m/s²,K=1.5
DLM4600SPL
2. TECHNICAL SPECIFICATIONS
3. INTENDED USE
This Petrol lawn mower has been designed for cutting lawn areas in private house and hobby
gardens.
The machine is to be used only for its prescribed purpose . any other use is Deemed to be a case of
misuse. The user/operator and not the Manufacturer will be liable for any damage or injuries of any
kind caused as a result of this
Please note that our equipment has not been designed for use in commercial , trade or industrial
applications . our warranty will be voided if the machine is used in commercial , trade or industrial
businesses or for equivalent purposes.
4. SAFETY INFORMATION
IMPORTANT
Please read these instructions fully before assembling and operating. Description Of Symbols
Symbols are used in this manual to attract your attention to possible risks. The safety symbols and
the explications which accompany them must be perfectly understood. The warning themselves do
not prevent the risks and cannot be a substitute for proper methods of avoiding accidents.
Operation
1.Do not operate the engine in a confined space where dangerous carbonmonoxide fumes can
collect;
2.Mow only in daylight or in good artificial light;
3.Avoid operating the equipment in wet grass, where feasible;
4.Always be sure of your footing on slopes;
5.Walk, never run;
Wipe away any spilt oil.)
4. Align the ribs of the cap with the groove of the filler neck. then rotate
1/4 turn to secure it.
Filling with engine fuel As shown in Fig 15
CAUTION! Always use clean, fresh unleaded petrol. Purchase fuel in quantities that can be used
within 30 days. Never mix oil with petrol.
CAUTION! Do not fill into the base of neck to allow for fuel expansion. Do not overfill the fuel tank.
CAUTION! WARNING! Petrol is highly flammable and extreme precaution must be taken when
handling or working with it. Keep out of reach of children.
CAUTION! To prevent engine damage the engine is shipped without oil or petrol. The engine must be
filled with the correct grade of oil and petrol before starting the engine.
WARNING! Refuel in a well-ventilated area with the engine stopped. Do not smoke or allow flame or
sparks in the area where the engine is refueled or where petrol is stored. Avoid repeated or prolon-
ged contact with skin or inhalation of vapour.
1. Clean the area around the petrol filler capbefore removing the cap. Remove thewarning tag, check
the fuel level.
2. Refill the tank if the fuel level is low.3.Refuel carefully to avoid overfilling or
spilling fuel. There should be no fuel in thefiller neck.
4. Clean up any overflow or splashes of petrolbefore starting the engine.
5. Tighten the filler cap after filling, fingertight on.
-If petrol is spilled, do not attempt to start the engine but move the machineaway from the area of
spillage and avoid creating any source of ignition untilpetrol vapour have dissipated;
-Replace all fuel tank and container caps securely;4.Replace faulty silencers;
5. Before using, always visually inspect to see that the blades, blade bolts andcutter assembly are
not worn or damaged. Replace worn or damaged bladesand bolts in sets to preserve balance;
6. On multi-bladed machines, take care as rotating one blade can cause otherblades to rotate.
Operation
1.Do not operate the engine in a confined space where dangerous carbonmonoxide fumes can
collect;
2.Mow only in daylight or in good artificial light;
3.Avoid operating the equipment in wet grass, where feasible;
4.Always be sure of your footing on slopes;
5.Walk, never run;
CAUTION! Always use high quality detergent oil classified SAE30 oil (or equivalent e. g SAE 10W/30,
often termed as 4 Stroke lawn mower oil. Never use additives with recommended oil. To prolong the
Wipe away any spilt oil.)
4. Align the ribs of the cap with the groove of the filler neck. then rotate
1/4 turn to secure it.
Filling with engine fuel As shown in Fig 15
CAUTION! Always use clean, fresh unleaded petrol. Purchase fuel in quantities that can be used
within 30 days. Never mix oil with petrol.
CAUTION! Do not fill into the base of neck to allow for fuel expansion. Do not overfill the fuel tank.
CAUTION! WARNING! Petrol is highly flammable and extreme precaution must be taken when
handling or working with it. Keep out of reach of children.
CAUTION! To prevent engine damage the engine is shipped without oil or petrol. The engine must be
filled with the correct grade of oil and petrol before starting the engine.
WARNING! Refuel in a well-ventilated area with the engine stopped. Do not smoke or allow flame or
sparks in the area where the engine is refueled or where petrol is stored. Avoid repeated or prolon-
ged contact with skin or inhalation of vapour.
1. Clean the area around the petrol filler capbefore removing the cap. Remove thewarning tag, check
the fuel level.
2. Refill the tank if the fuel level is low.3.Refuel carefully to avoid overfilling or
spilling fuel. There should be no fuel in thefiller neck.
4. Clean up any overflow or splashes of petrolbefore starting the engine.
5. Tighten the filler cap after filling, fingertight on.
while the engine is running.
CAUTION! To prevent engine damage the engine is
shipped without oil or petrol. The engine must be filled
with the correct grade of oil and petrol before
starting the engine.
NOTE! Running the engine with a low oil level will cause engine damage. It is recommend that high
detergent, premium quality 4-stroke engine oil used.
CAUTION! Always use high quality detergent oil classified SAE30 oil (or equivalent e. g SAE 10W/30,
often termed as 4 Stroke lawn mower oil. Never use additives with recommended oil. To prolong the
life of your engine it is important that the oil is changed after the first 20 hours of use.
NOTE: To check the engine oil level, stop engine and place the mower on a level surface.
1.Remove the oil filler dipstick and wipe
oil from it with a clean cloth.
2. Insert the dipstick into the oil filler neck,3. Then remove the dipstick and check the oillevel. the oil
level must be between theMin and Max marks on the dipstick. If nearthe lower level, fill to upper
lever with the recommended oil((or equivalent t e. g SAE 10W/30). Do not overfill.
spilling fuel. There should be no fuel in thefiller neck.
4. Clean up any overflow or splashes of petrolbefore starting the engine.
5. Tighten the filler cap after filling, fingertight on.
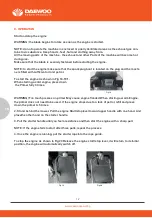
To clean a flooded engine
NOTE: if the engine won't start after you have Operated the starter several times, the engine may be
flood with excess fuel. Use following procedure to clear and start a flooded engine.
1.Release the engine start/stop lever to stopengine.
2.Remove the spark plug, dry it, and thenreinstall it.
NOTE: Install the spark plug carefully by hand, to avoid cross-threading.After the plug is seated
tighten 1/8 to 1/4 turn with socket spanner of sparkplug to compress the washer.
1.Pull the engine start/stop lever toward upper handle.
2.Operate the starter as described above
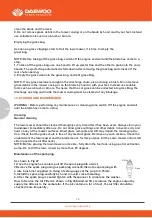
Using the Self-propelled function As shown in Fig 21
This unit equipped with self-propelled system.
If you press the drive lever(clutch lever), the clutch
for the drive will be closed and the lawnmower will
start to move with the engine running .
To stop the moving lawnmower, just simply release
the drive lever in good time.
Mowing
WARNING: Always observe the strictest safety procedures when using the lawnmower. Carefully
read the safety instructions of this manual before using the lawnmower.
clean the blade and the deck.
9. Do not remove grass debris in the mower casing or on the blade by hand orwith your feet. Instead
use suitable tools such as a brush or broom.
Emptying the grass bag
As soon as grass clippings start to trail the lawn mower, it is time to empty the
grass bag.
NOTE: Before taking off the grass bag, switch off the engine and wait untilthe blade has come to a
stop.
1. To take off the grass bag, use one hand to lift up ejector flap and the other to grab onto the carry
handle. The ejector flap automatically falls down after removing the grass bag and closes off the
rear chute opening.
2. Empty the grass debris in the grass bag, and refit grass Bag.
NOTE: If any grass residue is caught in the discharge chute, clean it using a brush. Do not remove
grass debris in the mower casing or on the blade by hand or with your feet. Instead use suitable
tools such as a brush or broom. To ensure that the cut grass can be collected into grass Bag, the
discharge opening and inside the mower casing must be cleared of any blockage.
10. STORING AND MAINTENANCE
WARNING : Before performing any maintenance or cleaning work, switch Off the engine and wait
until the blade has come to a stop.
Cleaning
6. On multi-bladed machines, take care as rotating one blade can cause otherblades to rotate.
Operation
1.Do not operate the engine in a confined space where dangerous carbonmonoxide fumes can
collect;
2.Mow only in daylight or in good artificial light;
3.Avoid operating the equipment in wet grass, where feasible;
4.Always be sure of your footing on slopes;
5.Walk, never run;
flame or spark;
3. Allow the engine to cool before storing in any enclosure;
4. To reduce the fire hazard, keep the engine, silencer, battery compartment andpetrol storage area
free of grass, leaves, or excessive grease;
5. Check the grass catcher frequently for wear or deterioration;6.Replace worn or damaged parts
for safety;
7. If the fuel tank has to be drained, this should be done outdoors.
Wipe away any spilt oil.)
4. Align the ribs of the cap with the groove of the filler neck. then rotate
1/4 turn to secure it.
Filling with engine fuel As shown in Fig 15
CAUTION! Always use clean, fresh unleaded petrol. Purchase fuel in quantities that can be used
within 30 days. Never mix oil with petrol.
CAUTION! Do not fill into the base of neck to allow for fuel expansion. Do not overfill the fuel tank.
CAUTION! WARNING! Petrol is highly flammable and extreme precaution must be taken when
handling or working with it. Keep out of reach of children.
CAUTION! To prevent engine damage the engine is shipped without oil or petrol. The engine must be
filled with the correct grade of oil and petrol before starting the engine.
WARNING! Refuel in a well-ventilated area with the engine stopped. Do not smoke or allow flame or
sparks in the area where the engine is refueled or where petrol is stored. Avoid repeated or prolon-
ged contact with skin or inhalation of vapour.
1. Clean the area around the petrol filler capbefore removing the cap. Remove thewarning tag, check
the fuel level.
2. Refill the tank if the fuel level is low.3.Refuel carefully to avoid overfilling or
spilling fuel. There should be no fuel in thefiller neck.
4. Clean up any overflow or splashes of petrolbefore starting the engine.
5. Tighten the filler cap after filling, fingertight on.
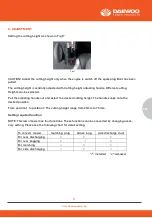
8. ADJUSTMENT
Setting the cutting height As shown in Fig 17
CAUTION! Adjust the cutting height only when the engine is switch off the spark plug Boot has been
pulled.
The cutting height is centrally adjusted with Cutting height adjusting handle. Different cutting
Heights can be selected.
Pull the adjusting handle out and select the desired cutting height. The handle snaps onto the
desired position.
From position 1 to position 7. The cutting height range from 25mm to 75 mm.
Setting required function
NOTE: This lawn mower has four functions. These functions can be converted by changing acces-
sory setting. Please see the following chart for detail setting.
WARNING! Refuel in a well-ventilated area with the engine stopped. Do not smoke or allow flame or
sparks in the area where the engine is refueled or where petrol is stored. Avoid repeated or prolon-
ged contact with skin or inhalation of vapour.
1. Clean the area around the petrol filler capbefore removing the cap. Remove thewarning tag, check
2. Refill the tank if the fuel level is low.3.Refuel carefully to avoid overfilling or
spilling fuel. There should be no fuel in thefiller neck.
4. Clean up any overflow or splashes of petrolbefore starting the engine.
5. Tighten the filler cap after filling, fingertight on.
clean the blade and the deck.
9. Do not remove grass debris in the mower casing or on the blade by hand orwith your feet. Instead
Operation
1.Do not operate the engine in a confined space where dangerous carbonmonoxide fumes can
collect;
2.Mow only in daylight or in good artificial light;
3.Avoid operating the equipment in wet grass, where feasible;
4.Always be sure of your footing on slopes;
5.Walk, never run;
NOTE! Running the engine with a low oil level will cause engine damage. It is recommend that high
CAUTION! Always use high quality detergent oil classified SAE30 oil (or equivalent e. g SAE 10W/30,
often termed as 4 Stroke lawn mower oil. Never use additives with recommended oil. To prolong the
life of your engine it is important that the oil is changed after the first 20 hours of use.
NOTE: To check the engine oil level, stop engine and place the mower on a level surface.
2. Insert the dipstick into the oil filler neck,3. Then remove the dipstick and check the oillevel. the oil
level must be between theMin and Max marks on the dipstick. If nearthe lower level, fill to upper
lever with the recommended oil((or equivalent t e. g SAE 10W/30). Do not overfill.
Wipe away any spilt oil.)
4. Align the ribs of the cap with the groove of the filler neck. then rotate
1/4 turn to secure it.
Filling with engine fuel As shown in Fig 15
CAUTION! Always use clean, fresh unleaded petrol. Purchase fuel in quantities that can be used
within 30 days. Never mix oil with petrol.
CAUTION! Do not fill into the base of neck to allow for fuel expansion. Do not overfill the fuel tank.
CAUTION! WARNING! Petrol is highly flammable and extreme precaution must be taken when
handling or working with it. Keep out of reach of children.
CAUTION! To prevent engine damage the engine is shipped without oil or petrol. The engine must be
filled with the correct grade of oil and petrol before starting the engine.
WARNING! Refuel in a well-ventilated area with the engine stopped. Do not smoke or allow flame or
sparks in the area where the engine is refueled or where petrol is stored. Avoid repeated or prolon-
ged contact with skin or inhalation of vapour.
1. Clean the area around the petrol filler capbefore removing the cap. Remove thewarning tag, check
the fuel level.
2. Refill the tank if the fuel level is low.3.Refuel carefully to avoid overfilling or
spilling fuel. There should be no fuel in thefiller neck.
4. Clean up any overflow or splashes of petrolbefore starting the engine.
5. Tighten the filler cap after filling, fingertight on.
Summary of Contents for DLM4600SPL
Page 19: ...www daewoopower bg 19 BG 1 20 2 21 3 22 4 22 5 22 6 23 7 25 8 27 9 28 10 30 11 33 12 34 13 41...
Page 40: ...www daewoopower bg 40 BG 10 6 M5x30 10 6 M5x30...
Page 43: ...www daewoopower bg 43 BG 24 6 6 12 6...
Page 44: ...www daewoopower bg 44 BG 1 1 2022 6 6...
Page 45: ...www daewoopower bg 45 BG...
Page 46: ...www daewoopower bg 1784 1 51 359 2 81 77 600 359 2 81 77 601...

