background image

PLAYBACK

37

Other Disc Playback

5

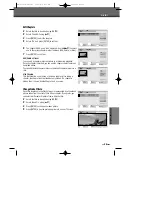
Press [NEXT] or [PREV] to manually skip to the next or previous image.

6

Press [

] (or [

œ

]) to rotate the image (counter) clockwise.

7

Press [STOP] to exit the slideshow.

• When a CD contains both MP3 files and JPEG files, the default Play mode is JPEG image files.
• The DVD Recorder can playback up to 1000 files per disc.
• MP3 files encoded below 64kbps are not supported.

You can enjoy a slide show while listening to MP3 music files. 

1

Prepare a CD which includes both MP3 and JPEG files.

2

Insert the CD and play an MP3 file. 

3

Press [TITLE] while playing the MP3 file to change the Play mode. The music playback will not stop.

4

Select an image file and press [ENTER] to start the slide show.

5

The MP3 file you selected continues to play during the JPEG slide show.

Playing MP3 Files During a Slide Show

DW-Q73D2P-SA(GB)  2005.9.2 9:30 AM  ˘

` 37   mac001  1200DPI 90LPI

Summary of Contents for DR-2100P

Page 1: ...ecorder DVD Recorder DR 2100P Instruction Manual HELP LINE 0870 100 2525 With queries please quote the page number reference number and model number DW Q73D2P SA GB 2005 9 2 9 30 AM A mac001 1200DPI 9...

Page 2: ...mperature Make sure the DVD Recorder is placed at least 10 cm apart from other home appliances or obstacles to ensure sufficient ventilation The apparatus should not be exposed to dripping or splashin...

Page 3: ...DUCT CAUTION TO REDUCE THE RISK OF ELECTRIC SHOCK DO NOT REMOVE COVER OR BACK NO USER SERVICEABLE PARTS INSIDE REFER SERVICING TO QUALIFIED SERVICE PERSONNEL The lightning flash with arrowhead symbol...

Page 4: ...rom overheating These openings must not be blocked or covered These openings must not be blocked by placing the unit on a bed sofa rug or other similar surface This unit should never be placed near or...

Page 5: ...n safe operating condition 22 WALL OR CEILING MOUNTING The product should be mounted to a wall or ceiling only as recommended by the manufacturer 23 HEAT The product should be situated away from heat...

Page 6: ...rmation 28 Restore Defaults 28 On Screen Display Overview __________________29 SETUP DVD Playback _________________________________32 Other Disc Playback __________________________36 PLAYBACK Basic Re...

Page 7: ...eleted recordings titles are marked deleted title Before a DVD R can be played in a DVD player it must be finalized in the DVD Recorder Once this process is complete no further recordings can be added...

Page 8: ...is assigned a number enabling you to easily locate the track you want Which discs you can use The following discs can be used in your DVD Recorder Playback and recording DVD RW Digital Versatile Disc...

Page 9: ...a recording recording will pause or stop automatically and an error message will be displayed on screen Video that is copy once only can only be recorded using DVD RW discs with CPRM Copyright Notice...

Page 10: ...re the polarities and are aligned correctly A A A A A A Caution Do not mix old and new batteries Never mix different types of batteries standard alkaline etc Handling Discs Do not touch the playback s...

Page 11: ...OSE Opens or closes the disc tray REC Starts recording Press repeatedly to set the recording time PLAY PAUSE Starts playback of a disc Pauses playback or recording temporarily STOP Stops playback PREV...

Page 12: ...1 1 1 5 Indicates a DVD Timer recording is set 1 1 1 5 Indicates a DVD Timer Recording is in standby mode 1 1 1 5 Indicates the DVD is recording Indicates the dts title is playing RECP Recording Pause...

Page 13: ...der on and off Lock Unlock the front panel by pressing and holding it over 5 seconds Opens and closes the disc tray in DVD mode Switches the DVD Recorder input to Tuner AV1 AV2 or AVF Press and hold f...

Page 14: ...next or previous chapter track Progressive Scan Mode If your TV supports Progressive Scan you can view high quality video by setting the DVD Recorder to Progressive Scan mode If your TV does not suppo...

Page 15: ...er equipment with audio inputs COMPONENT PROGRESSIVE VIDEO OUT Y Pb Pr Connect to a TV with Component Video Y Pb Pr inputs COAXIAL Digital Audio Out Connect to an amplifier with a coaxial digital audi...

Page 16: ...ction you use will work with all input sources Please refer to the manuals for your TV VCR stereo system or other devices as necessary to make the best connections For better sound reproduction connec...

Page 17: ...DVD Recorder and the corresponding scart socket at the back of a satellite decoder or set top box S Video Connection 1 Connect the S VIDEO OUT jack on the DVD Recorder to the S Video in jack on your T...

Page 18: ...more of the audio formats supported by your DVD Recorder MPEG 2 Dolby Digital and DTS Check the receiver manual and the logos on the front of the receiver Connecting an Amplifier Receiver Due to the D...

Page 19: ...or LINE2 jacks on the DVD Recorder to the audio video out jacks on your external component using optional audio video cables Connecting Optional Equipment Front of DVD Recorder Jack Panel of Accessory...

Page 20: ...een Set the clock Use to move left right and use to change the settings After setting the clock press ENTER to confirm If you cancel the process during Initial Installation you should repeat this proc...

Page 21: ...Restore Defaults using Then RESET the set see page 28 2 Power On then you see the Initial Installation 3 Select the country which you want to on page 26 then repeat the steps 4 10 on page 17 18 7 Com...

Page 22: ...sc Edit Timer REC Installation Manual Setting Auto Scan Clock Setting Adjust channels Choose OK Exit ENTER SETUP Manual Setup Standard PAL BG Reception Aerial Auto Search 25 Store Channel PR No NAME 4...

Page 23: ...with the move the next letter with the Manual Setup Standard PAL BG Reception Aerial Auto Search 25 Store Channel PR No NAME 4 P 04 Store Channel Cancel Decoder Off Fine Tune 0 Manual Setup Standard P...

Page 24: ...DVD Recorder to the desired type of antenna or cable TV system as shown in Connecting Antenna Cable on page 11 1 Follow steps 1 2 as shown under Manual Setting 2 While Installation is selected press...

Page 25: ...edit using 2 Press You can put a name by pressing and 3 Press ENTER to confirm Sort channels After tuning TV stations into your DVD Recorder you may wish to change the order of PR s you have in your s...

Page 26: ...ile Init Setup is selected press ENTER to go to the initial setup page 2 Use to select Recording Options 3 While Recording Options is selected press to select Mode 4 Press to move to the second level...

Page 27: ...s default language is selected Follow the same procedure as the OSD Language Menu Language Settings 22 Initial Setup Menu Language OSD Lang English Disc Menu Fran ais Subtitle Espa ol Audio Portugues...

Page 28: ...ressive Scan Video provides the highest picture quality with reduced flickering Interlace or Progressive If you connect the DVD Recorder to a digital television DTV or Monitor using the COMPONENT jack...

Page 29: ...when you play a DVD recorded with a Dolby Digital only for DVD or MPEG soundtrack If the DVD is recorded with a DTS sound track then no sound will be heard Dynamic Range While watching DVD movies you...

Page 30: ...d scenes will not be played unless an alternative scene is available on the disc The alternative must have the same rating or a lower one If no suitable alternative is found playback will stop You mus...

Page 31: ...r the new password to confirm press ENTER 26 Master Password If you forget your password press 3 3 0 8 on the remote control and then press ENTER Set the new password to something other than 0000 Init...

Page 32: ...he Auto Clock Set status and press ENTER to confirm VPS PDC VPS PDC is a service provided by some stations to enable you to perform timer recordings precisely even if the broadcaster delays the start...

Page 33: ...TER 4 The Initialize menu will appear Use the buttons to select OK and press ENTER System Information System Information helps service personnel identify key firmware information about your DVD Record...

Page 34: ...encoding method and channel number and changes the setting AC3 5 1 CH English or AC3 2 CH English Subtitle Shows the current subtitle language and changes the setting Repeat Shows the current repeat...

Page 35: ...und Effect Shows the current sound effect and changes the setting Off Concert Living Room Hall Bathroom Cave Area or Church Repeat Shows the current repeat mode and changes the setting Track All or Of...

Page 36: ...ted the audio channel can be switched only to Stereo Changing the TV Audio Channel Changing TV Channels If no disc is playing you can change TV channels using the 0 9 or PR buttons on the remote contr...

Page 37: ...arental Level setting the 4 digit code must be entered and or the disc must be authorized see Set Parental Level on page 25 The DVD Recorder will not play discs with Region codes different from the DV...

Page 38: ...button changes the Zoom level as follows X1 normal size X2 X3 X4 X1 2 X1 3 X1 4 X1 normal size 2 Use the buttons to scroll around the zoomed picture 3 To resume normal playback press ZOOM repeatedly u...

Page 39: ...Scan by pressing REPEAT repeatedly You can repeat a scene that starts when Repeat A displays on the screen To mark the end point press A B Press A B again to repeat the scene Selecting Titles When a...

Page 40: ...ll appear on the TV screen Otherwise the Disc menu may appear 2 The Title menu may contain camera angles spoken languages and subtitle options as well as the chapters for the title Digest For displayi...

Page 41: ...AT to repeat a track file and press again to repeat the whole disc On the MP3 CD menu you can display the folders on the disc Use to select the folder icon on the MP3 CD menu then press ENTER or PLAY...

Page 42: ...MP3 files encoded below 64kbps are not supported You can enjoy a slide show while listening to MP3 music files 1 Prepare a CD which includes both MP3 and JPEG files 2 Insert the CD and play an MP3 fil...

Page 43: ...ereo will record the broadcast in Stereo and the Monitor Audio will also be in Stereo 5 Press REC once Recording will start The REC indicator lights on the front panel display Recording continues unti...

Page 44: ...ng press STOP The DVD Recorder will automatically power off when One Touch Recording ends One Touch Recording allows you to add recording time in fixed increments at the touch of a button 1 Follow ste...

Page 45: ...y the Timer Record List 5 Press ENTER to save the program The Timer Record List will appear 6 Press SETUP to exit the Timer Record List 7 Timer indicator will light or be blinking Power Off the DVD Re...

Page 46: ...the entire VideoPlus number This number is up to 9 digits long and can be found next to the start time of the TV programme in your TV listings magazine e g 5 234 89 or 5 234 89 Enter 523489 for the Vi...

Page 47: ...le when Disc is protected in the Disc Operation menu see page 44 There are already 49 titles recorded on the disc If the disc is damaged the recording may not complete successfully even if the Check f...

Page 48: ...E repeatedly HQ High Quality 1 hr disc SP Standard Play 2 hrs disc EP Extended Play 4 hrs disc or SEP Super Long Play 8 hrs disc 5 Press REC once Recording will start The REC indicator lights on the f...

Page 49: ...d you can unprotect the disc 3 Use to select Protect menu 4 If you want to protect the whole disc press ENTER 5 To confirm select OK To cancel select Cancel If you select OK and press ENTER all the co...

Page 50: ...t to adapt the whole disc press ENTER 5 To confirm select OK To cancel select Cancel If you select OK and press ENTER the disc will be adapted Disc Operation Select OK Exit ENTER DISC Erase Finalize P...

Page 51: ...scs you can manage the disc using the Disc Menu The DVD R DVD RW Disc Menu allows you to rename your disc or finalize it so it will be compatible with most other DVD players At first go to Disc Operat...

Page 52: ...e erased title remains as an empty title Title Menu You can erase titles on DVD RW discs only DVD Recorder Init Setup Disc Edit Select Init Setup Disc Oper Disc Edit Timer REC Edit TITLE CH 10 10 20 a...

Page 53: ...The Protect Title progress bar will be displayed This may takes several seconds The Protect icon will appear in front of Title name Disc Edit Edit Stop Confirm ENTER Edit TITLE CH 10 10 20 am 12 21 0...

Page 54: ...the Playlist menu is represented by a thumbnail picture taken from the start of that title or chapter If you prefer you can select a different still picture from within the title 2 Select the title to...

Page 55: ...r cables are loose Wrong Tuning Band is selected in the DVD Recorder Setup menu Camcorder is off DVD Recorder s source is not set to AV1 AV2 or AVF Plug the power cord into the wall outlet securely Se...

Page 56: ...n jacks DVD Recorder Audio Video Out is not selected for viewing at the TV DVD Recorder s TV audio channel is set to BIL or MONO The remote control is not pointed at the remote sensor of the DVD Recor...

Page 57: ...AC power outlet with the power on This will help prevent condensation When condensation has occurred wait a few hours for the DVD Recorder to dry before using it Moisture Condensation Troubleshooting...

Page 58: ...rs SP mode 4 Hours EP mode 8 Hours SEP mode Video recording format Sampling frequency 27MHz Compression format MPEG 2 Audio recording format Sampling frequency 48kHz Compression format MPEG1 Layer2 DV...

Page 59: ...on this product during the guarantee period KEEP THIS SECTION FOR FUTURE REFERENCE On the expiry date of the manufacturer s guarantee you will be sent details of our annual insurance plan but if you h...

Page 60: ...be used solely for domestic purposes For further information regarding your guarantee please see the section at the rear of your user manual The guarantee will be rendered invalid if the product is re...

Reviews: