background image

5

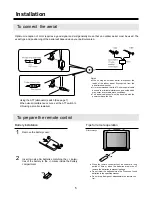
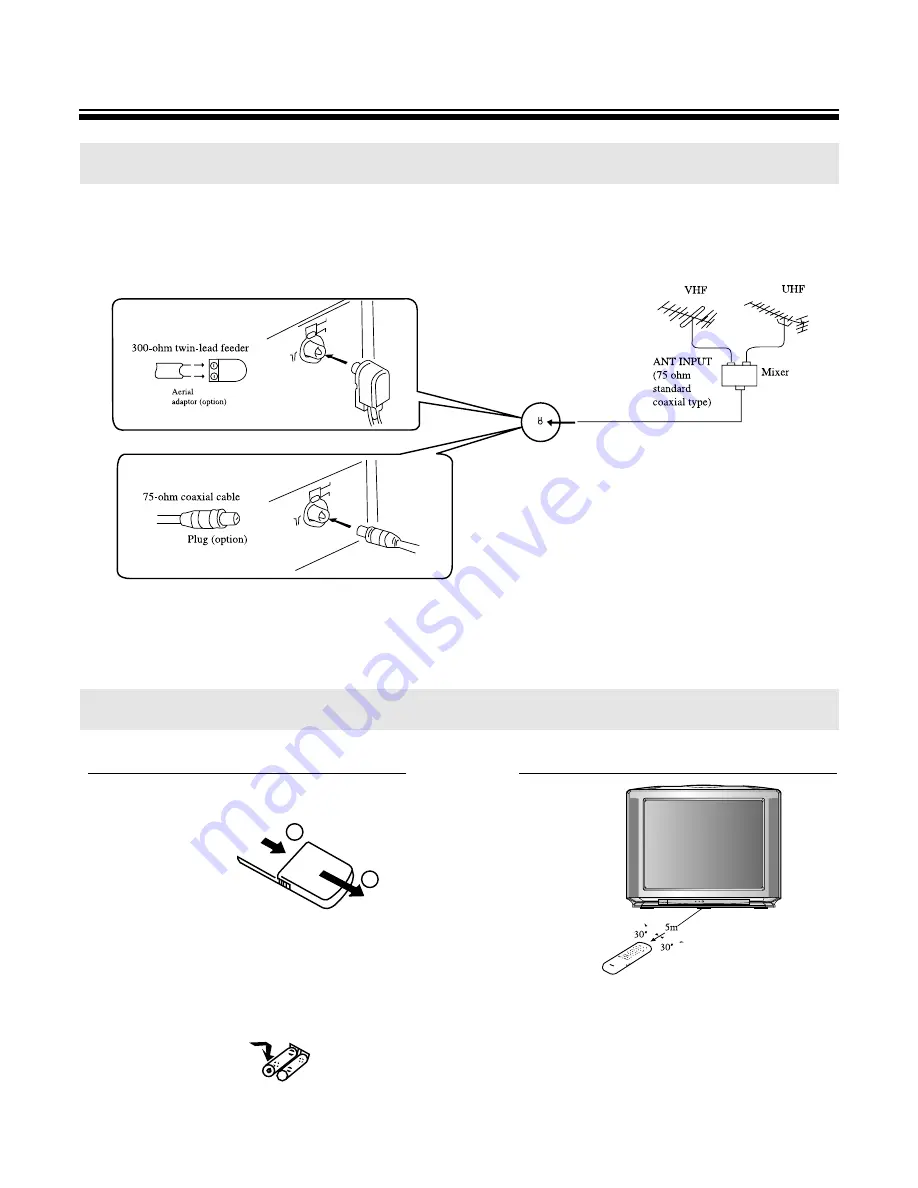
To connect  the aerial

To prepare the remote control

Installation

Optimum reception of color requires a good signal and will generally mean that an outdoor aerial must be used. The
exact type and positioning of the aerial will depend upon your particular area.

Notes

When using an outdoor aerial, disconnect the
leads of the indoor aerial, if connected, from the
aerial terminal socket.

It is recommended that the 75-ohm coaxial cable
be used to eliminate interference and noise which
may occur due to radio wave conditions.

The aerial cable should not be bundled with the
power cord and the like.

Using the ATT(attenuator) switch (See page 7)
When visual interference occurs, set the ATT switch to
ON using a small screwdriver.

Battery installation

Tips for remote operation

1

2

Remove the battery cover.

Insert two size AA batteries matching the +/- polari-
ties of the battery to the +/- marks inside the battery
compartment.

1

2

When the remote control will not be used for a long
period of time or when the batteries are worn out,
remove the batteries to prevent leakage.

Do not throw the batteries into a fire. Dispose of used
batteries in the specified manner.

Do not drop, dampen or disassemble the remote con-
trol.

Effective range

Summary of Contents for DTY-29Z9

Page 1: ...INSTRUCTION MANUAL COLOR TELEVISION DTY DTY 29Z9 29Z9 ...

Page 2: ... stereo bilingual mode 27 Watching Double Window 28 To display double window 28 Various double window operation 29 Watching Picture in picture 32 To display a sub picture 32 Various Picture in Picture operations 33 Watching POP Picture out picture 34 To display a POP Picture out Picture and various POP operations 34 Using Other Menus 35 Clock on off timer 35 Sleep time 36 To select the language of...

Page 3: ...e to the tape Whenever the Video recorder is exposed to extreme cold and heat at the time some condensation will occur When moisture is present turn the power switch on and allow at least 2 hours for the Video recorder to dry out Accessories Do not place the set on an unsta ble cart stand tripod bracket or table The set may fall causing serious injury to a child or an adult and serious damage to t...

Page 4: ...subject to excessive shock by being dropped or the cabinet has been dam aged lf the set does not operate normally when fol lowing the operating instructions Adjust only those controls that are specified in the operating instructions lmproper adjustment of other con trols may result in damage and will often require extensive work by a qualified technician to restore the set to normal operation When...

Page 5: ...direct light will not fall upon the screen Tonal darkness or a reflection on the picture screen may cause eyestrain Soft and indirect lighting is recommended for comfortable viewing ALLOW enough space between the unit and the wall for proper ventilation AVOID excessively warm locations to prevent possible damage to the cabinet or components RATED VOLTAGE 110 240V 50 60Hz Automatic degaussing All c...

Page 6: ...ave conditions The aerial cable should not be bundled with the power cord and the like Using the ATT attenuator switch See page 7 When visual interference occurs set the ATT switch to ON using a small screwdriver Battery installation Tips for remote operation 1 2 Remove the battery cover Insert two size AA batteries matching the polari ties of the battery to the marks inside the battery compartmen...

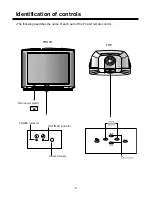
Page 7: ...6 Identification of controls The following describes the name of each part of the TV and remote control Infrared sensor ON TIMER indicator Main power switch FRONT TOP POWER indicator POWER ...

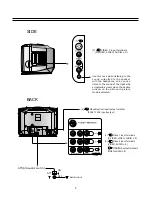
Page 8: ...isten to the sound of the right side screen sub screen when the double window on the picture in picture mode is selected 1 Video 1 input terminals S VIDEO VIDEO AUDIO L R 2 Video 2 input terminals VIDEO AUDIO L R MONITOR output terminals VIDEO AUDIO L R ATT Attenuator switch ATT ON OFF Aerial input 4 Video 4 option input output terminal SCART JACK input output ...

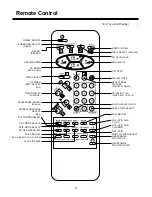
Page 9: ...R WOOFER ON OFF SKIP ON OFF PinP 2PIC SUB CH UP PinP 2PIC SUB CH DOWN HEADPHONE VOLUME UP HEADPHONE VOLUME DOWN PinP 2PIC SUB TV VIDEO SELECT VOLUME DOWN PR DOWN PAGE DOWN MENU INDEX TV VIDEO INPUT SELECT MIX TIME DISPLAY SUBCODE SELECTABLE SOUND CANCEL STEREO BILINGUAL SELECT SIZE PinP POSITION SELECT PinP MODE SELECT 2PIC MODE SELECT PICTURE SIZE SELECT STILL ON OFF RED GREEN YELLOW CYAN 2PIC PI...

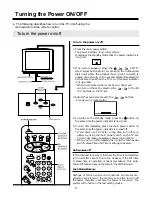
Page 10: ...he main power switch At the same time the power indicator is turned off If you don t use TV set for a long time turn off com pletely by using the main power switch on the TV set You can decrease unnecessary power consumption When you turn off completely by using the main power switch Sleep Time and Timer setting are cleared Auto power off If TV broadcast for a day is finished the TV will automatic...

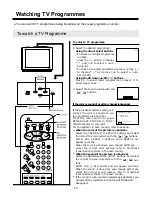
Page 11: ...ure is abnormal Select the COLOR with the PR buttons and select the correct the color system with the buttons AUTO PAL SECAM 4 43NTSC and 3 58NTSC will appear cyclically When the color is abnormal even though AUTO set select the correct color system refer to broadcast transmission systems in the each country When the sound of the picture is abnormal Select the SOUND with the PR buttons and select ...

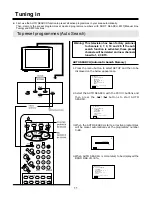
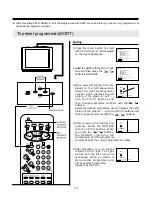
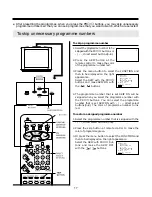
Page 12: ... SEARCH function to preset all active programmes in your area automatically Then memory the preset programmes at desired programme numbers with SORT SEARCH MFT Manual Fine Tuning and SKIP functions SETUP AUTO SEARCH SEARCH PROGRAM P MEMORY FINE TUNE SORT SELECT ACTIVATE EXIT MENU SETUP AUTO SEARCH SEARCH PROGRAM P 0 MEMORY FINE TUNE SORT SELECT ACTIVATE EXIT MENU SETUP AUTO SEARCH SEARCH PROGRAM P...

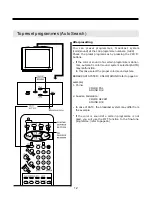
Page 13: ...d system selection AUTO may malfunction In this case select the proper color sound system BROADCAST SYSTEM COLOR SOUND refer to page 44 example 1 China COLOR PAL SOUND D K 2 Russian Federation COLOR SECAM SOUND D K In case of CATV the broadcast system may differ from the example If the color or sound of a certain programme is not good you will use the MFT function to the fine tune programme refer ...

Page 14: ...he PR buttons When you press the buttons the MEMORY sign turns red momentarily and the programme is memorized at the current programme number 5 After presetting you can see the display on the right The right picture and the left picture are exchanged When you desire to store another programme num ber at another programme repeat the step 3 to 4 To preset programmes SORT After presetting AUTO SEARCH...

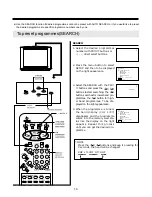
Page 15: ...ars and the programme enters into the memory wait sta tus like the display on the right appears Repeat this process until you can get the desired pro gramme 1 SETUP AUTO SEARCH SEARCH PROGRAM P 1 MEMORY FINE TUNE SORT SELECT ACTIVATE EXIT MENU 1 VHF L SETUP AUTO SEARCH SEARCH PROGRAM P 1 MEMORY FINE TUNE SORT SELECT ACTIVATE EXIT MENU 14 To preset programmes SEARCH Use the SEARCH function if desir...

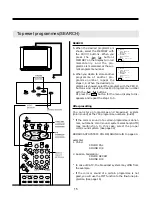
Page 16: ...ammes and broadcast system color sound at the 100 programme numbers 0 99 If the color or sound of a certain programme is abnor mal automatic color sound system selection AUTO may malfunction In this case select the proper color sound system See page 44 BROADCAST SYSTEM COLOR SOUND refer to page 44 example 1 China COLOR PAL SOUND D K 2 Russian Federation COLOR SECAM SOUND D K In case of CATV the br...

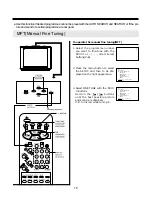
Page 17: ...uttons Hold on the buttons until the best possible picture and sound are obtained turns red while tuning in MFT Manual Fine Tuning Use this function if desired programmes cannot be preset with the AUTO SEARCH and SEARCH or if the pic ture and sound of a certain programme are not good 1 SETUP AUTO SEARCH SEARCH PROGRAM P 1 MEMORY FINE TUNE SORT SELECT ACTIVATE EXIT MENU SETUP AUTO SEARCH SEARCH PRO...

Page 18: ... turns red To restore a skipped programme number 1 Select the programme number that is skipped with the direct select buttons 0 9 2 Press the skip button at remote control to make the color of programme green 3 Or press the menu button to select the FUNCTION and then to be displayed on the right appearance Select the SKIP with PR but tons and make the SKIP OFF with the buttons 17 To skip unnecessa...

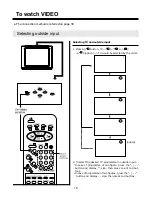
Page 19: ...TV programme in outside input In case of programme of one figure press the button and display sign then press one of 0 9 but tons In case of programme of two figures press the button and display sign then press 0 9 buttons 18 Selecting outside input To watch VIDEO The connection method is referred on page 39 1 1 2 3 4 option ...

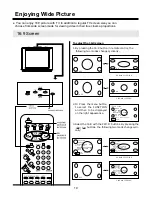
Page 20: ...en size you can choose from wide screen mode for viewing video in their true cinema proportions 16 9 OFF 16 9 ON 16 9 ON NORMAL VIEWING CINEMA VIEWING NORMAL VIEWING CINEMA VIEWING FUNCTION LANGUAGE BLUE SCREEN ON 16 9 OFF BROADCAST SYSTEM AUTO VOLUME ON SKIP ON SELECT ACTIVATE EXIT MENU FUNCTION LANGUAGE BLUE SCREEN ON 16 9 OFF BROADCAST SYSTEM AUTO VOLUME ON SKIP ON SELECT CHANGE EXIT MENU FUNCT...

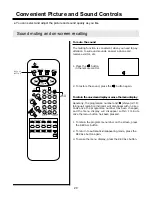
Page 21: ...eception indicator will disappear within 4 sec onds once the programme number has been changed and the menu display will disappear within 1 minute once the menu button has been pressed 1 To retain the programme number on the screen press the RECALL button 2 To return to automatic disappearing mode press the RECALL button again 3 To erase the menu display press the RECALL button ⅠⅡ Sound muting and...

Page 22: ...nd then to be displayed on the right appearance 2 Select the ADJUSTMENT with PR buttons and then to be dis played on the right appearance Select the desired item with the PR buttons and press with the buttons to adjust the level Selectable picture You can select the picture quality instantly among two preset modes and one user set mode MEMORY MODE Picture quality MEMORY The picture quality you set...

Page 23: ...win dow mode X display appears when the SHARPNESS is selected in the double picture mode 4 You can memory the STANDARD picture level in the MEMO RY position directly Press the button to select the STANDARD mode and press the ENTER button to store the STANDARD pic ture level in the MEMORY position and then MEMORY display disappears within 4 seconds 22 Item contrast weaker stronger brightness darker...

Page 24: ... of dark picture with BLACK STRETCH ON the picture is seen more deeper With BLUE STRETCH ON the blue picture is seen more bluer Press the menu button to select the PICTURE and then to be dis played on the right appearance Select the BLACK STRETCH ON with the PR buttons By pressing the buttons to change BLACK STRETCH ON The BLACK STRETCH is available for only NTSC3 58 NTSC4 43 broadcast system PICT...

Page 25: ...LIZER with the PR buttons By pressing the buttons to activate the EQUALIZER If the EQUALIZER menu appears on the right you will press the to select emphasized frequency band and press PR to adjust level Selectable sound You can select the sound quality instantly among three preset modes and one use set MODE Sound quality MEMORY The sound quality you set MOVIE Suitable for movie MUSIC Suitable for ...

Page 26: ...e the headphone volume and the button to the decrease head phone volume Or press the menu button to select the SOUND and then to be dis played on the right appearance Select the HEADPHONE VOL UME with the PR buttons Press the buttons to adjust headphone vol ume Press the button to decrease headphone volume and button to increase the headphone volume Item 0 1kHz decrease 100Hz level increase 100Hz ...

Page 27: ...ure or the Picture out Picture mode is selected the headphone output is sound output of sub picture Even if the headphone is plugged in The speaker sound is continued The volume of speaker sound may be adjusted by the volume down up buttons with menu off The volume of headphone sound may be adjusted by head phone volume down up buttons or headphone volume menu of menu mode In case of the Double wi...

Page 28: ...de Enjoying Stereo and Bilingual Broadcasts The unit receivers both stereo and bilingual broadcasts transmitted in either the NICAM or German stereo bilingual broadcast system 1 1 1 Ⅰ Ⅱ 1 1 Ⅰ Ⅱ 1 ⅠⅡ Display Reception mode Stereo Monaural Sound to be heard NICAM German stereo Main sound Main sound Sub sound Sub sound Mono sound Ⅰ Ⅱ If stereo sound is noisy If a broadcasting signal is not strong eno...

Page 29: ...nction A TV picture or a picture from external source equipment such as a VTR can be displayed as another picture You can enjoy as two TV sets by using headphone 1 Normal mode DP TP Two pictures as the ratio 16 9 picture Two partitive picture of full screen Select the desired picture 1 1 Left P i c t u r e Right P i c t u r e Programme number or external input number NOTE You can not select the sa...

Page 30: ...ure A TV picture the picture from the video input 1 1 video input 2 2 video input 3 3 video input 4 option 4 will appear cyclically When a TV picture appears select the desired TV programme using the CH buttons Press CH button to select lower programme numbers and CH button to select higher ones Or press the menu button to select the PAP and then to be displayed on the right appearance Select the ...

Page 31: ...s and change the sound system with the buttons AUTO D K I B G M will appear cyclically refer to page 44 To switch the double window Press the SWAP button when double window is dis played The main picture the left picture and the sub picture the right picture are switched Press the button again to switch again Various double window operation 1 1 Programme number or external input number 30 NOTE If ...

Page 32: ...ain To display a frozen picture for normal mode When the PAP is off press the STILL button to display a still picture To return to a moving picture press the STILL button again Use the still function to see a important scene or a mes sage in the still mode 31 Various double window operation 1 1 Programme number or external input number MOVING STILL MOVING STILL Left p i c t u r e Right p i c t u r...

Page 33: ...the video input 1 1 video input2 2 video input3 3 video input4 option 4 will appear cyclically 8 When a TV picture appears select the CH P00 with PR buttons Select the desired TV programme using the buttons Press button to select lower programme numbers and the button to select higher ones 32 Watching Picture in Picture The unit is capable of displaying two pictures with the small sub picture simu...

Page 34: ...icture is dis played The sub picture will be a still picture To return to a moving picture press the STILL button again To change the position of the sub picture and select the Picture Out Picture POP Multi Strobo Press the position button repeatedly when a sub pic ture is displayed The display position of the sub pic ture will changed in order to PIP mode and in the POP mode 33 A B Various Pictur...

Page 35: ...moment To restart the POP the multi strobo display press the CH or the STILL buttons POP Multi Strobo POP Multi Strobo stop 34 To display a POP Picture out Picture and various POP operation Watching POP Picture out Picture NOTE If the sub picture is the video input the POP is not available NOTE If you press the RECALL button repeatedly the POP operation will follow this chart The multi strobo The ...

Page 36: ...e TV will automatically turn on to a preset programe number at a preset time Select the ON TIME with PR buttons Press the buttons to activate the hour or the minute cyan OSD and preset the hour or the minute with the PR buttons or the direct 0 9 buttons Select the ON TIME PROG with PR buttons Press the buttons to activate ON TIME PROG with the PR buttons or the direct 0 9 buttons After setting CLO...

Page 37: ...This display disappears whin 4seconds useless any button is pressed Whenever pressed again the setting time is increased by 15 minutes 5 If this button is pressed again during the sleep timer operation the remaining time of the sleep timer appears on the screen 6 In addition if this button is pressed repeatedly the setting time is increased by 15 minutes continuously 7 When the remaining time beco...

Page 38: ... be dis played on the right appearance Press the PR buttons to select the LANGUAGE Press the buttons to activate the LANGUAGE 2 In the LANGUAGE menu display Press the PR buttons to select the desired LANGUAGE To select the language of the on screen display FUNCTION LANGUAGE BLUE SCREEN ON 16 9 ON BROADCAST SYSTEM AUTO VOLUME ON SKIP ON SELECT ACTIVATE EXIT MENU ...

Page 39: ...ume level In this case you can equalize the volume with the AUTO VOLUME ON Press the MENU button to select the FUNCTION and then to be dis played on the right appearance Press the PR buttons to select the AUTO VOLUME Press the buttons to change AUTO VOLUME ON To select the blue screen and auto volume NOTE With the AUTO VOLUME ON the maximum volume level can be down You can maximize the volume leve...

Page 40: ...nals while watching VIDEO AUDIO SET GAME PLAYER VCR CAMCORDER LASER DISC PLAYER Input terminals of VIDEO1 picture sound on left right S picture video picture input terminal Output terminals of Monitor picture sound on left right Input terminals of VIDEO2 picture sound on left right Input Output terminal of VIDEO4 option SCART JACK ...

Page 41: ...ol to tune TV into VIDEO Both VIDEO1 and VIDEO2 are OK Side Connector The connection method is as same as back In side connector it s better to connect the materials which are unusually used such like camcorder game player etc SEPARATE SELLING SEPARATE SELLING SOUND OUTPUT PICTURE OUTPUT PICTURE OUTPUT HI FI STEREO VIDEO HI FI STEREO VIDEO In case of mono VIDEO connect the VIDEO sound out put term...

Page 42: ... quality field VIDEO you can enjoy clear and sharp picture by connecting it with TV S VHS terminal 1 Connect S VHS connective plug separate selling with S VHS output terminal of VIDEO set and S VIDEO picture input terminal of TV set 2 Connect sound connective plug separate selling with sound output terminal of VIDEO set and sound input terminal of TV set 3 Press the TV VIDEO button in Remote contr...

Page 43: ...ective plug separate selling of picture sound 2 Connect the picture sound connective terminal to VIDEO CAMERA picture sound output terminal and the TV side picture sound input one 3 Press the TV VIDEO button in Remote control three times to select VIDEO3 4 Set the transfer switch of VIDEO CAMERA picture in output then replay the VIDEO CAMERA SEPARATE SELLING PICTURE OUTPUT SOUND OUTPUT ...

Page 44: ...l input terminal of AUDIO to right left sound output of TV monitor display Connect the picture sound connective plug to VIDEO picture sound input terminal TV monitor picture and sound output terminal The output of Monitor is as same as the present picture RIGHT LEFT RIGHT LEFT SEPARATE SELLING PICTURE INPUT SOUND INPUT SEPARATE SELLING ...

Page 45: ...ng Kong Iraq Islamic Republic of lran Lebanon Saudi Arabia etc Russian Federation etc Myanmar etc PAL B G PAL D K PAL I SECAM B G SECAM D K NTSC M Bahrain Kuwait Israel Oman Qatar United Arab Emirates Yemen etc India Indonesia Malaysia Singapore Thailand etc Broadcast Transmission Systems in Each Country ...

Page 46: ...o enter a page number or a subcode During digit entry page acquisition is stopped Page Down Page UP Page DOWN and UP buttons decrease or increase the current page number by 1 HOLD REVEAL STORE B R O W S E PAGE UP TV TEXT CONTRAST M E N U PAGE SELCTOR 0 9 TXT MODE SELECT PAGE DOWN INDEX MIX SUBCODE CANCEL SIZE R G Y C The Teletext service is carried on a TV transmission signal therefore it is only ...

Page 47: ... is expanded Press again and the display returns to normal size charac ters Browse The BROWSE button allows the user to very easily scan through the entire database In its simplest sense BROWSE instructs the decoder to capture the next complete Teletext page which arrives therefore it can be seen as an almost instant way of accessing random pages in the Teletext database and thereby removing the n...

Page 48: ...acquisition will be stopped Normal operation is restored by pressing the HOLD button again or by entering a new page number Cancel The CANCEL button suppresses the Text display and restores the normal TV picture while the receiver remains in the Teletext mode This function allows you to request Teletext pages and alter Teletext controls without interrupting a TV programme To return to normal TV op...

Page 49: ...o display the stored sub page L F T Press the L F T button to select the Teletext LIST mode The letter L and four colored page numbers will appear at the bottom of the screen To see one of these pages press the matching colored button R G Y C To change the favorite page numbers press a colored button and then three page selector buttons on the remote control in sequence EG To select page 100 on th...

Page 50: ...u press the button again the display disappears 2 Press the buttons to adjust level 49 Item contrast weaker stronger Pressing To adjust teletext characters quality ADJUSTMENT CONTRAST CHANGE 6 3 HOLD REVEAL STORE B R O W S E PAGE UP TV TEXT CONTRAST M E N U PAGE SELCTOR 0 9 TXT MODE SELECT PAGE DOWN INDEX MIX SUBCODE CANCEL SIZE R G Y C ...

Page 51: ...or another TV set The interference can be reduced to some extent by adjusting the direction or height of the antenna If the twin lead antenna cable is used replace it with a coaxial cable Picture has Snow Check the Antenna cable is broken or disconnected or damaged Small dot on the screen caused by a weak aerial signal Ghost images appear Check the Antenna direction has changed after storm or stro...

Page 52: ... at AC 220V 50Hz PAL SECAM NTSC3 58 4 43 AV B G D K I M H 110 240V 50 60Hz MAIN 15W X 15W Woofer 15W HYPER CHINA IVORY COAST VHF L K1 43 25MHz S7 147 25MHz VHF H S8 154 25MHz S41 463 25MHz UHF E21 471 25MHz C57 863 25MHz Frequency Synthesizer Tuning System ON Screen Display 100 Programmes AV INPUT 1 2 3 AV OUTPUT AV4 INPUT OUTPUT SCART JACK Option R 30F Required two 1 5V batteries type with AA siz...

Page 53: ...52 MEMO MEMO ...

Page 54: ...53 MEMO MEMO ...

Page 55: ...54 MEMO MEMO ...

Page 56: ...P N 48586915E107 R0 ...

Reviews: