background image

103

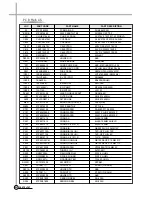
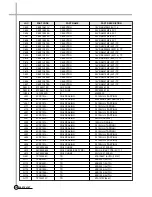
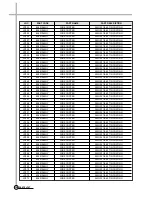
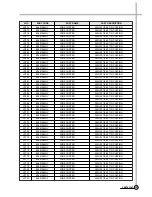
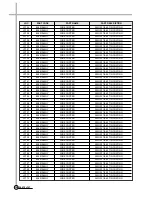
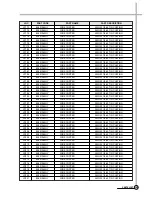
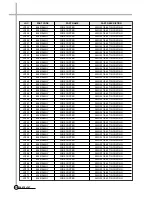
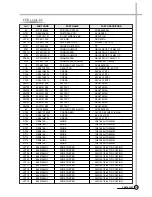
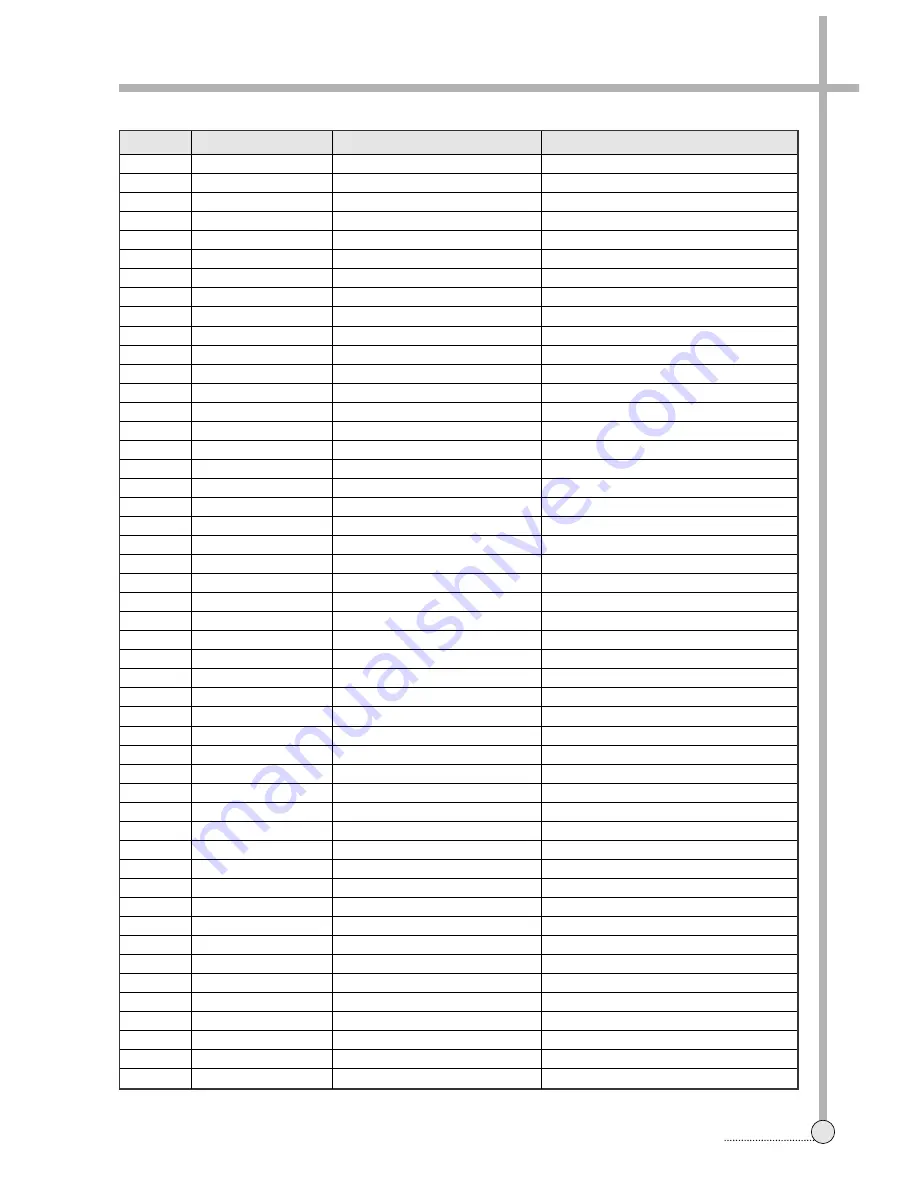
PARTS LIST

LOC

PART CODE

PART NAME

PART DESCRIPTION

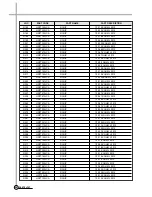
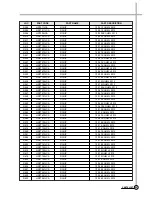
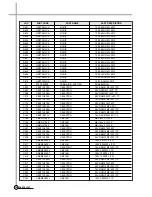
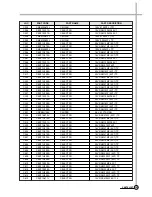
Q178     

TZSR1001--   

TR                    

KSR1001 (AUTO)

Q179     

TZTA1273Y-   

TR                    

KTA1273Y(966Y)

Q180     

TZSR1001--   

TR                    

KSR1001 (AUTO)

Q181     

TZTC3198Y-

TR

KTC3198Y-(1815Y) (AUTO)

Q201     

TZTC3202Y-

TR

KTC3202Y (AUTO)(1959Y)

Q202     

TZTA1266Y-

TR

KTA1266Y- (AUTO)(1015Y)

Q203     

TZTC3198Y-

TR

KTC3198Y-(1815Y) (AUTO)

Q204     

TZTC3198Y-

TR

KTC3198Y-(1815Y) (AUTO)

Q205     

TZTC3198Y-

TR

KTC3198Y-(1815Y) (AUTO)

Q251     

TZTA1266Y-

TR

KTA1266Y- (AUTO)(1015Y)

Q301     

TZTC3198Y-

TR

KTC3198Y-(1815Y) (AUTO)

Q302     

TZTC3198Y-

TR

KTC3198Y-(1815Y) (AUTO)

Q303     

TZTA1266Y-

TR

KTA1266Y- (AUTO)(1015Y)

Q304     

TZTC3198Y-

TR

KTC3198Y-(1815Y) (AUTO)

Q305     

TZTC3198Y-

TR

KTC3198Y-(1815Y) (AUTO)

Q306     

TZTC3198Y-

TR

KTC3198Y-(1815Y) (AUTO)

Q307     

TZTC3198Y-

TR

KTC3198Y-(1815Y) (AUTO)

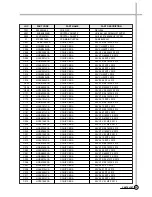
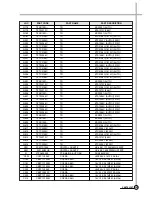
Q501     

TZSR1001--

TR

KSR1001 (AUTO)

Q502     

TZTA1273Y-

TR

KTA1273Y(966Y)

Q503     

TZTC3198Y-

TR

KTC3198Y-(1815Y) (AUTO)

Q504     

TZTA1273Y-

TR

KTA1273Y(966Y)

Q506     

TZSR1001--

TR

KSR1001 (AUTO)

Q601     

TZTA1266Y-

TR

KTA1266Y- (AUTO)(1015Y)

Q602     

TZTA1266Y-

TR

KTA1266Y- (AUTO)(1015Y)

Q603     

TZTA1266Y-

TR

KTA1266Y- (AUTO)(1015Y)

Q604     

TZTA1266Y-

TR

KTA1266Y- (AUTO)(1015Y)

Q605     

TZTA1266Y-

TR

KTA1266Y- (AUTO)(1015Y)

Q606     

TZTA1266Y-

TR

KTA1266Y- (AUTO)(1015Y)

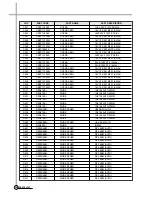
Q607     

TZSR2001--

TR

KSR2001 (AUTO)

Q608     

TZSR1001--

TR

KSR1001 (AUTO)

Q609     

TZSR1002--

TR

KSR1002 (AUTO)

Q610     

TZTC3198Y-

TR

KTC3198Y-(1815Y) (AUTO)

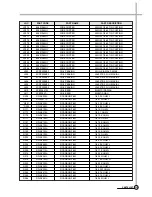
Q811     

TZTC3205Y-

TR

KTC3205Y (2236Y)

Q812     

TZTC3205Y-

TR

KTC3205Y (2236Y)

Q813     

TZTC3198Y-

TR

KTC3198Y-(1815Y) (AUTO)

Q814     

TZTA1273Y-

TR

KTA1273Y(966Y)

Q815     

TZTC3205Y-

TR

KTC3205Y (2236Y)

Q816     

TZTC3205Y-

TR

KTC3205Y (2236Y)

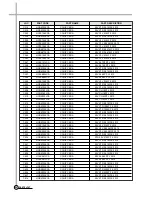
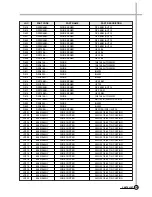
X001     

5XE17R734E   

CRYSTAL QUARTZ        

HC-49/U 17.734476MHZ 30PP

X501    

5XJ16R00UE   

CRYSTAL QUARTZ        

HC-49/S 16.000000MHZ 30PP

51      

97PA490500   

PCB MAIN A-AUTO AS    

DV-K884DY-AQ

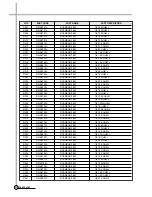
*C052    

CCZF1H104Z   

C CERA               

HIKF 50V 0.1MF Z AXIAL

C180     

CBZP1C103M   

C CERA SEMI           

16V Y5S 0.01MF M (AXIAL)

C181     

CBZP1C103M   

C CERA SEMI           

16V Y5S 0.01MF M (AXIAL)

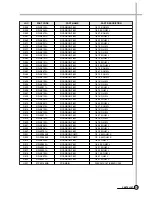
C182     

CBZP1C103M   

C CERA SEMI           

16V Y5S 0.01MF M (AXIAL)

C202     

CCZF1H104Z   

C CERA                

HIKF 50V 0.1MF Z AXIAL

C304     

CBZF1E223Z   

C CERA                

Y5V 25V 0.022MF Z AXIAL

C305     

CBZP1C103M   

C CERA SEMI           

16V Y5S 0.01MF M (AXIAL)

C315     

CBZP1C103M   

C CERA SEMI           

16V Y5S 0.01MF M (AXIAL)

Summary of Contents for DV-K88 series

Page 1: ...DAEWOO ELECTRONICS CO LTD Service Manual Video Cassette Recorder Model ALL K MECHA Hi Fi PAL MODELS DV K88 Series DV K86 Series DV K82 Series DV K8K Series DAEWOOELECTRONICSCO LTD OVERSEASSERVICEDEPT...

Page 2: ...on AUDIO Recording system Longitudinal track Input 8 dBm CENELEC standard more than 47 k ohms unbalanced Output 6dBm CENELEC standard less than 1 k ohm unbalanced 100 k ohms load Frequency range 100 H...

Page 3: ...VES 8 3 3 RECORD AND PLAYBACK PROCESSING CIRCUIT 8 3 4 IF CIRCUIT OPERATION 12 3 5 NORMAL AUDIO SIGNAL PROCESSING LA71511M 15 3 6 Hi Fi AUDIO SIGNAL PROCESSING BH7804K 16 3 7 VIDEO AUDIO SWITCHING CIR...

Page 4: ...UNCTIONS Front 1 STAND BY 2 STOP EJECT 3 CHANNEL UP DOWN SELECTION 4 PLAY BACK 5 REWIND REVIEW 6 FAST FORWARD CUE 7 RECORD OTR ONE TOUCH RECORDING Rear 1 EURO AV2 DECODER AV OUT 2 EURO AV1 AV IN 3 ANT...

Page 5: ...SE PIN 3 of PT01 3 Insert PATH JIG and Press REC button on the remote control 4 Check the position of the V sync from the rising edge of the SW pulse Standard 6 5H 0 5H 2 1 Servo Circuit Adjustment Me...

Page 6: ...INPUT SIGNAL Refer to the following P101 P102 GND CH1 0 5mS DIV 50mV DIV 10 1 OUTPUT SIGNAL Modulation Method 30 AM fm 400Hz fc 38 9MHz SIGNAL LEVEL 80dB V GEN GND GND POWER SUPPLY 9V 5V COMPONENT SI...

Page 7: ...9 1 1 2 2 50V 2 RF AGC RF AGC CONNECTION METHOD IF MODULE PCB TOP VIEW ADJUSTMENT PARTS R191 CHECKING POINT P101 PIN 7 TEST EQUIPMENTS Signal Gen Oscilloscope Power Supply INPUT SIGNAL Refer to the fo...

Page 8: ...y part 2 NAME AND OPERATION OF PINS ON SMPS MODULE 1 Primary Part 2 Secondary Part CIRCUIT SECTION 3 CIRCUIT OPERATION PRINCIPLES 3 1 Power Circuit PIN NO 1 2 NAME AC INPUT FUNCTION SUPPLY AC INPUT VO...

Page 9: ...secondary winding is rectified and filtered by DC2 and C22 The F and F power secondary winding is rectified and filterd by DC3 C21 and C29 A IC21 KA431 shunt regulator directly senses and accurately...

Page 10: ...elay line for luminance signal 3 2 Key Features of Video IC and Its Relatives 1 RECORD PROCESSING The video input signal selected by the A V switching IC KA8119B among AUX video input Front video inpu...

Page 11: ...the GROUP 4 LSB 1 4 bits of I2 C serial control 2 CHROMINANCE SIGNAL PROCESSING RECORD The pure chrominance signal is obtained by BPF1 fsc 4 43MHz which filters the input signal through FBC The gain o...

Page 12: ...requency portion and eliminates the spike noise and AM components The signal through DOUBLE LIMITER is then demodulate and then the RECORD NONLINEAR EMPHASIS characteristic is compensated by the DE EM...

Page 13: ...signal is applied to the CCD IC to reduce the chrominance crosstalk The NTSC PLAYBACK is possible on PAL SECAM SYSTEM by the NAP circuit the activation of which is determined by GROUP 7 MSB 7 8 bits...

Page 14: ...he tuner and the IF SAW filter to be matched to achieve the optimum IF input signal The IF amplifier output signal is fed to a frequency detector and to a phase detector The frequency detector is oper...

Page 15: ...ain functions The audio signal L R is amplified and coming out of the stereo digital sound processor 3 DIGITAL AUDIO FLOW The demodulator function includes integrated baseband filters for pulse shapin...

Page 16: ...nged by remote control as well The P S ratio white clip power saving etc also can be controlled only by changing a I2 C BUS data according to the designer s intention b DIGITAL AFT METHOD Conventional...

Page 17: ...the 7th pin The input signal passes through EQ AMP and LINE AMP so its output signal is finally obtained from the 77th pin The circuitry and its operation of EQ AMP is identical to the conventional EQ...

Page 18: ...over 40Vp p Especially the erasing current of F E HEAD ranges from 130 to 280mA and it should be 180mA when the HEAD impedance is at the center 1 SPECIAL FEATURES BH7804K processes the conventional H...

Page 19: ...signal to avoid the overmodulation and then the limitted signal is modulated with two carriers 1 4MHz Left Ch 1 8MHz Right Ch The modulated two signals are mixed by the FM MIX unit The mix ratio of FM...

Page 20: ...put port for Normal audio 2 Noise Compensation and Hi Fi Detect In the Hi Fi audio system the noise trouble occurs when the FM signal is defective The defection of FM signal is due to the Drop Out whi...

Page 21: ...ch for C 2 input 1 output 2 Internal Video Selector 4 input 1 output 3 Internal Video 6dB Amp 4 Distinguished Supply Voltage Audio 9V Video 5V 2 LA7152 3 input 1 output Video Switcher 3 BLOCK DIAGRAM...

Page 22: ...H L H W3D2 L L H H Remarks MODE POWER OFF PLAY EE TV VCR TV VCR TV VCR TUNER AV F AV TUNER AV TUNER AV F AV TUNER AV F AV REC NO YES C MEM NO YES C NO YES NO YES NO YES NO YES NO YES NO YES NO YES NO...

Page 23: ...set signal comes out to the decoder Case 8 TV set Watching receiving the normal CH VCR set EE TV mode Input source is tuner TV set signal comes out to the decoder Case 9 TV set Watching the C CH recei...

Page 24: ...d the F AV signal Case 18 TV set Watching the normal CH received on VCR set VCR set EE VCR mode Input source is tuner Tuner signal comes out to the decoder If a user press the REC button the VCR set r...

Page 25: ...IN30 PIN30 PIN30 PIN30 PIN30 PIN30 PIN30 PIN30 PIN30 PIN32 PIN30 AUDIO W3D1 H H L L L L H H H H L L L L H H SEL W3D2 L L L L H H L L L L L L H H H H REMARKS CHSEARCH CHSEARCH MODE POWER OFF PLAY EE RE...

Page 26: ...our particular country and locality 4 Leakage current test 1 Confirm specified or lower leakage current between B earth ground power cord plug prongs and externally exposed 1 1 accessible parts RF ter...

Page 27: ...he primary GND however it is not necessary to isolate the oscilloscope when check the secondary circuit A CHECKING THE PRIMARY CIRCUIT 4 1 Power Circuit No output Voltage Prepare the oscilloscope conn...

Page 28: ...Check each output voltage END Check the CN21 Check the diode of NO output stages Check transformer of NO output stages NO Check the COIL C of NO output stages YES YES YES YES B CHECKING THE SECONDARY...

Page 29: ...of IF Module Check Q179 Q180 and Power Supply Circuit NO Check Q177 Q178 and Power Supply Circuit NO Check Q181 EVER 33V and then PWM from COM NO YES Is RF AGC adjusted well YES Change the IF Module a...

Page 30: ...RIGHT System and channel by menu key NO Is system Select Option Diode applied well according to Option Table Correct the Option NO Is 5V supplied to MB point Pin No 4 of TM Block Check on off 5V and...

Page 31: ...B Check the pin serial of pin 49 50 of IC501 YES NO Digitron does not operate Is 5 8V supplied from D509 cathod Check power Module Check power module Check power module Check power Module Is 5V suppli...

Page 32: ...se appears although change cassette tape CTL HEAD height is normal and there is not dust Check R528 R527 R529 R523 Check R551 C532 Noise appears although adjusting tracking A Is CTL pulse output at pi...

Page 33: ...reen at the bottom Is sw pulse supplied from pin 18 of IC501 Noise appears on the screen on the whole B Are SW pulse and HA SW applied to preamp circuit YES Check video circuit YES Is Enve waveform su...

Page 34: ...31 FLOW CHART Auto stop during playback Check reel sensor Check connector and D FG circuits Is reel pulse applied to pin 5 and 6 of IC501 C Is D FG applied to pin 24 of IC501 YES Check IC501 YES NO NO...

Page 35: ...ading stops Check Q504 Check power module Is motor 12V supplied to IC502 7 8 pin 12V D Check connector and motor YES NO NO Check D504 Is 6 2V supplied to Pin 4 of IC502 YES NO Check P503 and Loading m...

Page 36: ...power Module Is motor 13V supplied E Check connector and motor YES NO Check circuit of R559 R558 R513 Is the input of pin 6 of P501 2 5V 3 5V YES NO Check IC501 Does pin 4 of IC501 supply C PWM YES Ch...

Page 37: ...pattern Is C sync applied to pin 93 of IC501 F Check motor NO YES Emergency mode when plugging power cord Check power Module Is ever 5V applied G Check IC501 YES NO Check IC501 and X501 Does X501 crys...

Page 38: ...s motor 13V supplied at pin 2 of CN21 H Check IC502 NO YES Check connector Check Deck part CAM DATA is changed when CST IN NO NO YES Is 5V supplied at pin 31 of IC501 Check IC501 Check pattern and R54...

Page 39: ...not operate Check C501 C521 When mains is unplugged is 3 6V at pin 26 76 and 81 of IC501 I Check IC501 NO YES Check X502 Is sine signal applied to pin 42 and 43 of IC501 NO YES Check reset circuit of...

Page 40: ...uit Is less then 0 2V at pin 80 of IC301 Is clock and data applied to pin 63 64 of IC301 Is collector of Q203 GND Check pattern and AC Head Check Q203 Q204 Q202 Check SYSCON Is the output at pin 77 of...

Page 41: ...of IC301 Check SYSCON Is the voltage above 4V at pin 80 of IC301 NO Check R204 R205 C209 Change IC301 Is signal input into pin 79 of IC301 NO Is the voltage from 0 7V to 3 0V at pin 5 of IC301 AC sign...

Page 42: ...of IC251 Is 5V supplied to the pin 39 of IC251 YES YES NO Check the PIF circuit Is signal Input into the pin 1 2 of IC251 in TV mode YES NO Is signal output at the pin 29 30 of IC251 YES NO Check the...

Page 43: ...IC251 YES YES YES NO Check the power circuit NO Change the IC251 NO Check the Preamp module NO NO Check the SYSCON Are the clock and data supplied to the pin 5 6 of IC251 YES Is 5V supplied to the pin...

Page 44: ...and pin 47 of IC301 at 5 volts TO RF OUT CIRCUIT TO A V SW CIRCUIT YES YES NO Check pin 95 94 of IC501 Is the CLK DATA signal obtained from pin 63 64 of IC301 YES NO Check TRICK H and IC301 Is the si...

Page 45: ...video SW Is video SW from pin 18 of IC501 supplied to pin 4 of IC401 YES YES NO Check drum and deck mechanism IC401 LA70011 NO NO Check TRICK H Is TRICK H from pin 21 of IC301 supplied to D302 at zero...

Page 46: ...V supplied to pin 13 of IC401 at 5 volts Change drum YES YES NO Check REC H Is REC H supplied to pin 11 of IC401 at 5 volts YES NO Check TRICK H Is TRICK H supplied to pin 1 of IC401 at zero volts YES...

Page 47: ...d to pin 25 of IC301 YES YES NO YES NO NO Is TRICK H supplied to anode of D302 at zero volt Is the luminance signal from pin 26 of IC301 fed to pin 18 of IC301 YES YES Check AV SW circuit NO NO Check...

Page 48: ...olts YES NO Check IC301 Is the down converted colour signal obtained from pin 14 of IC301 YES NO Check Q305 R323 R324 R325 R326 R327 C356 Is the down converted colour signal from pin 14 of IC301 fed t...

Page 49: ...rom pin 15 of IC301 fed to pin 25 of IC301 through pin 17 and pin 20 YES NO Check Q302 and R309 Is the luminance signal from pin 25 fed to pin 26 of IC301 through Q302 YES NO Change IC301 Is the lumin...

Page 50: ...IC302 respectively YES NO Check IC302 Is the signal obtained from pin 13 of IC302 YES NO Check IC301 Q304 R321 C334 Is the colour signal from pin 13 of IC302 fed to pin 45 through pin 52 and 46 of IC...

Page 51: ...or bar output 2 0Vp p 4 Pin 38 of IC301 PAL color bar output 2 0Vp p 5 2 Waveforms of The Luminance in The Record Mode Color bar input 5 Pin 18 of IC301 PAL REC luminance 300mVp p 6 Pin 18 of IC301 SE...

Page 52: ...5Vp p g Pin 25 of IC301 0 5Vp p h Pin 26 of IC301 0 5Vp p j Pin 38 of IC301 Video out 2 0Vp p k Pin 40 of IC301 400mVp p l Pin 42 of IC301 300mVp p 5 4 Waveforms of the Luminance in the PB Mode DP 1...

Page 53: ...5Vp p DOWN Pin 20 of IC301 500mVp p z Pin 37 of IC301 Video out 2 0Vp p x Pin 48 and 50 of IC301 240mVp p c Pin 52 of IC301 300mVp p v Pin 45 of IC301 500mVp p b Pin 46 of IC301 500mVp p 5 5 Waveforms...

Page 54: ...INPUT H Hi Fi 11 REMOCON IN I REMOCON DATA INPUT P REMOCON RECEIVER 12 A SW O Hi Fi A SWP OUTPUT P Hi Fi 13 NC 14 Q V SYNC O PINOUT THIS SIGNAL DURING TRICK MODES PULSE L VIDEO 2HD SW PULSE 15 C ROTAR...

Page 55: ...L I DEPENDING UPON CURRENT STATE L H IF L 32 768KHz H 16MHz IS SELECTED 41 VSS GND 42 XCIN I 32 768KHz OSC IN 43 XCOUT O 32 768KHz OSC OUT 44 CAM D I SEE THE PRECEDING PAGE L DECK CAM 45 NC 46 CAP I L...

Page 56: ...10 0 SEGMENT 10 67 G0 O GRID 0 68 G0 O GRID 0 69 G0 O GRID 0 70 G0 O GRID 0 71 G0 O GRID 0 72 G0 O GRID 0 73 AV4 O A V INPUT SELECTOR OUTPUT H L A V SW 74 OSC CONTROL O AUDIO OSC CONTROL PWR ON H PWR...

Page 57: ...R DATA INPUT L END SENSOR 91 PATH ADJUST I USE FOR PATH ADJUST A D PATH JIG 92 DC ENVE I DC ENVE DATA INPUT A D VIDEO 93 C SYNC I COMPOSITE SYNC DATA INPUT P VIDEO 94 AV PDC MOD O AV SW PDC MOD SERIAL...

Page 58: ...00 2 41 0 05 5 51 0 02 2 39 2 40 2 37 2 37 2 38 2 31 2 08 0 31 3 25 2 59 1 64 1 56 0 08 3 05 PIN NO 21 22 23 24 25 26 27 28 29 30 31 32 33 34 35 36 37 38 39 40 REC 0 35 1 56 0 02 2 41 2 15 3 08 0 00...

Page 59: ...59 0 00 2 54 0 00 1 75 9 18 2 17 0 83 0 04 0 42 1 97 0 00 PB 2 60 5 05 2 59 0 01 2 53 0 00 1 73 9 18 2 18 0 83 0 04 0 42 1 97 0 01 12BKK8W5ML for OSD IC DC AC Volt IC001 LC89977M for CCD IC IC302 LOC...

Page 60: ...40 41 42 43 44 REC 0 00 0 00 4 82 0 00 4 95 0 00 0 00 0 00 0 00 0 00 0 00 0 00 2 54 5 01 0 00 0 00 5 02 0 00 0 00 5 13 0 00 0 00 PB 0 00 0 00 5 01 0 00 4 47 0 00 0 00 0 00 0 00 0 00 0 00 0 00 2 4 5 0...

Page 61: ...505 PIN NO 1 2 3 REC 5 28 0 5 28 PB 5 28 0 5 28 PIN NO 1 2 3 4 5 6 7 8 REC 2 92 3 07 3 17 0 5 9 3 04 3 07 3 07 PB 3 4 3 2 3 2 0 6 0 3 0 3 2 3 2 IC051 SDA5649 MODE PIN NO 1 2 3 4 5 6 7 PAL 0 4 7 4 7 0...

Page 62: ...Q608 Q609 PB 2 30 5 30 5 40 3 20 5 40 5 40 12 3 0 00 0 00 POWER OFF 2 40 5 30 5 40 2 40 5 40 5 40 12 2 0 00 0 00 PB 0 00 0 00 0 00 0 00 0 00 0 00 12 3 0 00 5 20 POWER OFF 0 00 0 00 0 00 0 00 0 00 0 00...

Page 63: ...ON 11 0 11 0 5 88 5 88 0 0 10 25 POWER OFF 11 0 11 0 0 06 0 06 0 79 10 27 EMITTER COLLECTOR BASE PIF PART TR EE MODE PORTS LOC Q171 Q172 Q173 Q174 Q175 Q176 Q177 Q178 Q179 Q180 TWO CARRIER 9 4 9 4 9...

Page 64: ...ICE MODE is as follows 1 SERVICE MODE FOR REPAIR 2 TIMER CHECK MODE 3 CHANGE OF EEPROM DATA 4 Hi Fi CHECK MODE 5Everlasting data memory at E2 PROM OSD REMARKS 1 61 SERVICE MODE SECTION 8 SERVICE MODE...

Page 65: ...4 will be displayed To press 0 button on OSD 4 will be ejected 4The error state is displayed OK or NG in ERROR CHECK RESULTS screen means unchecked state OSD REMARKS 1 ERROR CHECK MODE 2 CHECKING is b...

Page 66: ...tton VFD SEGMENT CHECK will be selected in the TIMER CHECK MODE screen All segments are lit on VFD for 5 seconds OSD REMARKS 1 8 3 Timer Check Mode 1 FAST CLOCK OPERATION ITEM 1Press the number 1 butt...

Page 67: ...button to move from right to left 3Press the button to move from upper to lower 4Press the OK button to confirm the data change 5The data is not changable related to the system OSD REMARKS 1 8 5 Chan...

Page 68: ...ssed after this the data of the current status are stored in EEPROM then the SERVICE MODE MENU is displayed 10 The data corresponding to the system speed input selection trick play are not changed The...

Page 69: ...RUN MODE 0 FM AGC ON 0 COPY GUARD OFF 1 FM AGC OFF 1 COPY GUARD ON THROUGH 0 PB EQ TRAP 700KHz 1 PB EQ TRAP 1MHz 0 APC LOOP BEFORE 0 NORMAL 1 APC LOOP AFTER 1 SQ PB 0 THIS BIT IS FIX 0 VIDEO PEAK LOW...

Page 70: ...1 1 1 GROUP 5 0 1 0 1 1 0 1 1 GROUP 6 1 0 0 1 1 0 1 0 GROUP 7 0 0 0 0 1 0 0 0 GROUP 8 1 0 0 1 1 0 0 0 GROUP 9 1 0 0 0 1 0 8 7 6 5 4 3 2 1 TRICK PLAY GROUP 1 0 1 0 1 1 1 1 0 GROUP 2 1 1 1 1 1 1 0 1 GR...

Page 71: ...68 CIRCUIT DIAGRAMS 9 1 Connection Diagram SECTION 9 CIRCUIT DIAGRAM 68...

Page 72: ...69 CIRCUIT DIAGRAMS R819 5 1 9 2 Power Circuit Diagram...

Page 73: ...70 CIRCUIT DIAGRAMS 9 3 Syscon and Logic Circuit Diagram...

Page 74: ...71 CIRCUIT DIAGRAMS 9 4 AV SW Circuit Diagram...

Page 75: ...72 CIRCUIT DIAGRAMS 9 5 IF PDC Circuit Diagram TM...

Page 76: ...73 CIRCUIT DIAGRAMS 9 6 If Module Circuit Diagram A2...

Page 77: ...74 CIRCUIT DIAGRAMS 9 7 If Module Circuit Diagram Nicam...

Page 78: ...75 CIRCUIT DIAGRAMS 9 8 Hi Fi Pre Amp Circuit Diagram...

Page 79: ...76 CIRCUIT DIAGRAMS 9 9 Video Audio Circuit Diagram...

Page 80: ...77 CIRCUIT DIAGRAMS 9 10 Remocon Circuit Diagram...

Page 81: ...SECTION 10 COMPONENTS LOCATION GUIDE ON PCB BOTTOM VIEW 78 P C B LOCATION 10 1 PCB Main...

Page 82: ...80 P C B LOCATION 10 3 PCB Logic DV K8K S S Series DV K86 S S Series DV K82 S S Series...

Page 83: ...81 P C B LOCATION DV K88 S S Series...

Page 84: ...SECTION 11 DISASSEMBLY 83 DISASSEMBLY 11 1 Packing Ass y...

Page 85: ...84 DIAGRAMS DV K88 Series DV K82 Series DV K8K Series DV K86 Series 11 2 Front Panel Assembly...

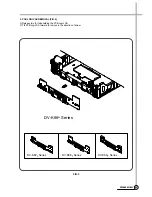
Page 86: ...6 8 C I R C U I T D I A G R A M S 9 1 C o n n e c t i o n D i a g r a m S E C T I O N 9 C I R C U I T D I A G R A M 6 8...

Page 87: ...85 DISASSEMBLY 1 TOP COVER REMOVAL FIG 1 1 Remove five 5 screws holding the top cover 2 Carefully lift the back of the top cover and slide to the rear to remove 11 3 Instrument Disassembly FIG 1...

Page 88: ...AL FIG 2 1 Remove the top cover 2 Remove two 2 screws securing front panel 3 Remove the F L bracket 4 Release seven 7 tabs holding the front panel 5 Remove the front panel DV K88 Series DV K82 Series...

Page 89: ...87 DISASSEMBLY 3 BOTTOM COVER REMOVAL FIG 3 1 Remove the top cover and front panel 2 Remove three 3 screws 3 Release four 4 tabs and lift out the bottom cover FIG 3...

Page 90: ...88 DISASSEMBLY 4 F L DOOR REMOVAL FIG 4 1 Open the F L door 90 2 Remove the F L door in the direction of arrow FIG 4...

Page 91: ...SEMBLY 5 PCB LOGIC AS REMOVAL FIG 5 2 Release two 2 tabs holding the PCB Logic AS 3 Tilt PCB Logic AS forward to remove in the direction of arrow DV K82 Series DV K86 Series DV K8K Series DV K88 Serie...

Page 92: ...90 DISASSEMBLY 6 COVER PRE AMP DECK AS REMOVAL FIG 6 1 Remove the top cover bottom cover and front panel 2 Remove five 5 screws 3 Pull out the DECK AS and COVER PRE AMP in the direction of arrow FIG 6...

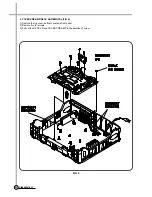
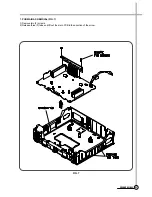
Page 93: ...91 DISASSEMBLY 7 PCB MAIN AS REMOVAL FIG 7 1 Remove two 2 screws 2 Release three 3 tabs and lift out the main PCB in the direction of the arrow FIG 7...

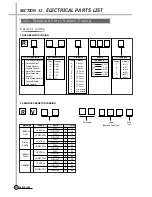
Page 94: ...478 0 47 479 4 7 471 470 472 4 7K 473 47K DISTANCE Code Distance A 2 5 mm B 5 0 mm C 7 5 mm D 10 0 mm E 12 5 mm F 15 0 mm G 17 5 mm H 20 2 mm J 22 0 mm k 25 0 mm X Auto lnsertion Z Auto lnsertion TOLE...

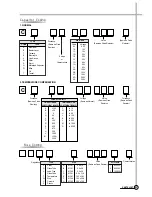
Page 95: ...Fixed Resistor C CHARACTERISTIC CAPACITANCE TEMPERATURE COEFFICIENT PPM C COEFFICIENT PPM C A 100 F 15 B 30 G 30 C 0 H 60 H 30 J 120 L 80 K 250 P 150 L 500 R 220 M 1000 S 330 N 2500 T 470 U 750 V 1000...

Page 96: ...PLFSQ2014 FILTER LINE SQ 2014 40MH L802 5PLFSQ2014 FILTER LINE SQ 2014 40MH M601 97P0717000 BOARD ANT SCART 2 HI PS HB M802 97P0974300 PLATE EARTH P ET T 0 4 PT01 97P6269100 CONN WAFER 00 8283 0712 00...

Page 97: ...2 C173 HCLK101JCA C CHIP CERA 50V SL 100PF J 2012 C175 HCBK103KCA C CHIP CERA 50V X7R 0 01MF K 2012 C177 HCLK101JCA C CHIP CERA 50V SL 100PF J 2012 C184 HCBK103KCA C CHIP CERA 50V X7R 0 01MF K 2012 C1...

Page 98: ...10 HCQK220JCA C CHIP CERA 50V CH 22PF J 2012 C511 HCQK220JCA C CHIP CERA 50V CH 22PF J 2012 C513 HCBK103KCA C CHIP CERA 50V X7R 0 01MF K 2012 C514 HCBK102KCA C CHIP CERA 50V X7R 1000PF K 2012 C515 HCB...

Page 99: ...3216 RJ015 HRF8000 EA R CHIP 1 8 0 OHM 3216 RJ016 HRF8000 EA R CHIP 1 8 0 OHM 3216 RJ017 HRF8000 EA R CHIP 1 8 0 OHM 3216 RJ018 HRF8000 EA R CHIP 1 8 0 OHM 3216 RJ019 HRF8000 EA R CHIP 1 8 0 OHM 3216...

Page 100: ...1 10 27K OHM J 2012 R258 HRFT473JCA R CHIP 1 10 47K OHM J 2012 R260 HRFT392JCA R CHIP 1 10 3 9K OHM J 2012 R262 HRFT472JCA R CHIP 1 10 4 7K OHM J 2012 R263 HRFT472JCA R CHIP 1 10 4 7K OHM J 2012 R278...

Page 101: ...IP 1 10 47K OHM J 2012 R548 HRFT101JCA R CHIP 1 10 100 OHM J 2012 R549 HRFT101JCA R CHIP 1 10 100 OHM J 2012 R550 HRFT332JCA R CHIP 1 10 3 3K OHM J 2012 R551 HRFT474JCA R CHIP 1 10 470K OHM J 2012 R55...

Page 102: ...MF 4X7 TP C012 CEXF1H229A C ELECTRO 50V RSM 2 2MF 4X7 TP C051 CEXF1C470A C ELECTRO 16V RSM 47MF 5X7 TP C174 CEXF1H479A C ELECTRO 50V RSM 4 7MF 4X7 C176 CEXF1E220A C ELECTRO 25V RSM 22MF 6 3X7 C178 CEX...

Page 103: ...TP C330 CEXF1A101A C ELECTRO 10V RSM 100MF 6 3X7 C331 CEXF1H109A C ELECTRO 50V RSM 1MF 4X7 TP C333 CEXF1H109A C ELECTRO 50V RSM 1MF 4X7 TP C337 CEXF1H109A C ELECTRO 50V RSM 1MF 4X7 TP C343 CEXF1H109A...

Page 104: ...P460170P CLIP FUSE PFC5000 0702 IC504 1K1A7033P IC KIA7033P L001 5CPX101J COIL PEAKING PL 100UH J TAPPING L002 5CPX569G T COIL PEAKING EL0405RA 5R6G RADIAL TP L051 5CPX101J COIL PEAKING PL 100UH J TAP...

Page 105: ...5Y Q602 TZTA1266Y TR KTA1266Y AUTO 1015Y Q603 TZTA1266Y TR KTA1266Y AUTO 1015Y Q604 TZTA1266Y TR KTA1266Y AUTO 1015Y Q605 TZTA1266Y TR KTA1266Y AUTO 1015Y Q606 TZTA1266Y TR KTA1266Y AUTO 1015Y Q607 TZ...

Page 106: ...0 01MF M AXIAL C633 CBZP1C103M C CERA SEMI 16V Y5S 0 01MF M AXIAL D171 DZN4148 DIODE 1N4148 AUTO 52MM D251 DZN4148 DIODE 1N4148 AUTO 52MM D301 DZN4148 DIODE 1N4148 AUTO 52MM D302 DZN4148 DIODE 1N4148...

Page 107: ...R9 AUTO JP001 85801065GY WIRE COPPER AWG22 1 0 65 TIN COATING JP002 85801065GY WIRE COPPER AWG22 1 0 65 TIN COATING JP003 85801065GY WIRE COPPER AWG22 1 0 65 TIN COATING JP004 85801065GY WIRE COPPER A...

Page 108: ...5801065GY WIRE COPPER AWG22 1 0 65 TIN COATING JP047 85801065GY WIRE COPPER AWG22 1 0 65 TIN COATING JP048 85801065GY WIRE COPPER AWG22 1 0 65 TIN COATING JP049 85801065GY WIRE COPPER AWG22 1 0 65 TIN...

Page 109: ...5801065GY WIRE COPPER AWG22 1 0 65 TIN COATING JP097 85801065GY WIRE COPPER AWG22 1 0 65 TIN COATING JP098 85801065GY WIRE COPPER AWG22 1 0 65 TIN COATING JP099 85801065GY WIRE COPPER AWG22 1 0 65 TIN...

Page 110: ...5801065GY WIRE COPPER AWG22 1 0 65 TIN COATING JP147 85801065GY WIRE COPPER AWG22 1 0 65 TIN COATING JP148 85801065GY WIRE COPPER AWG22 1 0 65 TIN COATING JP149 85801065GY WIRE COPPER AWG22 1 0 65 TIN...

Page 111: ...5801065GY WIRE COPPER AWG22 1 0 65 TIN COATING JP196 85801065GY WIRE COPPER AWG22 1 0 65 TIN COATING JP197 85801065GY WIRE COPPER AWG22 1 0 65 TIN COATING JP198 85801065GY WIRE COPPER AWG22 1 0 65 TIN...

Page 112: ...5801065GY WIRE COPPER AWG22 1 0 65 TIN COATING JP246 85801065GY WIRE COPPER AWG22 1 0 65 TIN COATING JP247 85801065GY WIRE COPPER AWG22 1 0 65 TIN COATING JP248 85801065GY WIRE COPPER AWG22 1 0 65 TIN...

Page 113: ...COIL PEAKING LAL02TB 2 2UH M AXIAL L610 5PB13857R COIL BEAD BI3857R RADIAL L611 5PB13857 COIL BEAD BI3857 AXIAL R006 RD AZ222J R CARBON FILM 1 6 2 2K OHM J R007 RD 4Z471J R CARBON FILM 1 4 470 OHM J R...

Page 114: ...FILM 1 6 1K OHM J R332 RD AZ104J R CARBON FILM 1 6 100K OHM J R333 RD AZ101J R CARBON FILM 1 6 100 OHM J R334 RD AZ155J R CARBON FILM 1 6 1 5M OHM J R503 RD AZ102J R CARBON FILM 1 6 1K OHM J R507 RD A...

Page 115: ...5 RD 4Z471J R CARBON FILM 1 4 470 OHM J R606 RD AZ750J R CARBON FILM 1 6 75 OHM J R607 RD AZ102J R CARBON FILM 1 6 1K OHM J R608 RD AZ102J R CARBON FILM 1 6 1K OHM J R609 RD AZ561J R CARBON FILM 1 6 5...

Page 116: ...3 PDC VPS LOC PART CODE PDC VPS ON PDC VPS OFF IC051 12HV5649 ADD DELETE C053 HCBK103KCA ADD DELETE C054 HCBK222KCA ADD DELETE C055 HCFK333ZCA ADD DELETE RJ015 HRF8000 EA ADD DELETE R052 HRFT105JCA A...

Page 117: ...1Z90 SW TACT SKHV10910A SW707 5S50101Z90 SW TACT SKHV10910A SW708 5S50101Z90 SW TACT SKHV10910A 42 97PC304000 PCB LOGIC SW A AUTO DV K884DY AQ C702 CBZP1C103M C CERA SEMI 16V Y5S 0 01MF M AXIAL C703 C...

Page 118: ...ING JP726 85801065GY WIRE COPPER AWG22 1 0 65 TIN COATING JP727 85801065GY WIRE COPPER AWG22 1 0 65 TIN COATING JP728 85801065GY WIRE COPPER AWG22 1 0 65 TIN COATING JP729 85801065GY WIRE COPPER AWG22...

Page 119: ...C117 HCFK104ZCA C CHIP CERA 50V Y5V 0 1MF Z 2012 C118 HCBK103KCA C CHIP CERA 50V X7R 0 01MF K 2012 C122 HCBK103KCA C CHIP CERA 50V X7R 0 01MF K 2012 C125 HCLK181JCA C CHIP CERA 50V SL 180PF J 2012 C1...

Page 120: ...R SEMI FIXED H20K 5X3 6Y PC MS 52 97PA490700 PCB IF A AUTO AS DV K884DY AQ JP001 85801065GY WIRE COPPER AWG22 1 0 65 TIN COATING JP002 85801065GY WIRE COPPER AWG22 1 0 65 TIN COATING JP003 85801065GY...

Page 121: ...MF Z 2012 C117 HCFK104ZCA C CHIP CERA 50V Y5V 0 1MF Z 2012 C118 HCBK103KCA C CHIP CERA 50V X7R 0 01MF K 2012 C119 HCBK223KCA C CHIP CERA 50V X7R 0 022MF K 2012 C120 HCBK223KCA C CHIP CERA 50V X7R 0 02...

Page 122: ...P 1 10 100K OHM J 2012 R120 HRFT104JCA R CHIP 1 10 100K OHM J 2012 R124 HRFT333JCA R CHIP 1 10 33K OHM J 2012 R126 HRFT105JCA R CHIP 1 10 1M OHM J 2012 R128 HRFT684JCA R CHIP 1 10 680K OHM J 2012 R129...

Page 123: ...85801065GY WIRE COPPER AWG22 1 0 65 TIN COATING JP012 85801065GY WIRE COPPER AWG22 1 0 65 TIN COATING JP013 85801065GY WIRE COPPER AWG22 1 0 65 TIN COATING R101 RD AZ103J R CARBON FILM 1 6 10K OHM J R...

Page 124: ...12 C458 HCLK221JCA C CHIP CERA 50V SL 220PF J 2012 C459 HCBK473KCA C CHIP CERA 50V X7R 0 047MF K 2012 C460 HCBK103KCA C CHIP CERA 50V X7R 0 01MF K 2012 C462 HCBK103KCA C CHIP CERA 50V X7R 0 01MF K 201...

Page 125: ...JP411 85801065GY WIRE COPPER AWG22 1 0 65 TIN COATING JP412 85801065GY WIRE COPPER AWG22 1 0 65 TIN COATING JP413 85801065GY WIRE COPPER AWG22 1 0 65 TIN COATING R402 RD AZ471J R CARBON FILM 1 6 470 O...

Page 126: ...YA1 IC POWER SW PWR TOP214YA1 L11 56X0000005 COIL BEAD BLI 7 5A L12 56X0000007 COIL BEAD BI 4865 5TS BASE PC11 1LTV817AB IC PHOTO COUPLER LTV817M CTR 80 160 R13 RS01Y334J R M OXIDE FILM 1W 330K OHM J...

Page 127: ...884DY AQ DZ12 DZZ6R8BM DIODE ZENER UZ 6 8BM AUTO D12 DZEU01Z DIODE EU01Z JP01 85801065GY WIRE COPPER AWG22 1 0 65 TIN COATING JP02 85801065GY WIRE COPPER AWG22 1 0 65 TIN COATING JP04 85801065GY WIRE...

Page 128: ...dj Fixture Use for X position adjust Tape path alignment 97PB396000 Special Driver Use for X position adjust Tape path alignment SECTION 13 SERVICE JIG CONNECTION METHODS The Service Fixture Cable 1 C...

Page 129: ...ent of the tape transporting system NOTE How to executing the unit in the service mode 1 Press the MENU button to go to MAIN MENU screen and press the number 484 in sequence then go to SERVICE MODE sc...

Reviews: