background image

1

2

Daewoo Video Cassette Recorder User’s Guide

Overview of the equipment,

continued

9

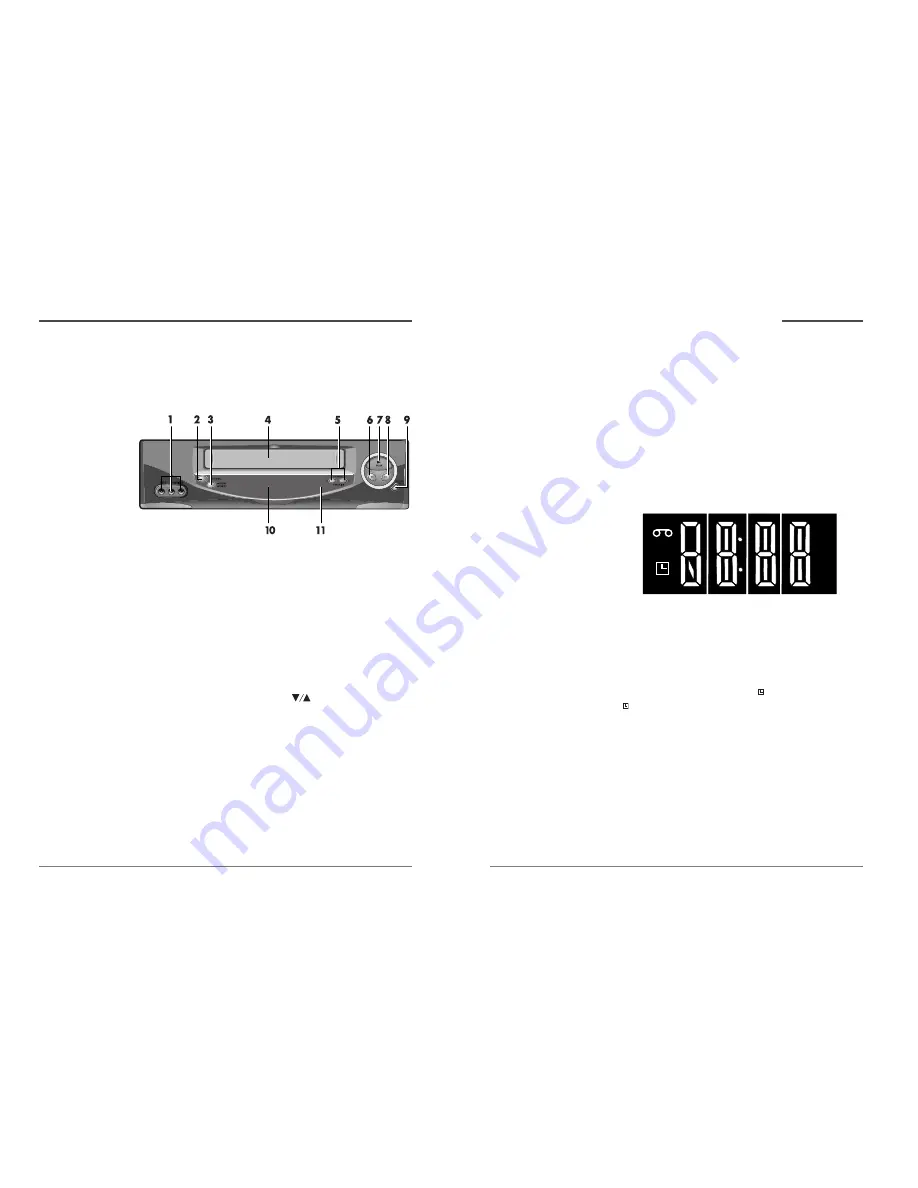
RECORD/OTR

Press to record the program currently airing on  the
channel. Press multiple times to process one-
touch-recording (OTR)time options.

10

Display panel

Displays information to assist you in operating
the VCR successfully.

11

Remote Sensor

This receiver receives a signal from your remote
control. Do not block it.

Front panel display

On/OFF

Turned on/off 

SLOW

Slow Motion

PLAY

Playback

REC

Record

FF

Fast Forward 

PAUS

Pause

SCH

Forward Search

STOP

Stop

REW

Rewind

SP/EP

Tape Speed

SCH-

Reverse Search

EJCT

Eject

HIFI

Hi-Fi

REC

TimerRecording   

R0:30,R1:00

OTR (One Touch Recording)

* When the lighted indicator is blinking on the display panel, the VCR

is in the child lock mode.

VCR

REC

LP

AM

Daewoo Video Cassette Recorder User’s Guide

This section summarizes the buttons, controls, and
terminals that you will use with your VCR.

Front panel

1

FRONT AUDIO/VIDEO JACK

Attach the VCR’s audio & video input at these
terminals.

2

POWER

Press to turn the VCR on or off.

3

STOP/EJECT

Press to stop tape movement and to eject a video
cassette.

4

Cassette compartment

Insert a video cassette into this slot.

5

CHANNEL/TRACKING 

Press to change the channel (channels stored in
memory only) or to adjust the tracking.

6

REW

Press to rewind a video cassette.

7

PLAY

Press to play a video cassette or press to during
video cassette playback to temporarily stop playback

8

FF

Press to fast forward a video cassette.

• To use the Front AV

jack,check the ‘Video2’ is
displayed on the TV screen
by pressing the INPUT key,
after connecting the Front
AV jack to Camcorder or
another VCR.

Overview of the equipment

L

R

Summary of Contents for DV-T87N

Page 1: ...Video Cassette Recorder User s Guide DV T87N As an ENERGYSTAR Partner DAEWOO has determined that this product meets the ENERGYSTAR guidelines for energy efficiency...

Page 2: ...e See example as shown i ANTENNA DISCHARGE UNIT NEC SECTION 810 20 ANTENNA LEAD IN WIRE POWER SERVICE GROUNDING ELECTRODE SYSTEM NEC ART 250 PART H GROUND CLAMP ELECTRIC SERVICE EQUIPMENT GROUNDING CO...

Page 3: ...damp cloth for cleaning 15 Object and Liquid Entry Never push objects of any kind into this video product through openings as they may touch dangerous voltage points or short out parts that could resu...

Page 4: ...CR is in the child lock mode VCR REC LP AM Daewoo Video Cassette Recorder User s Guide This section summarizes the buttons controls and terminals that you will use with your VCR Front panel 1 FRONT AU...

Page 5: ...ltiple times to process one touch recording OTR time options 9 SPEED Press to select tape recording speed SP or EP 10 MENU Press to display the main menu 11 CLEAR Press to delete previous selections 1...

Page 6: ...ssette Recorder User s Guide Overview of the equipment continued Overview of the equipment continued 13 EJECT Press to eject a video cassette from the compartment 14 CH TRACKING Up Down Press to chang...

Page 7: ...th two sets of leads You may have two sets of leads from your antenna system If your antenna system has both a coaxial lead and twin 300 ohm leads purchase a combiner available at electronics stores P...

Page 8: ...eo inputs 1 Connect a video cable to the VIDEO OUT terminal on the back of the VCR 2 Connect the other end of the video cable to the VIDEO IN terminal on the TV TV TV TV Connecting your VCR continued...

Page 9: ...tch available at your local electronics store Connect a third coaxial cable between the OUT terminal on the converter box and the B IN terminal on the A B switch Connect a coaxial cable between the OU...

Page 10: ...Once you have connected your VCR and put batteries in the remote control you are ready to use the VCR Before you start however you must be certain to do the following Turn on the television Tune the...

Page 11: ...ser s Guide Setting channels automatically Auto Channel Search Make sure that you use the auto channel search feature during daytime broadcast hours If you use the auto channel search feature at late...

Page 12: ...s Guide 4 Press 2 to select Add Remove Channels 5 Press DISPLAY to add the channel 6 Press MENU three times to exit from the menus Setting the Cable Box Cable Box Setup 1 Press MENU to display the men...

Page 13: ...nt panel and the VCR will eject the tape Pull the cassette out gently Audio visual material may include works of copyright which must not be recorded without authorization of the copyright owner If yo...

Page 14: ...video cassette has no safety tab e g a rented video cassette the VCR will automatically play the tape once you insert it If the VCR does not play the video cassette press PLAY Searching forward while...

Page 15: ...channel 3 or 4 or to the video input Insert a video cassette with a safety tab into the VCR If the VCR indicator VCR is not lit press TV VCR If your VCR is connected to an antenna set the viewing mode...

Page 16: ...the program airs Day Sat Year 01 will be automatically 11 Press 1 or 2 to select the recording speed and press MENU and the following screen will appear 12 Press MENU three times repeatedly to return...

Page 17: ...if the program is a broadcast in stereo or with a SAP Consult a television guide for program broadcast information The following guidelines will help you to determine the best audio playback mode Cho...

Page 18: ...second program the VCR will skip over it If you record multiple programs in one recording session the VCR will only find the index mark that was placed on the video cassette tape when the recording s...

Page 19: ...rmation on this feature SPRING Forward Fall Backward In the Spring daylight saving time begins on the first Sunday in April Because the clock automatically changes from 2 00 AM to 3 00 AM forward one...

Page 20: ...21 19 17 15 13 11 9 7 5 3 1 INPUT AUDIO L R VIDEO R L VIDEO OUT RF OUT ANT IN OUT IN VIDEO AUDIO L R AUDIO OUT It is recommended that the tape speed be set to the SP mode on the recording VCR for best...

Page 21: ...Make sure the batteries are fresh Make sure that you are using the remote control within the operational range no more than 30 either Glossary AFT Automatic fine tuning a circuit that automatically ad...

Page 22: ...x H x D 14 17 x 3 58 x 9 37 inches Carton size W x H x D 17 52 x 6 11 x 12 21 inches Weight Net 6 41 lbs Gross 8 37 lbs Troubleshooting continued side of the remote sensor centre and no more than 23...

Reviews: