21
20
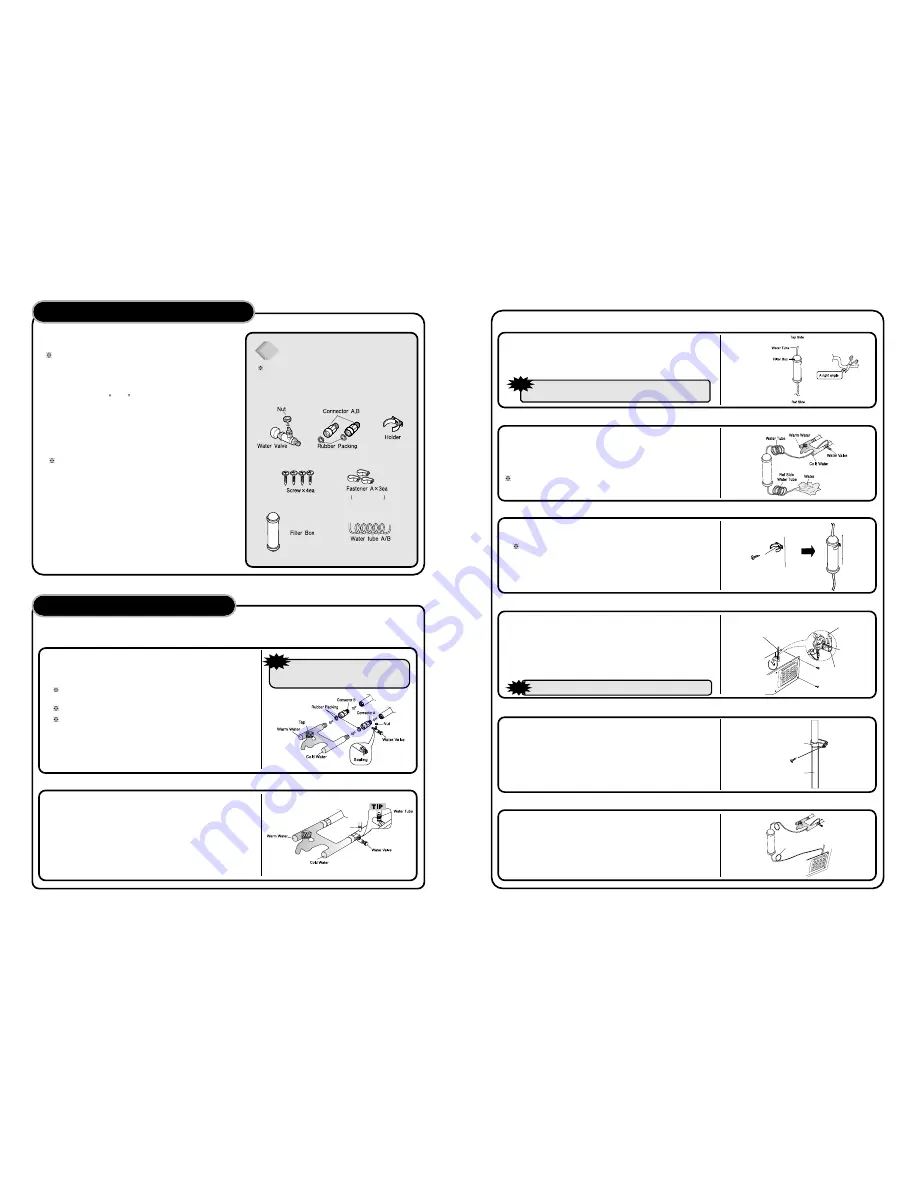
7. Fasten the Water Tube.
5. Attach the Filter Box
6. Connect the Water Tube to the refrigerator.
1) Remove the rear cover at the bottom back of the refrigerator.
2) Insert the fastening ring into the Water tube.
(Be careful to follow the direction of the nut.)
3) Insert the Water Tube into the top of Water Valve, turn the nut clockwise to
fasten it. (The Water valve is to the right of the motors.)
4) Check for any bent tubes or water leaks; if so, re-ckeck instalation procedure.
5) Replace the rear cover. (The Water Tube should be placed between the
groove of the refrigerator back and motor cover.)
Water Tube
Water Tube
Nut
1) Screw and fasten the filter holder to the left/right side of the back of
refrigerator.
In case the holder is not fastened well, remove the back paper of
the tape on the filter holder and attach it."
2) Insert the filter box into the holder.
1) Fasten the Water Tube with the [Fastener A] .
2) Check if the tube is bent or sqeezed. If so, set it right to prevent any
water leak.
Fastener A
Water Tube
4. Remove any substances in the filter.
1) Open the main tap water valve and check if water comes out of the
Water Tube.
2) Check if the Water Valve is open in case water does not come out.
3) Leave the valve open until clean water is coming out.
Initial water may contain some substances out of filter
(manufacturing process).
Set the tube upright as the figure shows.
Achtung
Achtung
8. After installation of Water Supply System
1) Plug the refrigerator, press the [WATER] button on the control panel for
2~3 minutes to remove any air (bubble) in the pipes and drain out the
initial water.
2) Check the water leak again through the water supply system (tubes,
connectors and pipes) Rearrange the tubes again and do not move the
refrigerator.
Water Tube
Leave a sufficient distance when cutting the tubes.
Achtung
Achtung
3. Get ready to install the Water Filter
1) Measure an approximate distance between the filter and the Water
Tube and cut the tube off filter vertically.
2) Connect the tubes to the filter as the figure shows.
Water Valve
How to install Water Line
WATER SUPPY KIT
1. The water pressure should be 3kgf/cm
2
or more to run the
automatic icemaker.
Checkup your tap water pressure ; if a cup of 180cc is full
within 10 seconds, the pressure is OK.
2. When installing the water tubes, ensure they are not colse to
any hot surfaces.
3. The water filter only filters water ; it does not eliminate any
bacteria or microbes.
4. If the water pressure is not so high to run the icemaker, call the
local plumber to get an additional water pressure pump.
5. The filter life depends on the amount of use. We recommend
you replace the filter at least once every 6months.
When attaching the filter, place it for easy access (removing
& replacing)
6. After installation of refrigerator and water line system, select
[WATER] on your control panel and press it for 2~3 minutes to
supply water into the water tank and dispense water.
7. Use sealing tape to every connection of pipes/tubes to ensure
there is no water leak.
8. The water tube should be connected to the cold water line.
Check the parts below for installing water supply.
Some other necessary parts are available at your local
service agents.
Installation Procedure
1. Join [Connector A], [Connector B] and [Water Valve] to the tap water lines.
The water valve should be connected to
the cold water line, otherwise there can be
a problem of cold water supply."
Achtung
Achtung
1) Switch off the main water line(valve).
2) Connect [Water Valve] and [Connector A].
3) Join [Connector A], [Connector B] to the tap water lines
Use only [Connector A + Water Valve] in case there's only one tap
water line.
Apply the sealing tape to all the joints as the figure shows.
If the connectors(valves) do not fit the existing water line, call your
service agent for additional guideance and action.
2. Connect the Water Tube to the Water Valve.
1) Insert the Nut to the Water tube.
2) Insert the Tube to the Valve as the figure shows.
3) Fasten the nut to join firmly.
(30154202400)
3011202000
(3010541600)
(A:3019503200
B:3019503300)
(3012020700)
(3014454500)
(7112401211)


