20
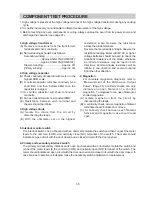
FM
RD
RD
LIVE
PRIMARY
INTERLOCK
SWITCH(UPPER)
L
R
RD
HIGH VOLTAGE
TRANSFORMER
OR
OR
H.V.
CAPACITOR
MAGNETRON
H.V. DIODE
GY
GY
GN
GN
BL
GY
GY
RELAY-1
RELAY-2
CONTROL P.W.B. ASS'Y
GY
3
2
1
NOTE : RD : RED
WH : WHITE
BK : BLACK
GN : GREEN
BR : BROWN
OR : ORANGE
BL : BLUE
GY : GRAY
GE : GREEN/YELLOW
CL : CAVITY LAMP
FM : FAN(BLOWER) MOTOR
GM : GEARED MOTOR
[CONDITION]
DOOR : CLOSED
COOK : OFF
NEUTRAL
GN
WH
CL
GM
BL
POWER SUPPLY
SINGLE PHASE ~ ONLY
RD
BK
BK
WH
GY
BK
SECONDARY
INTERLOCK SWITCH
Monitor
Interlock
Switch
Procedure
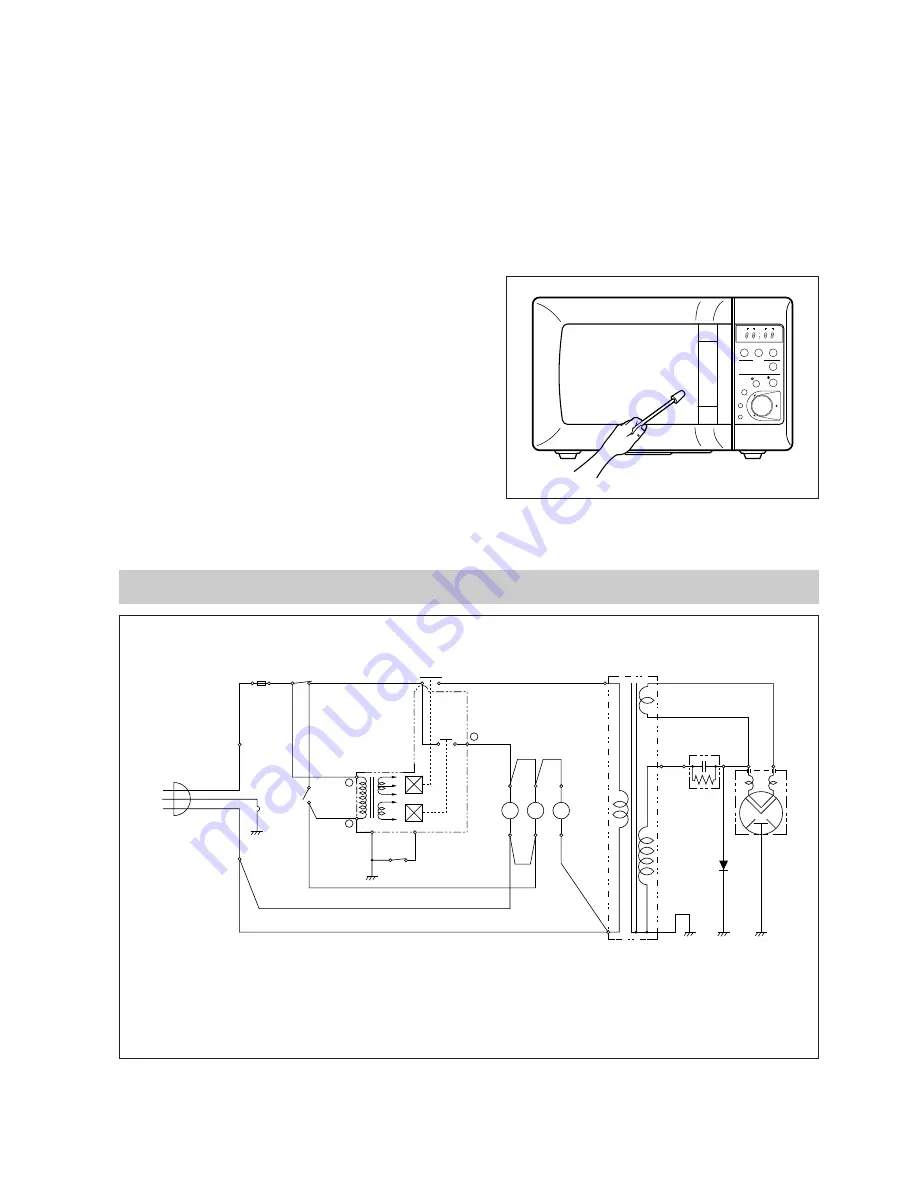
A) Prepare Microwave Energy Survey Meter, 600cc glass beaker, glass thermometer 100°C or 212°F.
B) Pour 275cc±15cc of tap water initially at 20±5°C (68±9°F) in the 600cc beaker with an inside diameter of
approx. 8.5cm (3.5 in).
C) Place it at the center of the tray and set it in a cavity.
D) Close the door and operate the oven.
E) Measure the leakage by using microwave energy survey meter with dual ranges, set to 2,450 MHz.
-Measured radiation leakage must not exceed the values prescribed below.
• Leakage for a fully assembled oven with door normally closed must be less than 4mW/cm
2
.
-When measuring the leakage, always use the 2 in (5cm) space cone with probe. Hold the probe
perpendicular to the cabinet, door. Place the space
cone of the probe on the door, cabinet, door seam,
door viewing screen, the exhaust air vents and the
suction air vents.
-Measuring should be in a counter-clockwise direction
at a rate of 1 inch/sec. If the leakage of the cabinet
door seam is unknow, move the probe more slowly.
-When measuring near a corner of the door, keep the
probe perpendicular to the areas making sure the
probe end at the base of the cone does not get
closer than 2 inches from any metal.
If it does, erroneous reading may result.
Fig. 1
WIRING DIAGRAM
Stop
Defrost
1
2
Weight
Quontity
Time
Lock
Auto cook
Watt
g
Power
Defrost
+1min
Auto Cook
STOP
START
CLEAR
Speedy
More
Less
Clock
Tim
er
/W
ei
gh
t/Q
ua
nt
ity
1. Beveroge
2. Soup
3. Casserole
4. Vegetable
5. Fish Fillets
Summary of Contents for KOR-616T0P
Page 40: ...39 FIG 5 MEASUREMENT POINT MP2 MP3 MP1...
Page 41: ...40 FIG 5 MEASUREMENT POINT...
Page 44: ...43 2 P C B CIRCUIT DIAGRAM...
Page 46: ...45 4 PRINTED CIRCUITS BOARD...
Page 47: ...46...
Page 52: ...51 3 Main Unit...


