background image

15

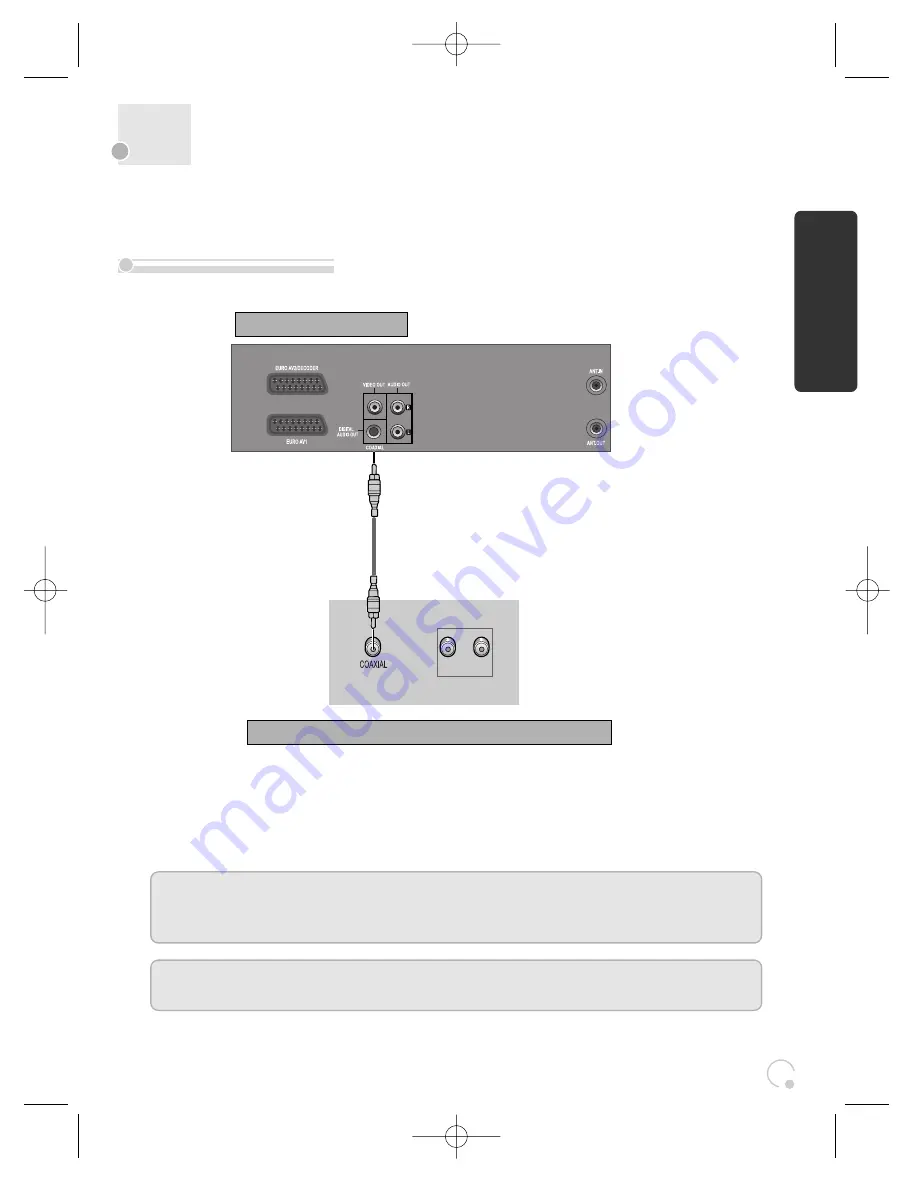
Connecting Dolby Digital Amp with
Digital Audio Out Jack

(L) AUDIO IN (R)

1

1

Select COAXIAL to connect to amp of Dolby Digital.

* If you want to know about “Dolby Digital”, please refer to [About DVD] in 53-55p.

Home Theatre Receiver with Dolby Digital decoding capability

REAR PANEL OF DVD-VIDEO

CONNECTING  CABLE
(Not supplied)

Manufactured under license from Dolby Laboratories. 
"Dolby" and the double-D symbol are registered trademarks of Dolby Laboratories. 

How to connect 

“DTS” and “DTS Digital Out” are trademarks of Digital Theatre Systems, Inc.

Installation

DC-G8GD1P-JL (DESUK)   2006.4.19 9:42 AM  ˘

`

15

Summary of Contents for SG-9210P

Page 1: ...anual carefully before connecting your DVD VCR and operating it for the first time Keep the manual in a safe place for future reference SG 9210P DVD PLAYER VIDEO CASSETTE RECORDER HELPLINE 08701002525 DC G8GD1P JL DESUK 2006 4 19 9 42 AM a ...

Page 2: ... Installation 17 Setting time and date Auto clock 18 OSD ON OFF Output Select 19 DVD Playback 20 VCR Playback 21 Recording 22 VCR Operation Tuning in New Stations 24 Timer Recording 27 More Functions 29 Connections and Copying 33 DVD Operation Playing a desired scene 35 Confirming the current PLAYING TIME 39 Selecting an AUDIO language and SUBTITLE language 41 Selecting ZOOM and Multi Angle 42 Abo...

Page 3: ... direct exposure to the laser beam do not try to open the enclosure Visible laser radiation when open and interlocks defeated DO NOT STARE INTO THE BEAM DANGER Visible laser radiation when open and interlock failed or defeated Avoid direct exposure to beam CAUTION Do not open the top cover There are no user serviceable parts inside the Unit leave all servicing to qualified service personnel This s...

Page 4: ...d openings in the case are provided for ventilation to ensure reliable operation of the unit and to protect it from overheating These openings must not be blocked or covered These openings must not be blocked by placing the unit on a bed sofa rug or other similar surface This unit should never be placed near or over a radiator or heat radiator This unit should not be placed in a built in installat...

Page 5: ...ing instructions Improper adjustment of other controls may result in damage and will often require work by a qualified technician to restore the unit to its normal operation E If the unit has been dropped or the cabinet has been damaged 18 Replacement Parts When replacement parts are required have the service technician verify that the replacements he uses have the same safety characteristics as t...

Page 6: ...itle chapter and part for DVD track disc and part for VCD CD Selective Play DVD VCD CD You can select and play the desired title chapter of DVD and track of Video CD CD in STOP mode 11 languages OSD On Screen Display function DVD You can select and display OSD in 11 languages Parental Lock function DVD This function can prevent playback of software that may be unsuitable for children Multi Audio f...

Page 7: ...g chemical cleaners Do not use any type of solvent such as gasoline or benzene as they may cause deterioration or paint to peel off Checking The video is a high precision device To obtain a clear picture we recommend regular inspection and maintenance every 1 000 hours of use by technical engineers For checking contact your dealer or your nearest service centre Checking and Replacement of Antenna ...

Page 8: ...nformation see Operation Display Window in 7p SELECT button Use to change DVD mode to VCR mode and vice versa 1 STOP button Use to stop playing 2 REWIND button Use to rewind currently being played videotape or disc or to review 3 Playback PAUSE button Playback videotape or disc Press this button to pause a screen 4 FAST FORWARD button Use to wind currently being played videotape or disc or to play...

Page 9: ...Pause RECORDING MODE DVD playback Fast playback Fast reverse playback Slow playback Pause picture DVD OPERATION VCR playback Fast forward Rewinding Fast playback CUE Fast reverse playback REVIEW Slow playback Still picture Stop Child Lock VCR OPERATION Operation Display Window Product information DC G8GD1P JL DESUK 2006 4 19 9 42 AM 7 ...

Page 10: ...uipment at your applicable collection point for the recycling of electrical electronic equipments waste In the European Union and Other European countries which there are separate collection systems for used electrical and electronic product By ensuring the correct disposal of this product you will help prevent potentially hazardous to the environment and to human health which could otherwise be c...

Page 11: ...ery installation Detach the battery cover on the rear of the remote control and insert two AAA batteries with the and ends aligned correctly Two AAA batteries supplied Product information Caution Danger of explosion if battery is incorrectly replaced For the best performance we recommend the use of Alkaline batteries Do not use rechargeable batteries When installing the batteries please observe th...

Page 12: ...ction button Clear button DVD VCR OSD Display button OK ENTER button Q DVD Menu button q DVD Chapter Title Time Search button W DVD Zoom button w Forward Search button E Stop button e DVD Next button Move into a next chapter or track VCR Frame Advance button in pause mode R DVD Repeat Playback button r DVD REPEAT a defined period from A to B button T DVD Angle button t DVD Mark button Y DVD VCR PR...

Page 13: ...al You will get better pictures and sound quality if you connect your player using a scart lead Before you start unplug all the equipment from the mains supply Television Aerial The type of aerial you should use depends on local interference and how far you are from the transmitter You should contact a local retailer if you have any questions about your aerial Back view of your player 200 240V 50 ...

Page 14: ... mains supply Television Aerial Back view of your player 200 240V 50 60 Hz You can use this connection if your player has two scart sockets This will improve sound and picture quality when you are recording from satellite Satellite Option 1 Connecting your player through RF lead DC G8GD1P JL DESUK 2006 4 19 9 42 AM 12 ...

Page 15: ... needed If your player does not have this connection see page 15 Player 200 240V 50 60 Hz You can also use a scart lead to improve picture and sound quality from your player Hi Fi Aerial Television If required plug a scart to phono cable into the AV1 socket on the back panel and into the audio socket on any audio amplifier Player 200 240V 50 60 Hz Hi Fi Aerial Option 1 Option 2 Installation DC G8G...

Page 16: ...her socket AV2 to connect other equipment To use this function see page 16 Howtoconnectyourplayertoacamcorder Before you start unplug all the equipment from the mains supply If you have connected your camcorder in this way you can also connect a scart lead from AV2 on the back panel of the player to the television To use this function see page 16 You can also connect the camcorder by using a phono...

Page 17: ... in 53 55p Home Theatre Receiver with Dolby Digital decoding capability REAR PANEL OF DVD VIDEO CONNECTING CABLE Not supplied Manufactured under license from Dolby Laboratories Dolby and the double D symbol are registered trademarks of Dolby Laboratories How to connect DTS and DTS Digital Out are trademarks of Digital Theatre Systems Inc Installation DC G8GD1P JL DESUK 2006 4 19 9 42 AM 15 ...

Page 18: ...ideo PR PR buttons have no effect To return to normal video use the other equipment must be turned off Recording from other Equipment Simple recording can be performed ensure the equipment is turned on and is displaying the correct channel Timer recording set the video to perform a timed recording ensuring AV1 is selected as the channel to be recorded Some equipment may have a timer which allows i...

Page 19: ...e TV and player 1 OK for AUTO SET AUTO SET tunes in all the stations you can receive in your country Clock is automatically set 2 If other stations are positioned on near the current RF OUTPUT CH the guide message appears automatically The player recommends the optimal RF OUTPUT CH number automatically 3 Press the OK button to confirm the recommended PR Should you wish the stations to have the sam...

Page 20: ...available for models with the VPS PDC function see page 28 Some broadcasting stations may send the time and date along with the VPS PDC data The video will automatically use this time and date during the initial setting up procedure during normal use and every time you switch the video off at the mains If you find that this time and date is incorrect you can remove this feature by following the st...

Page 21: ... DVD mode Call up the player s SETUP menu 1 Choose VCR SETUP And press the OK button 2 Select OSD ON OFF If you want OSD OFF mode select it and press OK button to confirm Then OSD characters are not displayed in the normal picture 3 This player is set to OSD On Screen Display ON mode before shipping and you can change it to OFF mode VCR SETUP CLOCK SET RF OUTPUT SET 16 9 SET OSD ON OFF AUTO CLOCK ...

Page 22: ...played on the TV screen and it is converted into PBC Playback Control mode In the case of CD VCD1 1 and MP3 the disc plays 4 To stop it press button If you want to stop playback press STOP button 5 Press OPEN CLOSE button to remove the disc 6 Various Playback Methods If you want fast forward cue or reverse review playback press or œ œœ œ button in Playback mode You can watch fast playing reverse s...

Page 23: ...e desired scene in pause status If you want slow motion playback press button in Pause mode You can watch the desired scene in the slow forward cue playback NOTE VCR doesn t have Slow Reverse Playback function If you want to watch a series of screens one by one FRAME ADVANCE press NEXT button in Pause mode Each time you press this button the picture advances by one frame If you press REPLAY button...

Page 24: ...e control to change to VCR mode Insert a recordable tape Insert a tape with recording tab With CHANNEL NUMBER and INPUT buttons select the desired broadcasting channel or external input unit to be recorded 1 2 3 Select the desired speed SP or LP with SPEED button 4 Press REC button Then it starts recording 5 If you want to pause recording press PAUSE button After pressing PAUSE button if the pause...

Page 25: ... copy protected then insert a blank tape 2 2 Press REC button during playing of DVD DVD plays and VCR starts recording 3 3 If you press STOP button in DVD mode DVD and VCR will stop at the same time If you press STOP button in VCR mode VCR stops to record and DVD continues to play 1 1 First follow the steps 1 to 4 in Recording With VCR 2 2 Press REC button reference the Recording Times Table below...

Page 26: ...rogramme is encoded and you have a decoder connected to socket EURO AV2 press the œ œ or to select ON or OFF Change or create the station name 4 Once you see the station you want store it by selecting OK Tune in further stations from step 3 onwards or exit tuning mode 5 PR PRESET AUTO SET MANUAL SET PR ERASE PR ALIGN PR SELECT OK CONFIRM SETUP END MANUAL SET PR UP DOWN SELECT OK CONFIRM SETUP END ...

Page 27: ...Change the letters with the PR buttons move to the next letter with the œ œ buttons 2 Store and exit 3 MANUAL SET PR SELECT OK CONFIRM SETUP END PR01 BBC1 PR08 SKYS PR02 BBC2 PR09 MTVE PR03 ITV PR10 P 10 PR04 CHA4 PR11 P 11 PR05 SKY1 PR12 PR06 SKYN PR13 PR07 SKYM PR14 MANUAL SET PR UP DOWN 0 1 CHANGE CREATE OK CONFIRM SETUP END PR 01 RECEPTION AERIAL AUTOSEARCH CH01 FINE TUNING DECODER ON NAME ___...

Page 28: ... button 1 1 Call up the player s SETUP menu choose PR PRESET then PR ERASE 2 2 Select the station location number you want to clear Review the picture by pressing œ œ button Clear by pressing OK button PR ERASE PR SELECT PR VIEW OK ERASE SETUP END PR ALIGN PR ALIGN PR VIEW OK CONFIRM SETUP END PR01 BBC1 PR08 SKYS PR02 BBC2 PR09 MTVE PR03 ITV PR10 P 10 PR04 CHA4 PR11 P 11 PR05 SKY1 PR12 PR06 SKYN P...

Page 29: ... œ buttons and change the setting If programme timings overlap the machine will give a warning message If you don t adjust the times the machine will record the first programme completely then continue with the second one If there is no sufficient free space for the recording on the cassette the video switches automatically to LP for double recording capacity The recorder will eject cassettes whic...

Page 30: ...IMER PROGRAM ONCE PR 03 START TIME 21 20 END TIME 22 20 START DATE 13 05 SAT TAPE SPEED SP VPS PDC ON 0 ERASE CORRECT SETUP END Timer Review changing and erasing VPS PDC is a service provided by some stations to enable you to perform timer recordings precisely even if the broadcaster delays the start time of the programme slightly The time you enter is the VPS PDC time so must be correct Not all s...

Page 31: ...there is sufficient space for a recording for example To ensure the remaining time shown is accurate select from the list given in the menu the cassette tape length currently being used Call up the player s SETUP menu choose TAPE CONTROL Remaining time display is only possible when the cassette is loaded TAPE CONTROL TAPE REMAIN E 240 01 27 TAPE REMAIN GO TO ZERO COUNTER RESET INDEX INDEX E 180 E ...

Page 32: ...ETUP CLOCK SET RF OUTPUT SET 16 9 SET OSD ON OFF AUTO CLOCK PR SELECT OK CONFIRM SETUP END 16 9 SET AUTO OFF ON PR SELECT OK CONFIRM SETUP END If you watch a programme which is recorded in 16 9 wide screen format with this player your TV must have 16 9 wide screen function and you have to connect the TV and player with the A V scart cable If you press the PLAY button for 5secs during stop or still...

Page 33: ...ntrol Use only good quality tape cassettes with the VHS logo Keep cassettes away from excessive moisture or dust magnetic and electrical fields loud speakers and computer monitors for example Always wind the tape to the beginning when you have finished Store with the full spool at the bottom and with the cassette in its cover You can protect your precious recordings from being wiped by breaking ou...

Page 34: ...er station or the current station changes the sound mode your player displays the programme and sound mode on screen if not press AUDIO STEREO stereo BIL I BIL II bilingual nothing monaural sound During Playback the player displays what is recorded on the cassette if not press AUDIO Hi Fi stereo bilingual nothing monaural sound During a stereo performance playback Hi Fi broadcast STEREO Hi Fi ster...

Page 35: ...f your TV as described in its manual When you have found the test signal store it under the channel number on your TV for player input Press the ENTER button of the player s remote control again for longer than 5 seconds to remove the test signal 1 If the quality of the test signal transmitted to the TV is poor due to interference caused by a station transmitting on channel 52 you can tune the pla...

Page 36: ... of their EURO AV SCART sockets On the other video select its AV input and set the machine to record Switch your player to play back at the position you want copying to start TV other VCR Other VCR Decoder for Pay TV Camcorder Video Player Satellite Receiver Audio Amp devices Should you wish to assemble your own film from camcorder footage for example use the assembly technique for smooth edit poi...

Page 37: ... is activated 1 Press the ENTER button or PLAY button after pressing the œ button to select the desired title For the case of VCD disc press the Number button The selected title now starts playing 2 Some movie discs may contain multiple titles If the disc has a movie title menu recorded on it the TITLE PBC or MENU button can be used to select the movie title Details of operation may differ dependi...

Page 38: ... and Normal Playback mode is resumed 3 Each time you press REPEAT button in playback mode repeat playback starts as below Repeating a defined period Repeating a defined period from A to B CHAPTER Current chapter will play repeatedly TITLE Current title will play repeatedly DISC Current disc will play repeatedly TRACK Current track will play repeatedly FOLDER Current folder will play repeatedly OFF...

Page 39: ...to search with a chapter number or title number please select TT or CH using the œ button Then enter the new chapter title number to be searched using the NUMBER buttons 2 TT 01 02 CH 20 Searching DVD with a title number chapter number or a time TT 01 02 CH 20 10 TT 02 CH 10 20 01 TT 01 02 TIME 0 20 If you want to search with a chapter time press the SEARCH button three times Please enter the new ...

Page 40: ...f PBC OFF the screen like the right figure appears Please enter the new time to be searched using the NUMBER button PLAY starts from the selected position If it is PBC ON pressing the disc time converts PBC to OFF mode automatically 1 If you want to search with a track number press the SEARCH button three times Please enter the new track number to be searched using the NUMBER buttons 3 If you want...

Page 41: ...h time you press DISPLAY button in playback mode DISPLAY is change as below Confirming the current playing time of DVD disc TITLE ELAPSED TT 01 02 CH 01 10 0 00 57 TT 01 02 CH 01 10 0 10 05 TT 01 02 CH 01 10 0 05 56 TT 01 02 CH 01 10 1 53 25 TITLE REMAIN CHAPTER ELAPSED CHAPTER REMAIN DC G8GD1P JL DESUK 2006 4 19 9 42 AM 39 ...

Page 42: ...utton It shows the current playing time Each time you press DISPLAY button in playback mode DISPLAY is change as below Confirming the current playing time of VCD disc TRACK ELAPSED TRACK 01 20 0 00 57 TRACK REMAIN TRACK 01 20 0 05 57 DC G8GD1P JL DESUK 2006 4 19 9 42 AM 40 ...

Page 43: ... ENG French FRE Spanish SPA and others appear sequentially Keep pressing SUBTITLE button till the user s preferred language appears in playback mode If a DVD disc includes subtitle information every time the user presses SUBTITLE button English ENG French FRE Spanish SPA and OFF appear sequentially Selecting an audio language Selecting a subtitle language DVD Operation AUDIO 1 2 AC3 2CH ENGLISH SU...

Page 44: ...alised and the area can be changed with the operation of the œ buttons If a disc includes multi angle information the user can watch a screen in multi angles The function is limited to a DVD disc supporting multi angle information Keep pressing ANGLE button till the preferred angle appears Every time the user presses ANGLE button the angle changes by degrees in consecutive order 01 01 Using a zoom...

Page 45: ...he right figure appears 2 Select the file to listen to Move the cursor to desired file which you want to listen to by pressing œ button Press PLAY or ENTER to start playback The selected file will play Press to stop playback 4 Select the folder Move the cursor to desired folder by pressing œ button and press ENTER button to confirm 3 Playing a disc containing MP3 files 00 00 001 003 Sky Winamp max...

Page 46: ...nd must incorporate the MP3 file extension EXAMPLE MP3 where each is a letter or number Use only letters and or numbers in file names If you use special characters the file and or folder names may not be displayed correctly on the on screen display Caution Try to avoid the use of the CD RW Rewritable disc if possible because it can not be played back according to the recording format A CD R must b...

Page 47: ...button and press ENTER button to confirm 2 Select the file which you want to view by pressing the button 3 If you press the PLAY or ENTER when a JPG image is selected a slidshow will begin automatically starting from the selected image Press to stop playback 4 00 00 001 003 CAR ANIMAL CAMP 00 10 04 22 002 125 CAMP 1 CAMP001 2 CAMP002 3 CAMP003 4 CAMP004 5 CAMP005 1 CAMP001 jpg jpg jpg jpg jpg Play...

Page 48: ... Also they are different according to the discs If it is a VCD2 0 select PBC ON mode by pressing TITLE PBC button CD and VCD1 1 do not support the function 1 If it is a DVD disc move the cursor to the relevant item with the arrow buttons œ and select one with ENTER button or PLAY button 2 To display menus on a disc DC G8GD1P JL DESUK 2006 4 19 9 42 AM 46 ...

Page 49: ... is entered 4 A user can set OSD language Audio Subtitle and Disc Menu OSD LANGUAGE AUDIO SUBTITLE DISC MENU LANGUAGE VIDEO AUDIO OTHERS ENTER SETUP OSD LANGUAGE AUDIO SUBTITLE DISC MENU ENGLISH AUTO OFF AUTO LANGUAGE VIDEO AUDIO OTHERS ENTER SETUP ENGLISH FRENCH SPANISH GERMAN ITALIAN DUTCH PORTUGUESE SWEDISH CZECH OSD LANGUAGE AUDIO SUBTITLE DISC MENU LANGUAGE VIDEO AUDIO OTHERS ENTER SETUP ENGL...

Page 50: ...se 8476 Tagalog 6671 Bulgarian 7168 Scots Gaelic 7589 Kirghiz 8185 Quechua 8479 Tonga 6672 Bihari 7176 Galician 7665 Latin 8277 Rhaeto Romance 8482 Turkish 6678 Bengali Bangla 7178 Guarani 7678 Lingala 8279 Romanian 8484 Tatar 6679 Tibetan 7185 Gujarati 7679 Laothian 8285 Russian 8487 Twi 6682 Breton 7265 Hausa 7684 Lithuanian 8365 Sansrit 8575 Ukrainian 6765 Catalan 7273 Hindi 7686 Latvian Lettis...

Page 51: ...e of the original scene of 16 9 If a user selects 4 3 LB the user can watch the original scene of 16 9 but the top and bottom of the screen look black color If a disc size is originally recorded in 4 3 the user cannot watch it in the wide screen format even though the user has set it to 16 9 Wide TV ASPECT 4 3 LB LANGUAGE VIDEO AUDIO OTHERS ENTER SETUP LANGUAGE VIDEO AUDIO OTHERS ENTER SETUP TV AS...

Page 52: ...lect an audio menu according to the speaker set being used While in STOP or RESUME STOP mode press SETUP button 1 BITSTREAM The raw audio signal recorded on the disc goes to the digital audio output LPCM The decoded audio signal goes to the digital audio output DIGITAL OUT DYNAMIC RANGE BITSTREAM LANGUAGE VIDEO AUDIO OTHERS ENTER SETUP LANGUAGE VIDEO AUDIO OTHERS ENTER SETUP DIGITAL OUT DYNAMIC RA...

Page 53: ... children from watching violence sexual scenes and other objectionable material When PASSWORD appears on the screen input the password Then press ENTER button 5 While in STOP or RESUME STOP mode press SETUP button 1 OSD SCREEN SAVER DEFAULTS PARENTAL PASSWORD ON ON RESET 8 ADULT CHANGE LANGUAGE VIDEO AUDIO OTHERS ENTER SETUP LANGUAGE VIDEO AUDIO OTHERS ENTER SETUP OSD SCREEN SAVER DEFAULTS PARENTA...

Page 54: ...to Lock status When the disc has no parental function even if the disc is for adults only the Parental Lock doesn t activate The initial password is 3308 In case you forget the newly entered password you can use 3308 as a password LANGUAGE VIDEO AUDIO OTHERS ENTER SETUP OSD SCREEN SAVER DEFAULTS PARENTAL PASSWORD CHANGE LANGUAGE VIDEO AUDIO OTHERS ENTER SETUP OSD SCREEN SAVER DEFAULTS PARENTAL PAS...

Page 55: ...his unit is designed and manufactured to respond to the Region Management information that is recorded on a DVD disc The region number of this player is 2 If the region number described on the DVD discs does not correspond to the Region number of this player the player will not play this disc This player will play DVD discs made for ALL regions Therefore this player will play DVD discs marked with...

Page 56: ...movie theatres around the world It enables the bit rate to be increased to provide good sound quality DTS and DTS Digital Out are trademarks of Digital Theatre Systems Inc Multi Angle Some DVD discs contain various scenes that have been simultaneously shot from a number of different angles PCM Linear PCM is a signal recording format used in a CD while CD is recorded in 44 1kHz 16bit a DVD is recor...

Page 57: ...ct sunlight or other forms of heating After using the disc please replace it in its case Before using the disc please wipe it from its centre outwards using a clean soft cloth Do not use any type of solvent such as thinner benzol benzene commercial cleaning goods or antistatic spray Handling Disc Cleaning Disc DC G8GD1P JL DESUK 2006 4 19 9 42 AM 55 ...

Page 58: ...ptimum reception picture CABLE Cable television Index Search A feature of this VCR that automatically records an index mark each time recording begins It helps you locate a particular segment of the tape quickly and easily LP Long Play an intermediate tape recording speed that combines most of the picture audio quality obtainable at the standard recording speed with some of the tape economy of Ext...

Page 59: ... operated automatically Please pull out the tape and put it in again If the product has not been used for a long time the cassette may not eject because the videotape has stretched In this case please pull out the power plug for about 10mins and then press EJECT button Please check your antenna s interconnections TV channel should be tuned to the unit on a vacant programme number video channel Ple...

Page 60: ...t Please check that the record protect tab on the cassette is intact If the tab is missing cover the hole with a piece of scotch tape Was a cable data output code connected correctly Did you turn off your player Please turn it on You may have not memorised channels Please check your channel setting or press a number button Some tapes or discs distributed in the rental market for hire are copyright...

Page 61: ... plugs are connected properly Check all contacts and connections Please check the angle of operation of the remote control the distance and any obstacles that may be interrupting the signal Battery may be weak or exhausted When you operate DVD use it by pressing DVD button Dolby Digital sound can be reproduced via a Dolby Digital amplifier only Please check Dolby Digital mark on your DVD If playin...

Page 62: ...of DVD and VCR VIDEO output terminal 1 0 Vp p unbalanced RCA JACK SCART JACK VIDEO output DVD only RGB output 75Ω In load R 0 7Vp p G 0 7Vp p B 0 7Vp p AUDIO output common use of DVD and VCR Audio output terminal 2 kinds 5 8dBm VCR 2Vrms DVD RCA JACK AUDIO output DVD only Analogue AUDIO output 2 0Vrms Digital audio output COAXIAL Playable tape Very high density tapes with VHS marks Playable disc D...

Page 63: ...equired if service is needed on this product during the guarantee period KEEP THIS SECTION FOR FUTURE REFERENCE On the expiry date of the manufacturer s guarantee you will be sent details of our annual insurance plan but if you have already bought an extended warranty for this product from your retailer please tick box The information provided will be held on computer by the DAEWOO Registration De...

Page 64: ...ntained in the manual It must be used solely for domestic purposes For further information regarding your guarantee please see the section at the rear of your user manual The guarantee will be rendered invalid if the product is resold or has been damaged by inexpert repair DAEWOO disclaims any liability for incidental or consequential damages The guarantee is in addition to and does not diminish y...

Reviews: