DRPB64V Operation Manual
After extensive use, the tool may accumulate small metal chips
from rivets within the nose assembly of the tool. This will
compromise the tool’s efficiency, therefore, it is recommended that you clean or change the nose
assembly parts periodically.
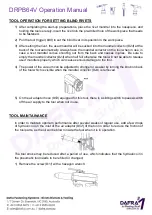
1)
Use the
wrench (in accessories pack)
and a spanner provided by user;
Included in accessories kit
Provided by user
Wrench hole 1 for
compressed spring pedestal (#22)
;
Wrench hole 2 for
clamping sleeve (#3)
;
Wrench hole 3 for
nosepieces (#1)
;
Wrench hole 4 for
front sleeve (#2)
;
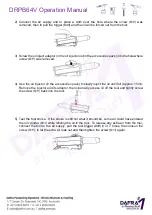
2) Remove the
nosepiece (#1)
on the tool using the
wrench
included in the kit;
3) Disassemble the
front sleeve (#2)
:
4) Disassemble
clamping sleeve (#3)
:
5) Take out the
3-jaw set (#4)
from the
clamping sleeve (#3)
, then remove the
assembly pusher (#5)
,
the
pusher spring (#6)
and
mandrel tube (#20
) from the tool. Once removed, inspect all parts for
wear before cleaning and replacing them. Any damaged parts should be replaced at this time.


