Chapter 4
Common Parameters and Color-Changing Order
number, which means users can set and change the color-changing order along with the
display.
4.2.2.
Setting of Color-Changing Order
1.
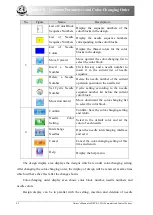
Click
in the main interface to enter the color-changing interface.
2.
Input the needle numbers in order in the needle number selection area. The
design displayed in the design display area and the color list in the color-changing
display area will be renewed along with the input of each needle number.
3.
Click
to check if the input color-changing order is correct.
4.
To change a needle number in the color-changing order, the user can
click
to move the list, so as to put the target item to the current operation
position. And then click the new needle number.
5.
In order to insert a needle number in the color-changing order, user needs
click
to move the order list and to place the target item to the current
operation position, and then click
.
Finally, he has to click the number of the needle
to insert.
6.
To delete a needle number in the color-changing order, click
.
7.
If the user has confirmed that the first N items are set correctly and hopes to
repeat the settings of the first N items from the N+1 item, he can click
to
move the order list and to place the item N+1 to the current operation position and then
click
.
8.
After confirming the input color-changing order, user can click
to save
the color-changing order and return. Clicking
is to abandon the setting and
return.
Note: For detailed color-changing operations in sequin or cording embroidery, refer to
related chapters.
4.2.3.
Set Needle Color
To make the color displayed in the screen get close to the color in real embroidery, this
system can set all the needle colors used by the current design. This setting will be saved with
color-changing order.
1.
Click
in the main interface to enter the color-changing interface.
Owner’s Manual of BECS- 285A Computerized Control System
43


