background image


5.Dimensions


© China Daheng Group, Inc. Beijing Image Vision Technology Branch                                                              16 


Figure 5-2 Optical interface of C-mount 

5.3. Tripod Adapter Dimensions 

When customizing the tripod adapter, you need to consider the relationship between tripod adapter, screw 
length and step thickness of tripod adapter.   

1)  Screw length = tripod adapter step thi spring washer thi screwing length of camera 

screw thread 


Figure 5-3 Schematic diagram of screw specification, tripod adapter step thickness and spring washer thickness 

2)  It is recommended that you select the screw specifications and the tripod adapter step thickness from 

the table below: 

Summary of Contents for MARS USB3

Page 1: ...MARS USB3 Vision Cameras User Manual Version V1 0 1 Date 2020 03 09 China Daheng Group Inc Beijing Image Vision Technology Branch...

Page 2: ...anch The right is also reserved to modify or change any parts of this manual in the future without prior notification All other trademarks are the properties of their respective owners 2020 China Dahe...

Page 3: ...ring high resolution high definition and extremely low noise The camera is equipped with standard USB3 0 interface is easy to install and use The MARS family cameras are especially suitable for machin...

Page 4: ...ration 4 3 1 1 Software Package 4 3 1 2 User Software Interface 4 3 2 Camera Power 5 3 3 Camera Driver Installation 6 3 3 1 System Requirements 6 3 3 2 Driver Installation 6 3 4 Open Device and Start...

Page 5: ...2 Image Acquisition Control 37 8 2 1 Acquisition Start and Stop 37 8 2 1 1 Acquisition Start 37 8 2 1 2 Acquisition Stop 38 8 2 2 Acquisition Mode 39 8 2 3 Trigger Type Selection 40 8 2 4 Switching T...

Page 6: ...6 8 4 1 Color Transformation Control 76 8 4 2 Gamma 78 8 4 3 Sharpness 79 8 4 4 Lookup Table 80 8 4 5 Defect Pixel Correction 81 8 5 Image Transmission 81 8 5 1 Calculate Frame Rate 81 8 5 2 USB Inter...

Page 7: ...uto Create Lut 91 9 1 2 4 Save Lut 92 9 1 3 Precautions 92 9 1 3 1 Read From Device 92 9 1 3 2 Write To Device 93 9 1 3 3 Directory Structure 93 9 2 Frame Rate Calculation Tool 93 10 FAQ 95 11 Revisio...

Page 8: ...ing screw connectors the MARS series cameras can secure the reliability of cameras deployed in harsh industrial environments Featuring high reliability and high price performance ratio the MARS series...

Page 9: ...wing and software can be downloaded from the Downloads of DAHENG IMAGING website The relevant contents are as follows Document MARS USB3 Vision Cameras User Manual CAD Technical Drawing DAHENG IMAGING...

Page 10: ...tro static discharge may damage cameras permanently so use suitable clothing cotton and shoes and touch the metal to discharge the electro static before operating cameras 2 2 Environmental Requirement...

Page 11: ...er to the samples to develop their own control programs 5 Programmer s Manual This manual is the users programming guide that instructs the users how to configure the programming environment and how t...

Page 12: ...e GEN i CAM standard GEN i CAM is administered by the European Machine Vision Association EMVA GenICam provides a generic programming interface for all kinds of cameras and devices It provides a stand...

Page 13: ...e installation package from www daheng imaging com en Downloads 2 Run the installer 3 Follow the instructions of the installation wizard to complete the installation process During the installation pr...

Page 14: ...V W m2 s V lux s e W m2 s or DN W m2 s The spectral response graphs given by different manufacturers are different Some graphs ordinate is relative sensitivity response and abscissa is wavelength Som...

Page 15: ...281g Software Windows XP Win7 Win8 Win10 32bit 64bit OS Data Interface USB3 0 Programmable Control Image size gain exposure time trigger polarity flash polarity Conformity CE RoHS FCC USB3 Vision Gen...

Page 16: ...with opto isolated 2 programmable GPIOs Operating Temp 0 C 45 C Storage Temp 20 C 70 C Operating Humidity 10 80 Power Consumption 4W 5V Lens Mount C Dimensions 62mm 62 mm 50 4mm Weight 281g Software W...

Page 17: ...g Image Vision Technology Branch 10 4 2 2 Spectral Response Figure 4 1 MARS 1230 23U3C sensor spectral response Figure 4 2 MARS 1230 23U3M sensor spectral response 4 3 MARS 1231 32U3M C 4 3 1 Paramete...

Page 18: ...4dB Pixel Data Formats Bayer RG8 Bayer RG10 Signal Noise Ratio 40 79dB Synchronization External trigger software trigger I O 1 input and 1 output with opto isolated 2 programmable GPIOs Operating Temp...

Page 19: ...CMOS Optical Size 1 1 inch Pixel Size 3 45 m 3 45 m Frame Rate 32 1fps 4096 3000 ADC Bit Depth 10bit Pixel Bit Depth 8bit 10bit Shutter Time 24 s 1s Gain 0dB 24dB Pixel Data Formats Mono8 Mono10 Signa...

Page 20: ...ndows XP Win7 Win8 Win10 32bit 64bit OS Data Interface USB3 0 Programmable Control Image size gain exposure time trigger polarity flash polarity Conformity CE RoHS FCC USB3 Vision GenICam Table 4 4 MA...

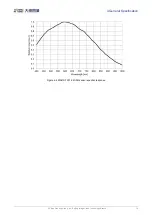
Page 21: ...4 General Specification China Daheng Group Inc Beijing Image Vision Technology Branch 14 Figure 4 4 MARS 1231 32U3M sensor spectral response...

Page 22: ...flange distance is 17 526 mm in the air The maximum allowed thread length of lens should be less than 11 1mm as shown in Figure 5 2 A longer lens thread will damage camera The color models are equippe...

Page 23: ...nship between tripod adapter screw length and step thickness of tripod adapter 1 Screw length tripod adapter step thickness spring washer thickness screwing length of camera screw thread Figure 5 3 Sc...

Page 24: ...adapter step thickness mm Spring washer thickness mm Screwing length of camera screw thread mm M4 8 screw 2 2 1 4 8 M4 10 screw 4 2 1 4 8 If the screw specification and the thickness of the tripod ad...

Page 25: ...es the influence of invisible light on the image The monochrome models are equipped with a transparent glass The following are their specifications and spectral response Remove IR filter or transparen...

Page 26: ...image can cover There are mainly 1 2 2 3 1 1 2 1 1 1 4 3 and so on When selecting a lens make sure that the optical size of the lens is not smaller than the COMS sensor size of the digital camera 3 Re...

Page 27: ...mechanical structure optical axis changes below 10 m The housing is small and compact the minimum outer diameter is only 29 5mm and it can be installed in various limited spaces Easy to install there...

Page 28: ...o install there are 3 fixing holes on the lens barrel for fixing the iris and focusing The best fixing hole can be selected according to the installation environment Models HN 0619 5M C2 3X HN 0816 5M...

Page 29: ...camera has been boot loaded but no data is being transmitted Flashing green Data is being transmitted Flashing yellow The camera s initialization failed Table 7 1 Camera status 7 2 USB Port Recommend...

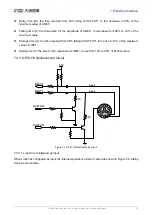
Page 30: ...amera or other peripherals could burn out 7 3 1 Line0 Opto isolated Input Circuit Hardware schematics of opto isolated input circuit is shown as Figure 7 1 3 3V Line0 Line0 INPUT0 5V 24V 9 1 2 3 4 5 6...

Page 31: ...internal circuit Signal output Power PWR GND NPN Pull up resistor 9 1 2 3 4 5 6 7 8 12 11 10 Figure 7 2 NPN photosensor connected to opto isolated input circuit 3 3V Line0 Line0 FPGA INPUT0 External...

Page 32: ...opto isolated input circuit Rising time delay TRIGIN_R_DELAY the time required for the response to the decrease to 0 8V of INPUT0 from 50 rising of LINE0 Falling time delay TRIGIN_F_DELAY the time req...

Page 33: ...ng time delay tr td 50 s 0 C 45 C parameter description is shown in Figure 7 6 Falling time delay ts tf 50 s 0 C 45 C parameter description is shown in Figure 7 6 Delay time in typical application con...

Page 34: ...ts the time required from 50 falling of OUTPUT1 to the rise to 10 of the maximum value of LINE1 Rising time tr the time for the response of LINE1 to rise from 10 to 90 of its final value 7 3 3 GPIO 2...

Page 35: ...voltage 0V 0 6V Line2 3 voltage Logic 1 input voltage 1 9V 24V Line2 3 voltage The status is unstable when input voltage is between 0 6V and 1 9V which should be avoided When input of Line2 3 is high...

Page 36: ...photoelectric sensor connected to Line2 input circuit When LIine2 3 is configured as input pull down resistor over 1K should not be used otherwise the input voltage of Line2 3 will be over 0 6V and l...

Page 37: ...y parameters are affected greatly by external voltage and external pull up resistor but little by temperature Output delay time in typical application conditions temperature is 25 C are shown in Table...

Page 38: ...China Daheng Group Inc Beijing Image Vision Technology Branch 31 EXVCC 5 24V Line2 OUTPUT2 PTC 9 1 2 3 4 5 6 7 8 12 11 10 External circuit Figure 7 11 Internal equivalent circuit of camera when Line2...

Page 39: ...l trigger the MARS U3 series camera has the external trigger filtering feature including rising edge filtering and falling edge filtering The user can set the trigger filter feature by setting the Tri...

Page 40: ...efault input line level is false when the camera is powered on indicating that the input line level is not reversed If it is set as true indicating that the input line level is reversed As shown in th...

Page 41: ...lay time Exposure time Figure 8 4 Strobe signal schematic diagram UserOutput In this mode the user can set the camera s constant output level for special processing such as controlling the constant li...

Page 42: ...Wait signal can be used to optimize the acquisition of the trigger image and to avoid excessive triggering It is recommended to use the TriggerWait signal only when the camera is configured for extern...

Page 43: ...nd images are transferred the AcquisitionTriggerWait signal will be pulled high Signal 2 Signal1 Image1 Trigger Signal AcquisitionTriggerWait Signal Output Image Image2 Image4 Image3 Image5 Image6 Fig...

Page 44: ...sion 8 1 3 Read the LineStatus 1 Read the level of single line The MARS U3 series camera can get the line s signal status When the device is powered on the default status of Line0 and Line1 is false a...

Page 45: ...isitionStart command The frame rate is determined by the exposure time ROI and some other parameters Trigger Acquisition Exposure Reading out Start Status Trigger Figure 8 11 Trigger acquisition proce...

Page 46: ...g Complete stop Reading out Stop command Stop time Exposure Ignored Figure 8 13 Acquisition stop during blanking After the camera transferred a whole frame the camera goes into wait state When user se...

Page 47: ...l it can acquire a frame of image until the AcquisitionStop command is executed It is not necessary to execute the AcquisitionStart command every time 2 When the trigger mode is set to On the trigger...

Page 48: ...mage Transmission Trigger Signal frame2 frame2 frame1 frame3 frame5 frame4 frame6 Figure 8 15 FrameBurstStart trigger FrameStart trigger mode and FrameBurstStart trigger mode are selected at the same...

Page 49: ...mode Trigger Frame Continuous mode Trigger Continuous Frame 1 2 3 4 frame1 frame2 frame3 frame4 frame5 frame6 frame7 Figure 8 17 Switch trigger mode during frame reading out As shown in Figure 8 17 th...

Page 50: ...ontinuous mode It is also not active until the 5th frame is finished it should wait a complete frame The camera switches from trigger mode to continuous mode at point 4 and then the camera works in co...

Page 51: ...igger delay time is zero 8 2 7 External Trigger Acquisition and Configuration External trigger acquisition configuration The camera supports external trigger acquisition mode Three steps followed shou...

Page 52: ...ue is generally in the range of several to several tens of s The delay is mainly affected by the connection mode driving intensity and temperature When the external environment is constant the delay i...

Page 53: ...e sensor are exposed at the same time and then the sensor will read out the image date one by one The advantage of the global shutter is that all the lines are exposed at the same time and the images...

Page 54: ...quisition The time width of the flash signal can be got by the following formula T T 1 T Setting the exposure time The MARS U3 series camera supports setting the exposure time step 1 s The exposure ti...

Page 55: ...two exposure modes Overlapping exposure and non overlapping exposure The user cannot assign the overlapping exposure or non overlapping exposure directly it depends on the frequency of trigger signal...

Page 56: ...the Nth frame image is reading out the N 1th frame image has been started exposure The formula of overlapping exposure frame period overlapping exposure frame period exposure time readout time Time Ov...

Page 57: ...s the response curve of the camera changes as shown in Figure 8 26 The horizontal axis represents the output signal of the sensor in the camera and the vertical axis represents the gray value of the o...

Page 58: ...odel and whether the camera is monochrome or color The following table shows the pixel format supported by the camera Model Pixel Format MARS 1230 23U3M C Mono8 Mono12 BayerRG8 BayerRG12 MARS 1231 32U...

Page 59: ...ificant bits are filled with zero When Mono12 is selected the effective data is only 12 bits the 4 of the MSB 16 bits data are set to zero Note that the brightness value of each pixel contains two byt...

Page 60: ...12 the value of each pixel in the output image of the camera is 16 bits According to the location difference the three components of red green and blue are respectively represented The format in the m...

Page 61: ...st byte is the low 8 bits of the pixel value and the second byte is the high 8 bits of the pixel value 8 3 3 ROI By setting the ROI of the image the camera can transmit the specific region of the imag...

Page 62: ...portion will be used for auto function control AAROI is defined by the following way AAROIOffsetX The offset of the X axis direction AAROIOffsetY The offset of the Y axis direction AAROIWidth The widt...

Page 63: ...An example for the relative position between the ROI and the current image 8 3 4 2 Auto Gain The auto gain can adjust the camera s gain automatically so that the average gray value in AAROI is achieve...

Page 64: ...8bit pixel data the expected gray value range is 0 255 and for 12bit pixel data the expected gray value range is 0 4095 The camera adjusts the exposure time in the range minimum exposure time maximum...

Page 65: ...is AWBROIOffsetX 100 AWBROIOffsetY 50 AWBROIWidth 640 AWBROIHeight 480 The relative position of the ROI and the image is shown in Figure 8 28 ROI 1024 1000 ROI 640 480 100 50 Figure 8 28 An example f...

Page 66: ...bit The lookup table can be a linear lookup table or a non linear lookup table The typical linear lookup table implements the selection of 8 bits and Figure 8 29 is an example of the linear lookup tab...

Page 67: ...ge all the pixels gray values are the same in the frame In the adjacent frame the gray value of the next frame increases by 1 compared to the previous frame until to 255 and then the next frame gray v...

Page 68: ...eturns to 0 The first pixel gray value of adjacent column increases by 1 until the last column When the pixel gray value increases to 255 the next pixel gray value returns to 0 Compared to the moving...

Page 69: ...fy the effective configuration parameters The effective parameters are stored in volatile memory of the camera so when the camera is reset or powered on again the effective configuration parameters wi...

Page 70: ...Height BalanceRatio R G B LUT Load parameters UserSetLoad Load the vendor default configuration parameters or the user configuration parameters into the effective configuration parameters After this o...

Page 71: ...f the user defined name of each camera otherwise an exception will occur when the camera is opened 8 3 10 Timestamp The timestamp feature counts the number of ticks generated by the camera s internal...

Page 72: ...ning factor are both set to 2 the camera combines the adjacent 4 sub pixels of the same color according to the corresponding positions and outputs the combined pixel values as one sub pixel R G B G R...

Page 73: ...balance ROI will change The changed value is the original value the value before the setting divided by the Binning factor For example assume that you are using a camera with a 1200 x 960 sensor Horiz...

Page 74: ...4 skips rows 5 and 6 and so on Figure 8 39 Mono camera vertical Decimation Figure 8 40 Color camera vertical Decimation As a result the image height is reduced For example enabling vertical Decimatio...

Page 75: ...n factor Depending on your camera model the following values are available 1 Disable Decimation 2 Enable Decimation Considerations When Using Decimation 1 Effect on ROI settings When you are using Dec...

Page 76: ...ical Decimation value is set to a value other than 1 the vertical Binning feature cannot be used 8 3 13 Reverse X and Reverse Y The Reverse X and Reverse Y features can mirror acquired images horizont...

Page 77: ...relative to the sensor remains the same Therefore the camera acquires different portions of the image depending on whether the Reverse X or the Reverse Y feature are enabled Figure 8 49 The original i...

Page 78: ...l Shift To configure the digital shift factor enter the expected value for the DigitalShift parameter By default the parameter is set to 0 i e digital shift is disabled When the DigitalShift parameter...

Page 79: ...d over triggering To determine if the camera is currently waiting for trigger signals a Set the AcquisitionStatusSelector parameter to the expected trigger type Two trigger types are available FrameTr...

Page 80: ...r certain use cases you may want to specify parameter values outside of the factory limits You can use the remove parameter limits feature to expand the parameter range The features of the extended ra...

Page 81: ...ear after the camera is powered off 8 3 19 Timer The camera only supports one timer Timer1 which can be started by a specified event or signal only ExposureStart signal is supported The Timer can conf...

Page 82: ...ls of the counter statistics refer to the signals that have been triggered for filtering without a trigger delay If CounterValue is enabled the statistical data can be inserted into the frame informat...

Page 83: ...us all the other RGB values that are read can be converted to the standard RGB values by using the mapping table created by the 24 colors 1 Prerequisites For the color transformation to work properly...

Page 84: ...eature uses a transformation matrix to deliver modified red green and blue pixel data for each pixel The transformation is performed by premultiplying a 3 x 1 matrix containing R G and B pixel values...

Page 85: ...e to the brightness value of each pixel according to the following formula red pixel value R of a color camera shown as an example The maximum pixel value Rmax equals e g 255 for 8 bit pixel formats 1...

Page 86: ...one of the following Gamma correction modes User The Gamma correction value can be set as expected sRGB The camera s internal default Gamma correction value This feature is used with the color transfo...

Page 87: ...em in the camera to avoid time consuming calculations The camera itself has a factory default lookup table and the default lookup table does not affect image luminance 2 Creating the user defined LUT...

Page 88: ...lower intensity value than their neighboring pixels outlier pixels and adjusts their intensity value The defect pixels affect the visual experience and further image processing The MARS series cameras...

Page 89: ...urrent device acquisition bandwidth the current device acquisition bandwidth will be reduced to the limit of the DeviceLinkThroughputLimit the current device acquisition bandwidth can be read from the...

Page 90: ...the pixel format is Mono12 or BayerRG12 the row period unit us Trow 1044 37 5 27 84 The camera acquisition time unit s Tacq height 34 Trow MARS 1231 32U3M C When the pixel format is Mono8 or BayerRG8...

Page 91: ...e effective information contained in each event is shown in Table 8 9 No Event Type Information 1 ExposureEnd Event Event ID Frame ID Timestamp 2 BlockDiscard Event Event ID Frame ID Timestamp 3 Frame...

Page 92: ...software trigger signal if the front end sensor is exposing it will not be able to respond to the new FrameTrigger signal then the camera will send a FrameStartOvertrigger event to the host Note that...

Page 93: ...alaxyView exe After opening the device that you want to operate through this software you can open LUT Create Tool from the menu bar plugin list With the plugin you can achieve the following functions...

Page 94: ...n again you need to select Write To Device The Lut parameter will be written to the UserSet0 After the device is powered on again select the Read From Device in the GroupBox to load the UserSet0 and r...

Page 95: ...dard Lut 2 Read From Device When you select read from device the tool will automatically load UserSet0 and then load the Lut saved by the device If the device supports LUTEnable it will automatically...

Page 96: ...effects are updated to the lookup table in the device When selecting the standard Lut or default Lut and selecting Write To Device then when reading the written parameters will be updated to the GUI...

Page 97: ...or default Lut and auto create Lut the widget interface will update the parameters stored when saving Lut the updated parameter values include Lut range Gamma brightness contrast and the values selec...

Page 98: ...s Failure to follow the format when manually modifying will result in failure to read the file 5 Default The default option is the Lut data when the device is shipped from the factory and is the initi...

Page 99: ...er values together in the file Reading the file again will restore the saved case If written to the device the MARS U3 cameras will save and restore the parameter 9 1 2 4 Save Lut The group contains t...

Page 100: ...se the Write to Device function with caution 9 1 3 3 Directory Structure When reading writing Lut and Auto Creat Lut you need to rely on some files in the installation package directory so do not arbi...

Page 101: ...on and whether the maximum value can be reached depends on whether the camera is affected by other acquisition parameters 8 AcquisitionFrameRateMode indicates whether frame rate control is enabled On...

Page 102: ...ed the camera 5 Fail to open device it shows that This device can only be operated on an USB3 0 Port 1 Please check whether the camera is connected to USB2 0 port or USB2 0 HUB Be sure to connect the...

Page 103: ...10 FAQ China Daheng Group Inc Beijing Image Vision Technology Branch 96 9 Camera crashes on Advantech AIIS 1440 IPC 1 Be sure the driver version of AMD USB controller is later than 2 20...

Page 104: ...Vision Technology Branch 97 11 Revision History No Version Changes Date 1 V1 0 0 Initial release 2019 09 25 2 V1 0 1 Modify Figure 1 1 Figure 7 6 and Figure 8 9 Rename MARS 1230 23U3x and MARS 1231 32...

Page 105: ...x 010 82563343 Email isales deheng imaging com 2 Shanghai Office Tel 021 35312826 Fax 021 65201839 128 Email shanghai daheng imaging com 3 Shenzhen Office Tel 0755 83479565 Fax 0755 82044020 E mail sh...

Page 106: ...g Image Vision Technology Branch 99 Email xian daheng imaging com 12 2 Contact Support If you have any questions in using DAHENG IMAGING products please contact the experts on our support team Tel 400...

Reviews: