background image

08

Tech

Wheels 

Installing a Quick Release Front Wheel 

• Move the quick-release lever away from the 
wheel to the OPEN position.

• With the steering fork facing forward, insert 
the wheel between the fork blades, so the axle 
seat is firmly on top of the slots that are at the 
tips of the fork blades - the fork dropouts. The 
quick-release lever should be on the left side 
of the bicycle. 

• With your right hand holding the quick-release 
lever in the OPEN position, tighten the tension- 
adjusting nut with your left hand until it is tight 
against the fork dropout.

• Simultaneously, push the wheel firmly to the 
top of the slots in the fork dropouts and center 
the wheel rim in the fork. Move the quick-release 
lever upwards and swing it into the CLOSED 
position. The lever should be parallel to the fork 
blade and curved back toward the wheel. With 
just the right amount of force, the lever should 
make a clear, embossed mark on the surface 
of the fork.    

CAUTION:

If your bike is equipped with disk brakes, 
be careful not to damage the disk, caliper 
or brake pads when re-inserting the disk 
into the caliper. Unless the disk is correctly 
inserted in 

the calliper, do not activate a disk 

brake’s control lever. See also Figure 4.B. 


WARNING: 

A secure clamping process of the front and 
rear wheels should take  considerable force. 
When securing the tension of the rear wheels, 
you should be able to fully close the quick 
release by wrapping your fingers around 
the fork blade for leverage. The lever should
leave a clear, embossed mark in the surface 
of your fork if it is done correctly. Open the 
lever, turn the tension-adjusting nut Clockwise 
a quarter turn, then try again to achieve the 
proper safety measures.

Installing a Quick Release Rear Wheel 

• If the lever cannot be pushed to a parallel 
position with the fork blade, return the lever 
to the OPEN position. Then try to turn the 
tension-adjusting nut counter-clockwise by 
one-quarter turn.

• To restore correct brake pad-to-rim clearance, 
re-engage the brake quick-release mechanism. 
Check by spinning the wheel of your bicycle to 
see if it is centered in the frame and clears the 
brake pads. Lastly, squeeze the brake levers to 
make sure they are working properly.  

• Check to make sure the rear derailleur is 
still in its outermost, high-gear position. 

• Pull back the derailleur body with your right 
hand. 

• Move the quick-release lever to the OPEN 
position, the lever should now be on the 
side of the wheel opposite the derailleur and 
free-wheel sprockets.  


• Place the chain on top of the smallest free-
wheel sprocket. Then, insert the wheel up and 
then back into the frame dropouts. Pull it all the 
way into the dropouts section.  

• Tighten the quick-release adjusting nut until 
it is firmly against the frame dropout. Swing the 
lever toward the front of the bike. To be sure, 
the lever should be parallel to the frame’s chain 
stay (seat stay) and curved toward the wheel. 
When applying the correct amount of clamping 
force, you should be able to wrap your fingers 
around the frame tube for leverage. A sign you 
have done this correctly is when you have a clear, 
embossed mark in the surface of your frame.

Summary of Contents for Bike

Page 1: ...OWNER S MANUAL www dahon com ...

Page 2: ...recommends that your bicycle is regularly serviced by a qualified bicycle mechanic 01 Wheel 02 Rear Derailleur 03 Chain 04 Crank Set 05 Pedal 06 Seat Post 07 Saddle 08 Bolts for Bottle Cage 09 Frame 10 Head Set 11 Handlepost 12 Handlebars 13 Brake Lever 14 Fork 15 Brakes ...

Page 3: ...14 16 17 Section 2 Safety Section 3 Fit Section 4 Tech Section 5 Service Section 7 Torque Values Section 6 Warranty Service Intervals 1 Break in Period 2 After Every Long Hard Ride 3 After Every Long Hard Ride or After 10 to 20 Hours of Riding 1 Brake Controls and Features 2 How Brakes Work C Shifting Gears 1 How a Derailleur Drive Train Works 2 Shifting Gears 3 Shifting the Rear Derailleur 4 Shif...

Page 4: ...ormance of your bike please see you local dealer for additional information Safety Maintenance for Rims To prolong the lifetime of your rims it is important to ensure they are kept clean and undamaged along the braking surface It is advised to periodically inspect your rims for excessive wear If you have any questions concerning the safety of your rims please have them inspected by your local bicy...

Page 5: ...rning hazard and yield signs Always be a defensive rider Always assume that others do not see you and expect the unexpected The Basics 05 Safety WARNING Wet weather impairs traction braking and visibility for bicyclists and other motor vehicles sharing the road During wet conditions the risk of an accident is dramatically increased Never hold onto another vehicle Do not weave through traffic or ma...

Page 6: ... and recognizable when riding CAUTION Reflectors and their mounting brackets should be checked regularly to ensure they are clean straight and securely mounted Consult with your dealer about replacing any damaged reflectors that are loose or bent Check to be sure you comply with all local laws about night riding Please see the following recommendations While riding at dawn at dusk or at night Ride...

Page 7: ...mall adjustments NOTE Any local dealer can change the angle of the handlebar or bar end extended Correct saddle adjustment and placement is a significant factor in getting the best performance as well as comfort from your bicycle If you do not feel comfortable in your saddle position see your local dealer Saddles can be adjusted in 3 directions Up and down adjustment Check for correct saddle heigh...

Page 8: ...verage The lever should leave a clear embossed mark in the surface of your fork if it is done correctly Open the lever turn the tension adjusting nut Clockwise a quarter turn then try again to achieve the proper safety measures Installing a Quick Release Rear Wheel If the lever cannot be pushed to a parallel position with the fork blade return the lever to the OPEN position Then try to turn the te...

Page 9: ...urer s instructions for operation and care for your brakes or call your dealer It is very important to learn and remember which brake lever controls which brake Your bike comes pre set and adjusted the right brake lever controls the rear brake and the left lever controls the front brake Check to make sure your hands can reach and squeeze the brake levers The function of a rim actuated brake on a b...

Page 10: ...ke you a further distance with each turn of the pedal crank The larger sprockets produce lower gear ratios which use less pedalling effort but propel you a shorter distance with each spin Two set screws or limit screws on the rear derailleur body are designed to restrict the travel of the rear derailleur By tightening the high rear derailleur adjustment gear screws it will keep the chain from shif...

Page 11: ...h upshifting and downshifting test each of the different gear combinations First build your confidence by practicing gear shifts where there are no hazards or other traffic Learn to anticipate the need to shift and shift to a lower gear before the hill gets too steep If you have difficulties with shifting there might be an error with the mechanical adjustment see your dealer for help If your bicyc...

Page 12: ...wear indicators The rear wheel undergoes more chain rotation than the front therefore note that restoring any worn chain may mean replacing the rear wheel cassette or freewheel Toe clips and straps are a way to keep your feet correctly positioned and engaged with the pedals Toe clips are positioned on the ball of the foot over the pedal spindle which gives you maximum pedalling power When tightene...

Page 13: ...s place the folded collapsed or packed away bicycle in a carry bag There are spacious internal pockets for parts that must be removed such as pedals or tools you might need later Having a nice neat package is easy when the sides of the bag are pulled up tight and the handle shoulder strap is fastened The entire process will only take a few seconds It is perfect to carry your bike on any public con...

Page 14: ...ay require readjustment by your dealer The Mechanical Safety Check can help you identify components that will need readjustment If everything seems fine to you it is still always best to take your bike back to the dealer for a check up Typically dealers suggest you bring the bike in for a 30 day check up A way to judge when it is time for the first check up is to bring the bike in after three to f...

Page 15: ...s the bicycle is covered by specified subject matters under the warranty Look at the brake pads If they are starting to look worn or are not properly hitting the wheel rim squarely please consult your local dealer to have them adjusted or replaced Check the control cables and cable housings If there are any signs of rust or fraying have your dealer replace them Also check for consistency between d...

Page 16: ...king bikes Damage resulting from commercial use accident misuse abuse neglect and or other non standard use of the product To make a warranty claim you must present both the original receipt of sale and the limited warranty statement proof of warranty coverage at the place of purchase If this is not an option contact your local retailer Should you need further assistance please visit our website w...

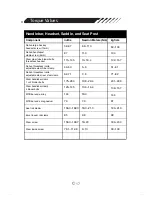
Page 17: ...ess innite adjustable stem rear stem clamp Stem handlebar clamp 1 or 2 binder bolts Stem handlebar clamp 4 binder bolts MTB bar ends alloy MTB bar ends magnesium Seat rail binder Kore I beam rail clamp Stem screw Stem inside screw 52 87 87 115 145 44 53 62 71 175 260 120 145 144 70 156 3 182 3 85 156 3 199 7 78 1 112 8 6 8 11 3 11 3 13 16 4 5 6 7 8 19 8 29 4 13 6 16 4 16 3 7 9 18 0 21 0 9 6 18 23 ...

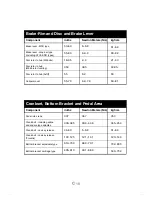
Page 18: ... bolt one key release Truvativ Bottom bracket adjustable type Bottom bracket cartridge type Brake Rim and Disc and Brake Lever Component in lbs Newton Meters Nm kgf cm 53 60 55 80 18 35 350 55 55 70 6 6 8 6 2 9 2 4 39 5 6 2 6 2 7 9 61 69 63 92 21 40 402 5 63 63 81 Crankset Bottom Bracket and Pedal Area Component in lbs Newton Meters Nm kgf cm 307 300 395 44 60 107 125 610 700 435 610 34 7 33 9 44 ...

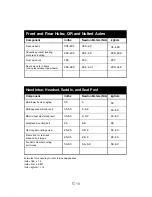
Page 19: ...34 5 49 29 4 49 20 3 29 4 44 1 35 499 299 499 207 299 449 Freehub body Cassette sprocket lockring disc brake lockring Front axle nuts Rear axle nuts to frame non quick release type wheels BAB lower frame coupling BAB upper seat binder bolt BB mid seat mast binder bolt Kickstand mounting bolt H2O cage mounting screw Frame front or rear rack braze on bolt torque Fender to frame mounting bolt torque ...

Page 20: ...o 1 P O Box 17 Goliamokonarsko Shosse Str Tsaratsovo Village 4027 Bulgaria 359 32335 598 Headquarters Dahon North America INC 833 Meridian Street Duarte CA 91010 1 800 442 3511 Dahon Technologies Ltd Dahon Bldg Furong 6th Rd Shajing Shenzhen 518125 P R C 86 755 27249136 ...

Reviews: