background image

Basic  Operations    22 

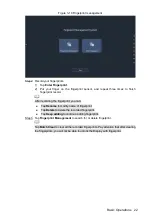
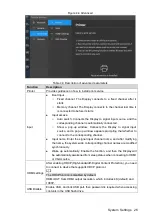
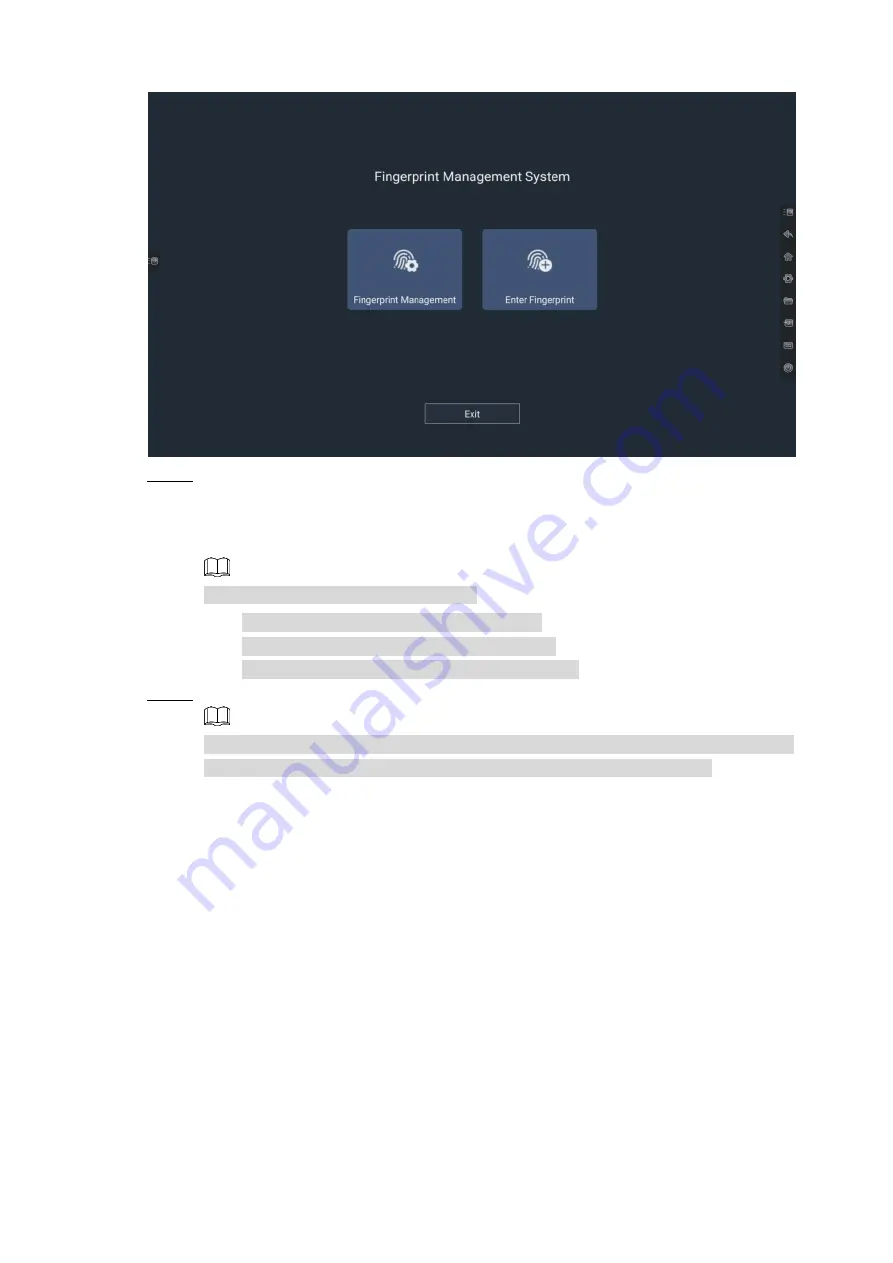
 Fingerprint management 

Figure 3-10


  Record your fingerprints. 

Step 2

1)  Tap 

Enter Fingerprint

2)  Put  your  finger  on  the  fingerprint  sensor,  and  repeat  three  times  to  finish 

fingerprint record. 


After recording the fingerprint, you can: 


Tap 

Rename

 to modify name of fingerprint. 


Tap 

Delete

 to delete the recorded fingerprint. 


Tap 

Keep adding

 to continue adding fingerprint. 

  Tap 

Fingerprint Management

 to search for or delete fingerprint. 

Step 3


Tap 

Batch Clear 

to clear all the recorded fingerprints. Pay attention that after clearing 

the fingerprints, you will not be able to unlock the Display with fingerprint.

Summary of Contents for Hiboard-A65H

Page 1: ...Smart Interactive Whiteboard User s Manual V1 0 1 ZHEJIANG DAHUA VISION TECHNOLOGY CO LTD ...

Page 2: ...avoided could result in slight or moderate injury CAUTION Indicates a potential risk which if not avoided could result in property damage data loss lower performance or unpredictable result TIPS Provides methods to help you solve a problem or save you time NOTE Provides additional information as the emphasis and supplement to the text Revision History Version Revision Content Release Time V1 0 1 U...

Page 3: ... the customer service for the latest program and supplementary documentation There still might be deviation in technical data functions and operations description or errors in print If there is any doubt or dispute please refer to our final explanation Upgrade the reader software or try other mainstream reader software if the manual in PDF format cannot be opened All trademarks registered trademar...

Page 4: ...owing into the Display Operate the Display within the rated range of power input and output Do not dissemble the Display Transport use and store the Display under the allowed humidity and temperature conditions Do not use the liquid cleaner or spray cleaner when cleaning the Display Use the clean and soft cloth or use the special lens wiping cloth when cleaning the surface of display screen Power ...

Page 5: ... 3 2 Signal Input Source 14 3 3 Wireless Projection 15 3 4 3 4 1 Projection through PC 15 3 4 2 Projection through Smartphone 17 Electronic Whiteboard 18 3 5 File Management 20 3 6 Fingerprint Management 21 3 7 4 System Settings 23 Setting Network Connection 23 4 1 Setting General Operations 24 4 2 Setting Advanced Parameters 25 4 3 Setting System Parameters 27 4 4 5 Shutdown 29 6 Updating System ...

Page 6: ...ce software such as Microsoft Office and audio and video files With built in fingerprint identification module the screen can be locked and unlocked by fingerprint The Display can be used in scenarios such as education business conference and theme display Package Contents 1 2 When you receive the Display check the outer box against any obvious damage Unpack the box and check whether the component...

Page 7: ... 1 3 4 Ports for details 3 Right side ports See 1 3 4 Ports for details 4 Front panel ports See 1 3 4 Ports for details 5 Speaker plays multimedia sound 6 Indicator light It is red when the Display is in standby mode and blue when the Display is in normal use 7 Front panel buttons See 1 3 3 Buttons for details 8 Bottom panel ports See 1 3 4 Ports for details ...

Page 8: ...Overview 3 1 3 2 Dimensions 1 3 2 1 65 inch Display Dimensions mm inch Figure 1 2 ...

Page 9: ...Overview 4 1 3 2 2 75 inch Display Dimensions mm inch Figure 1 3 ...

Page 10: ...inch Display Dimensions mm inch Figure 1 4 1 3 3 Buttons See Figure 1 5 and Table 1 3 Front panel buttons Figure 1 5 Table 1 3 Description of buttons No Name Description 1 Infrared sensor Receives signals from remote control ...

Page 11: ...interactive whiteboards to share information 2 RJ45 IN Ethernet port for connecting the Display to network 3 HDMI OUT High definition audio and video signal output interface for transmitting the uncompressed HD video and multichannel audio data to the connected Display with HDMI port 4 COAX OPTICA Coaxial or fiber optic interface for transmitting audio data 5 RS 232 Transparent debugging serial po...

Page 12: ...ugh the light sensor and adjusts the backlight brightness accordingly 2 USB port Connects to USB devices such as portable hard drives USB flash drives USB keyboard and USB mouse The port is applicable to both OPS computer and Android system Bottom Panel Ports Bottom panel ports Figure 1 9 Table 1 7 Description of bottom ports No Name Description 1 VGA DP TOUCH Transfers VGA DP touch signals 2 DP I...

Page 13: ...h signals 7 USB 3 0 FOLLOW Connects to USB devices such as portable hard drive USB flash drive USB keyboard and USB mouse The port is applicable to both OPS computer and Android system 8 ANDROID USB 2 0 Connects to USB devices such as portable hard drives USB flash drives USB keyboard and USB mouse The port is applicable to Android system 9 TF CARD Storage interface for inserting a memory card ...

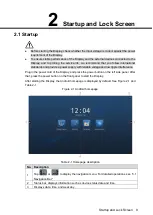
Page 14: ...upply with reliable voltage and low ripple interference Plug in the power cord of the Display and press the power button on the left side panel After that press the power button on the front panel to start the Display After starting the Display the Android homepage is displayed by default See Figure 2 1 and Table 2 1 Android homepage Figure 2 1 Table 2 1 Homepage description No Description 1 Tap o...

Page 15: ... can browse through news and search for information that you need Tap E board to start whiteboard function For detailed operations see 3 5 Electronic Whiteboard Tap WPS Office to open the software and then edit your document Tap DSSCloudHD and then you can follow the onscreen instructions to access the software for real time video surveillance Tap Fingerprint Management to add or clear fingerprint...

Page 16: ...the actual interfaces shall prevail Navigation Bar 3 1 After bringing up the navigation bar you can quickly select the operations you need See Figure 3 1 and Table 3 1 Navigation bar Figure 3 1 Table 3 1 Description of navigation bar Icon Description Tap it to hide the navigation bar Tap it and you will return to the previous page or the Android homepage On the Input interface tap it and the syste...

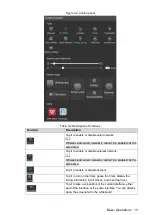
Page 17: ... Management Tap it to go to the Input interface where you can select the signal input source For detailed operations see 3 3 Signal Input Source Tap it to go to the Control Panel interface For detailed operations see 3 2 Control Panel Tap it and you can select power options such as Powered off Turn Off OPS Sleep and Reboot Control Panel 3 2 After bringing up the control panel it is convenient to e...

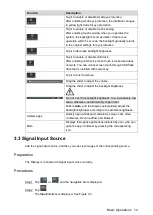
Page 18: ...it to enable or disable wireless network Wireless and wired networks cannot be enabled at the same time Tap it to enable or disable hotspot Tap it to turn on the timer pause the timer display the timing information in full screen and reset the timer Tap it to take a screenshot of the current interface either part of the interface or the entire interface You can directly apply the screenshot to the...

Page 19: ...secret key Tap it to lock the screen Drag the slider to adjust the volume Drag the slider to adjust the backlight brightness Do not set the backlight brightness to a excessively low value otherwise an abnormality might occur Enable Auto and the Display automatically adjust the backlight brightness according to the ambient brightness System apps Quickly open whiteboard calculator screen cast video ...

Page 20: ...d HD video and multichannel audio data HDMI2 DP Connects to DP DisplayPort signal source to play DP signal source images Camera Reserved function OPS OPS Open Pluggable Specification computer is an open pluggable microcomputer After installing the OPS computer to the Display you can switch to Windows system and then do operations such as using teaching software VGA Connects to VGA signal source to...

Page 21: ...ess Projection on the Android homepage The wireless projection interface is displayed See Figure 3 4 2 Insert the wireless dongle into the USB port on the front panel of the Display Android system The system starts pairing Wireless projection Figure 3 4 3 After successful pairing tap OK in the message box Project PC screen to the Display Step 2 1 Insert the wireless dongle into the USB port of PC ...

Page 22: ...ent in your phone to the Display for presentation Preparations The Display and your phone are connected to the same LAN For details about network connection see 4 1 Setting Network Connection Procedures Tap Wireless Projection on the Android homepage Step 1 The wireless projection interface is displayed See Figure 3 6 Tap to enable or disable your wireless projection password If the password is en...

Page 23: ...e EShare for Android applicable to Step 3 your phone system and then install EShare software Open EShare and then select the corresponding device name to connect your Step 4 phone for example EShare 6750 After successful connection to the Display you can remotely manage the Display with your phone or project the content in your phone to the device screen for presentation Electronic Whiteboard 3 5 ...

Page 24: ...ve a file export pictures send an email share by scanning QR code set the background view whiteboard information and exit whiteboard Tap and then you can view the files list that is saved or open a file to edit it When you have created several files you can tap or to go to the previous or next file Restart the electronic whiteboard and the system will clear the files list Tap it to add a new white...

Page 25: ...vious operation You can undo up to 20 operations Tap it to redo the operation that you have undone You can redo up to 20 operations Tap it to switch between different writing modes Single point Supports only one writing point You can also zoom with two fingers and move the content you have written with two or more fingers Multi point Supports multiple writing points Tap it to switch the menu butto...

Page 26: ...file display mode Fingerprint Management 3 7 Record your fingerprint to the Display and then you can lock or unlock the Display with your identified fingerprint Tap More Applications on the Android homepage and then tap Fingerprint Step 1 Management The Fingerprint Management System interface is displayed See Figure 3 10 ...

Page 27: ...After recording the fingerprint you can Tap Rename to modify name of fingerprint Tap Delete to delete the recorded fingerprint Tap Keep adding to continue adding fingerprint Tap Fingerprint Management to search for or delete fingerprint Step 3 Tap Batch Clear to clear all the recorded fingerprints Pay attention that after clearing the fingerprints you will not be able to unlock the Display with fi...

Page 28: ...ttings Figure 4 1 Setting Network Connection 4 1 Tap Network and then tap WLAN or Ethernet to connect to wireless or wired network See Figure 4 2 and Table 4 1 You can either enable WLAN wireless network or Ethernet wired network means disabled means enabled The Display itself can also act as hotspot to share data with other interactive whiteboards ...

Page 29: ... gets a dynamic IP address automatically Manual Set IP address subnet mask default gateway and DNS manually for the Display Hotspot Enable hotspot and you can set network SSID security password and AP frequency band 2 4 GHz and 5 GHz default frequency bands are available A 2 4 GHz network covers a larger range and penetrates solid objects such as wall better but a 5 GHz network carries more data a...

Page 30: ...d time of the touch assistance icon and its folding status If disappear is selected the icon will not be displayed on the operation interface VOL and BRT Adjust the volume and the backlight brightness which can be adjusted manually or automatically Theme Set the theme used by the Display 3 sets of themes are available by default Setting Advanced Parameters 4 3 Tap Advanced and then you can set par...

Page 31: ... pop up window appears prompting that whether to connect to the corresponding channel Input name Enter the signal input channel name and after modifying the name the system wide corresponding channel names are modified synchronously Wake up automatically Enable the function and then the Display will be automatically awakened from sleep status when connecting to HDMI or VGA source HDMI settings Aft...

Page 32: ...ime of the Display ranging from 1 5 10 15 or 30 minutes after no operation is done to always keep the Display in sleep mode Standby Enable Standby and you can set the standby time by 30 60 90 minutes after the system enters sleep mode or set other time Update Check for updates and update system online Set OTA server Security Set system security Screen lock You can lock the screen with password or ...

Page 33: ...System Settings 28 Function Description About View device name editable memory storage space resolution and Android version and MAC address information ...

Page 34: ...ower off protection to the OPS computer After you shut down the Display the OPS computer will shut down after a while Press and hold the power button for 3 s and the system will prompt whether to shut down the Display Tap OK and then you can turn it off Press the power button on the left side panel to shut down the Display ...

Page 35: ...ng normal operation Update by USB flash drive After the update the user settings will be restored to factory settings It is recommended to use this way when the system starts abnormally Online Update 6 1 Online update checks for and carries out updates automatically When updating your system online make sure that you device is connected to the network Tap System Settings Update Step 1 The Update i...

Page 36: ...ot directory of the flash drive Step 1 Insert the USB flash drive to the Android USB port of the Display Step 2 Update the system with USB flash drive of FAT 32 type otherwise the update might fail Press and hold the power button for 2 s to shut down the Display Step 3 Press and then release the power button then press and hold the power button Step 4 The system starts to update After the update i...

Page 37: ...Check whether the USB flash drive is inserted into the USB port of the Android main control board If not properly insert the flash drive Check whether the USB flash drive is in FAT32 format If not format the flash drive Update again 3 I start the Display but the OPS computer cannot start The OPS computer will not start automatically You need to press the power button on your OPS computer 4 If ther...

Page 38: ... with the stylus pen and lift the pen when there is a circle on the screen Then the right tap menu is displayed Drag Tap and hold the icon that you want to drag with the stylus pen and move the stylus pen to the target position Lift the stylus pen to finish the dragging operation Slide Tap and hold the interface for example slider used for web browsing that you want to slide with the stylus pen an...

Page 39: ...tem is equipped with the latest security patches and fixes When the equipment is connected to the public network it is recommended to enable the auto check for updates function to obtain timely information of firmware updates released by the manufacturer We suggest that you download and use the latest version of client software Nice to have recommendations to improve your equipment network securit...

Page 40: ...ary Services and Choose Secure Modes If not needed it is recommended to turn off some services such as SNMP SMTP UPnP etc to reduce risks If necessary it is highly recommended that you use safe modes including but not limited to the following services SNMP Choose SNMP v3 and set up strong encryption passwords and authentication passwords SMTP Choose TLS to access mailbox server FTP Choose SFTP and...

Page 41: ...es from external network The network should be partitioned and isolated according to the actual network needs If there are no communication requirements between two sub networks it is suggested to use VLAN network GAP and other technologies to partition the network so as to achieve the network isolation effect Establish the 802 1x access authentication system to reduce the risk of unauthorized acc...

Page 42: ...DAHUA VISION TECHNOLOGY CO LTD Address No 1199 Bin an Road Binjiang District Hangzhou P R China Postcode 310053 Tel 86 571 87688883 Fax 86 571 87688815 Email overseas dahuatech com Website www dahuasecurity com ...

Reviews: