background image


13 

5.2  Modifying the IP Address  

To properly configure the camera for your network, you need the following information: 


Camera IP address – This address is an identifier for the camera on an IP network. For example, 

140.11.2.115 is valid syntax for an IP address. 


Subnet mask – A mask is used to determine the subnet an IP address belongs to.  


Gateway IP address – This address is a node on a network that serves as an entrance to 

another network. 


Port – A port is an endpoint to a logical connection in an IP network.  

Dahua supplies the ConfigTool to access and to modify the network settings of a device. Refer to the 

Operation Manual, available on the CD included with the camera or on Dahuasecurity.com, for 

complete information.  

Notes:  


Ensure that the network parameters of each camera is available before starting configuration. 


The ConfigTool supports those cameras that are part of the same network that as the computer 

running the ConfigTool. 

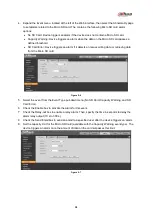
5.3  Using the ConfigTool 

1. 

Install the ConfigTools.exe on a computer. 

2. 

Adjust the computer’s network settings so that it is on the same network as the camera. 

3. 

Launch the ConfigTool to generate a list of devices on the network. 

4. 

Double click the device to be configured, the ConfigTool opens the Login dialog box for the 

device. 

5. 

Enter the IP address, Username, Password, and Port number of the camera, then click OK. Note: 

the default Username and Password for the device is “admin” and “admin” respectively. The 

default port is 37777.  


Figure 5-1 

Summary of Contents for NK8BB7Z

Page 1: ...12 MP Network Bullet Camera NK8BB7Z Quick Start Guide Version 001 001 Dahua Technology USA Inc...

Page 2: ...Unpacking 5 3 Installation and Configuration 6 3 1 Cable Connections 6 3 2 Alarm I O Connections 6 3 3 Framework and Dimensions 7 3 4 Locally Storing Data 7 3 5 Alarm Setup 7 Alarm Input 7 Alarm Outpu...

Page 3: ...protect the unit from damage especially in damp environments Protect the plug and power cord from foot traffic being pinched and its exit from the unit Units with or without an ON OFF switch have pow...

Page 4: ...ng or installation Environmental Precautions Do not aim the unit at a strong light source or into direct sunlight to focus A strong light source may cause overexposure and may affect the longevity of...

Page 5: ...e solvent like alcohol benzene or thinner or use a strong detergent with abrasives which may damage the surface coating or reduce the working performance of the unit Do not touch or wipe a dome cover...

Page 6: ...guide is 2017 Dahua Technology Company LTD This user guide is the intellectual property of Dahua Technology Company LTD and is protected by copyright All rights reserved Trademarks All hardware and s...

Page 7: ...nal packing carton is the safest container to transport the unit in the event the unit must be returned for service Retain the carton and all shipping material for future use Please refer to the enclo...

Page 8: ...network to supply power 4 I O I O port Alarm signal input output Refer to the table below more details 5 Power Power Input Port Power port Input 12 VDC power supply Use in accordance with device labe...

Page 9: ...card is first in first out FIFO The camera deletes the oldest first entry as new storage requirements arise The camera does not signal nor make an indication when data is deleted Storage time is depen...

Page 10: ...device to the ALARM_OUT port 3 Launch Internet Explorer and type the camera IP address in the address bar Internet Explorer opens the Login page 4 Type the Username and Password for the camera The de...

Page 11: ...rn the camera over to access the bottom of the camera 3 Insert a Micro SD card into the SD Card Slot Refer to the figure below for the location of the SD Card slot Note Do not remove the bottom cover...

Page 12: ...f connector to the network port and rotate it clockwise to lock the network port and waterproof connector firmly e Slide the Waterproof Locking Cover over the main body of waterproof connector and rot...

Page 13: ...position the camera by tilting twisting and rotating the camera as shown in Figure 4 4 below Use the following camera adjustment limits Pan 0 to 360 Tilt 0 to 90 Rotation 0 to 360 Note Do not rotate t...

Page 14: ...and automate the assignment of IP addresses DHCP should only be enabled if using dynamic IP address notification or if the DHCP can update a DNS server TFTP The Trivial File Transfer Protocol is a sim...

Page 15: ...the CD included with the camera or on Dahuasecurity com for complete information Notes Ensure that the network parameters of each camera is available before starting configuration The ConfigTool suppo...

Page 16: ...figure alarm inputs and outputs view live camera images and review recorded video Note Different devices may have different Web interfaces the figures below are for reference only and may not represen...

Page 17: ...ording medium and to configure an alarm that triggers once the Micro SD card passes a pre determined storage 1 Access the Web Interface for the device and click the Setup tab Expand the Storage menu t...

Page 18: ...s writing data or retrieving data from the Micro SD card Figure 5 6 5 Select the event from the Event Type pull down menu No SD Card Capacity Warning and SD Card Error 6 Check the Enable box to activa...

Page 19: ...logy USA Inc 23 Hubble Irvine CA 92618 Tel 949 679 7777 Fax 949 679 5760 Email sales usa global dahuatech com Rev 001 001 2017 Dahua All rights reserved Design and specifications are subject to change...

Reviews: