Local Configurations
234
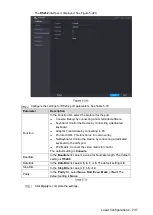
Parameter
Description
Enable
Enable the FTP upload function.
Host IP
IP address of the PC that is installed with FTP server.
Port
The default is 21.
Anonymity
Enter the user name and password to login the FTP server.
Enable the anonymity function, and then you can login
anonymously without entering the user name and password.
User Name
Password
Remote Directory
Create folder on FTP server.
If you do not enter the name of remote directory, system
automatically creates the folders according to the IP and
time.
If you enter the name of remote directory, the system creates
the folder with the entered name under the FTP root
directory first, and then automatically creates the folders
according to the IP and time.
File Length(M)
Enter the length of the uploaded recorded video.
If the entered length is less than the recorded video length,
only a section of the recorded video can be uploaded.
If the entered length is more than the recorded video length,
the whole recorded video can be uploaded.
If the entered length is 0, the whole recorded video will be
uploaded.
Image Upload Interval
(Sec.)
If this interval is longer than snapshot interval, the system
takes the recent snapshot to upload. For example, the
interval is 5 seconds, and snapshot interval is 2 seconds per
snapshot, the system uploads the recent snapshot every 5
seconds.
If this interval is shorter than snapshot interval, the system
uploads the snapshot per the snapshot interval. For
example, the interval is 5 seconds, and snapshot interval is
10 seconds per snapshot, the system uploads the snapshot
every 10 seconds.
To configure the snapshot interval, select
Main Menu >
CAMERA > ENCODE > Snapshot
.
Channel
Select the channel that you want to apply the FTP settings.
Week Day
Select the week day and set the time period that you want to
upload the recorded files. You can set two periods for each week
day.
Period 1, Period 2
Record type
Select the record type (Alarm, Intel, MD, and General) that you
want to upload. The selected record type will be uploaded during
the configured time period.
Click
Test
.
The system pops up a message to indicate success or failure. If failed, please check
the network connection or configurations.
Click
Apply
to complete the settings.
Summary of Contents for Smart 1U
Page 1: ...DIGITAL VIDEO RECORDER User s Manual V1 0 0...
Page 30: ...Connecting Basics 20...
Page 80: ...Local Configurations 70 No Icon Description...
Page 181: ...Local Configurations 171 Select the Enable check boxes to enable IoT function See Figure 5 152...
Page 234: ...Local Configurations 224...
Page 280: ...Glossary 270 Abbreviations Full term VGA Video Graphics Array WAN Wide Area Network...
Page 298: ...Earthing 288...

