background image


2 Structure 

2.1 Packing List 

Table 2-1 Packing list 

Name 

Quantity 

Thermal Monocular Camera 

Micro USB Cable 

Charger 

Camera Pouch 

Quick Start Guide 

Legal and Regulatory Information 

Warranty Card 

2.2 Device Description 

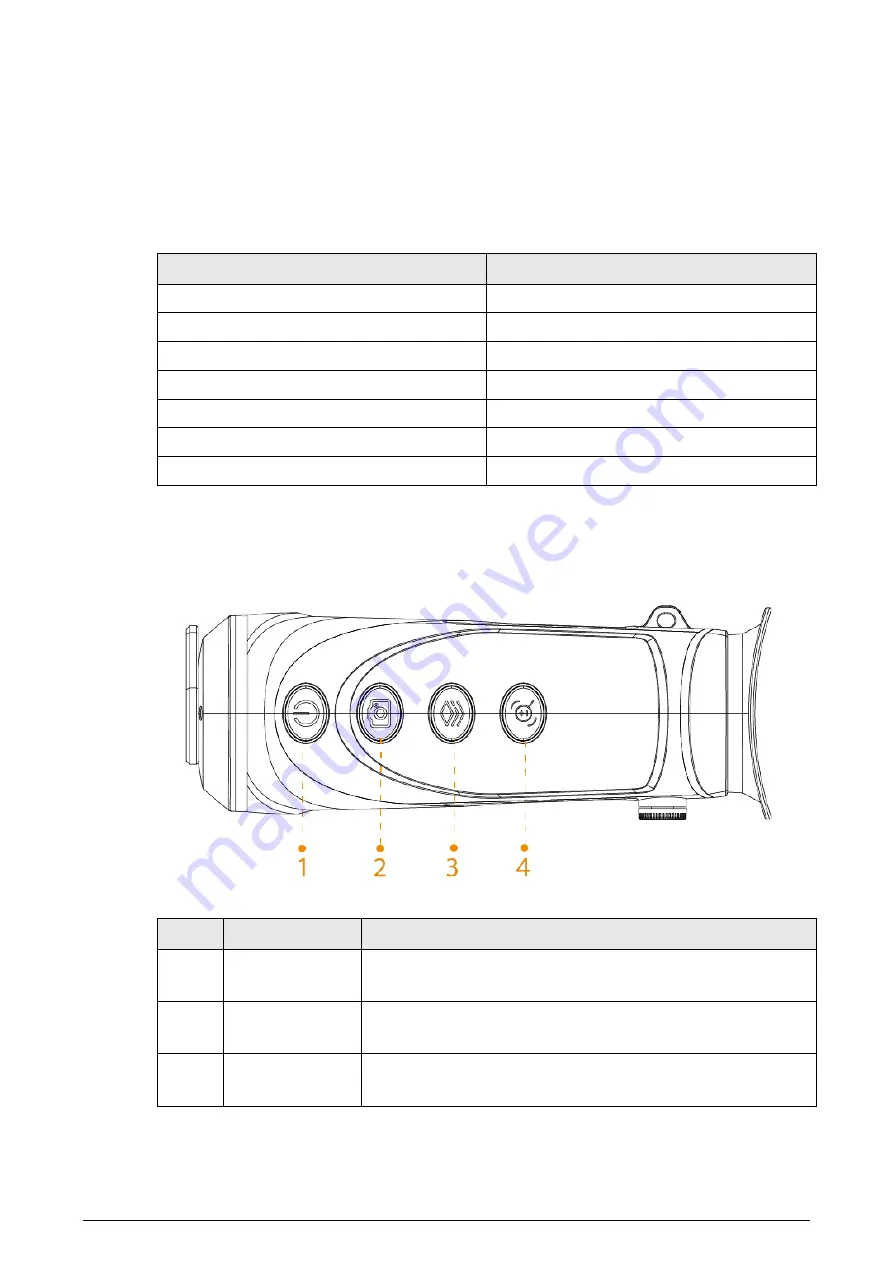
Figure 2-1 Button description 


Table 2-2 Button description 

No. 

Name 

Description 

Power button 

  Press and hold to start or shut down the Camera. 

  Press to enable or disable the suspend mode. 

Capture button 

  Press and hold to record videos. 

  Press to capture images. 

Mode button 

  Press and hold to enter the main menu. 

  Press to select the pseudo color. 

Summary of Contents for TPC-M20-B10-G

Page 1: ...Thermal Monocular Camera User s Manual V1 0 0...

Page 2: ...age Take care to avoid coming into contact with electricity Indicates a laser radiation hazard Take care to avoid exposure to a laser beam Provides methods to help you solve a problem or save time Pro...

Page 3: ...me differences appearing between the actual product and the manual Please contact customer service for the latest program and supplementary documentation There might be errors in the print or deviatio...

Page 4: ...immerse the device in liquid Do not mechanically vibrate or crash when storing Store the Camera in a ventilated place that has no strong electromagnetic radiation For long term storage of the battery...

Page 5: ...facturer The Camera should be maintained by qualified professionals Make sure to cut off the power before cleaning the Camera to prevent electric shock If the Camera malfunctions contact your local cu...

Page 6: ...ization 6 3 2 2 3 Setting Digital Zoom 8 3 2 2 4 Setting External Display 8 3 2 3 Setting Start Bar Display 8 3 2 4 Setting FFC Mode 9 3 2 5 Setting Fire Warning 9 3 2 6 Setting Buzzer 9 3 2 6 1 Buzze...

Page 7: ...VI 3 3 2 Capturing Images 14 3 3 3 Exporting File 14 3 4 Charging 14 4 System Update 16 Appendix 1 Compliance Notice 17...

Page 8: ...s display different effects Digital zoom Supports 1 2 3 and 4 digital zoom The number might different depending on devices Fire warning Tracks fires in real time Range measurement Marks the top and bo...

Page 9: ...on 1 Warranty Card 1 2 2 Device Description Figure 2 1 Button description Table 2 2 Button description No Name Description 1 Power button Press and hold to start or shut down the Camera Press to enabl...

Page 10: ...pointer Wavelength 650 nm Beam diameter 15 20 mm 10 m Maximum average output power 0 9 mW Press and hold to manually adjust the shutter Press for digital zoom Laser can cause damages to eyes Do not l...

Page 11: ...or tripod installation 4 Protective cover Dust prevention Close the cover when not using the Camera 5 Charging indicator Red and green lights flashing alternately charging error Red light on charging...

Page 12: ...to start it When the Camera is on press and hold to shut down it When the Camera is on press to suspend the Camera When the Camera is in suspend mode press to weak up it 3 2 Configuring the Camera 3 2...

Page 13: ...ds color to the thermal image and uses color to indicate the temperature Step 1 On the main menu press or to select Colorization Step 2 Press to go to the Colorization configuration screen Step 3 Pres...

Page 14: ...7 Figure 3 3 White hot Figure 3 4 Alarm Figure 3 5 Iron red...

Page 15: ...creen Mode Step 2 Press to go to the Screen Mode configuration screen Step 3 Press to select PAL Step 4 Press to save the configuration Step 5 Connect the external screen to the Camera through the CVB...

Page 16: ...The camera calibrates image automatically every certain period 1 Press to select Auto 2 Press to confirm The camera calibrates image automatically Manual Calibrate the image manually as needed 1 On t...

Page 17: ...the buzzer you can hear a beep when pressing a key 3 2 7 Setting Ranging Mode After setting the ranging mode the Camera can measure the range towards targets To guarantee the measurement accuracy kee...

Page 18: ...ate at the points with the highest and lowest temperature in the image 3 2 10 Setting USB Mode Step 1 On the main menu press or to select USB Mode Step 2 Press to go to the USB Mode configuration scre...

Page 19: ...de Step 1 On the main menu press or to select Suspend Mode Step 2 Press to go to the Suspend Mode configuration screen Step 3 Press to select the suspend mode Automatic When the idle time is up to the...

Page 20: ...guration 3 2 15 Setting DPC After enabling DPC Defective Pixels Correction you can correct the defective pixels in the image Step 1 On the main menu press or to select DPC Step 2 Press to go to the DP...

Page 21: ...mera to the computer through USB data cable The driver will automatically be installed for first time connection Connect the cables before starting the Camera Do not hot swap the USB port of the Camer...

Page 22: ...th the delivery Step 1 Open the sealing cover of the USB port when charging Step 2 Connect the USB cable to the USB port to charge the Camera The charging indicator states Red and green lights flashin...

Page 23: ...s to select Mass on the USB Mode configuration screen Step 3 Connect the Camera to the computer and then copy the update program to the SD card Step 4 Press Zoom button and Power button at the same ti...

Page 24: ...tation the United States European Union United Kingdom and or other member countries of the Wassenaar Arrangement Please consult your professional legal or compliance expert or local government author...

Reviews: