background image

12 


Please use the security code received in your email box to reset the password 
within 24 hours; otherwise the security code becomes invalid. 


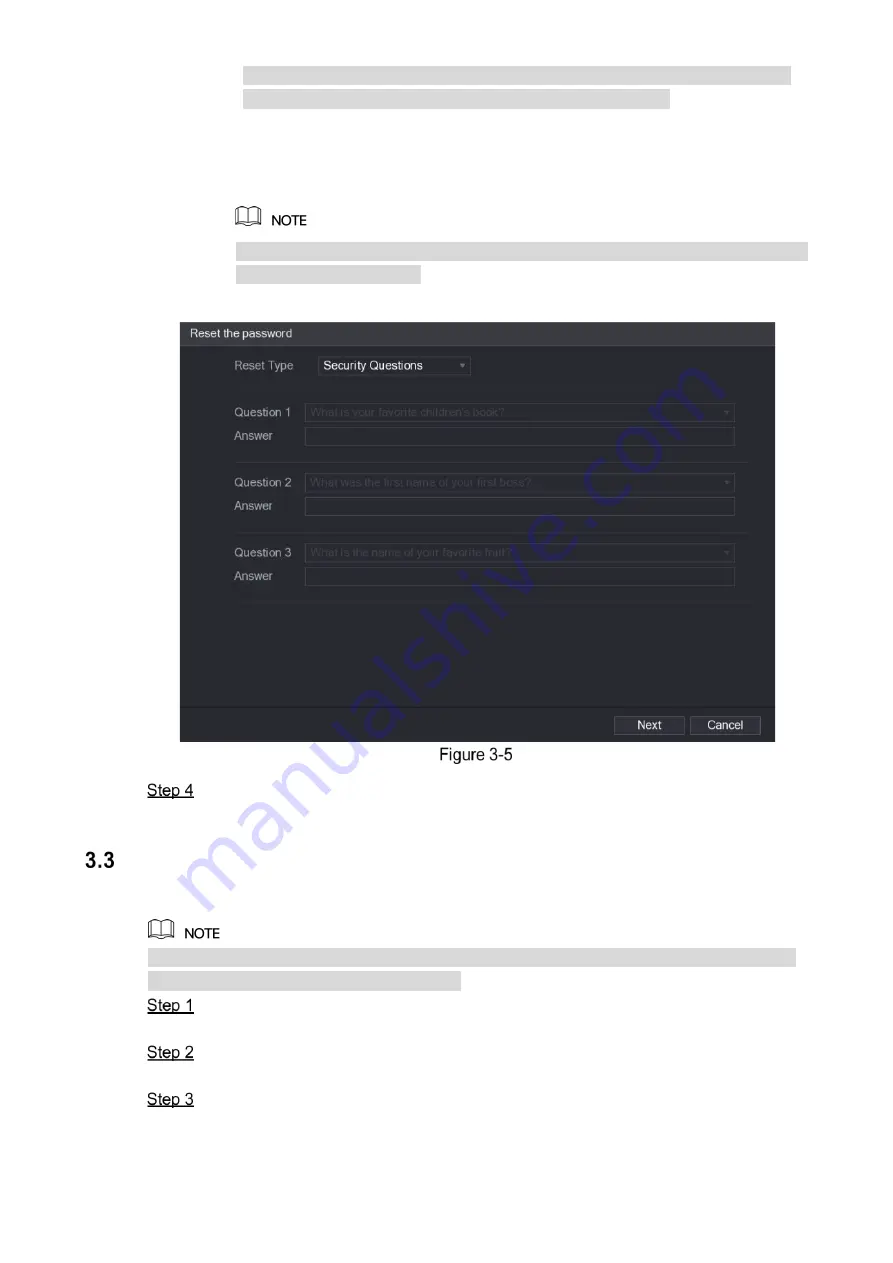
Security questions 

1)  On the 

Reset the password

 interface as shown in Figure 3-4, in the 

Reset Type


list, select 

Security Questions

, the 

Security Questions

 interface is displayed. 

See Figure 3-5. 


If you did not configure the security questions before, in the 

Reset Type

 list, there 

is no 

Security Questions

2)  In the 

Answer

 box, enter the correct answers. 


  Click

 Next

 and then follow the onscreen instructions to complete the password 

resetting. 

 Adding Remote Device 

You can add remote devices by adding the IP address. 


This function is available after having configured the channel type as IP channel by selecting 

Main Menu > CAMERA > CHANNEL TYPE

  Select 

Main Menu > CAMERA > REGISTRATION > Registration

The 

Registration

 interface is displayed. 

  Click 

IP Search

The searched devices are displayed. 

  Add the device by either of the following ways. 


Double-click the device, or select the check box of the device and then click

 Add


Click 

Manual Add

, configure the parameters and then click 

Apply

The device is displayed in the

 Added Device

 area. See Figure 3-6. 

Summary of Contents for X74A3L

Page 1: ...DIGITAL VIDEO RECORDER Quick Start Guide V1 0 0...

Page 2: ...y When replacing the battery make sure the same model is used We assume no liability or responsibility for any problems caused by unauthorized modifications or attempted repair Use a power supply that...

Page 3: ...prior written notice All trademarks and registered trademarks mentioned herein are the properties of their respective owners Any loss caused by not complying with the operations described in the Guide...

Page 4: ...lling DVR into Rack 5 Booting up 6 2 The Grand Tour for Rear Panel 7 3 Local Configurations 9 Initializing DVR 9 Resetting Password 10 Adding Remote Device 12 Configuring Recording Storage Schedule 13...

Page 5: ...sales engineer immediately Sequence Checking items Requirement 1 Package Appearance No obvious damage Packing materials No broken or distorted positions that could be caused by hit 2 Labels Labels on...

Page 6: ...Connect the other end of HDD cable to the mainboard 5 Use the power cable to connect HDD and mainboard 6 Put back the cover and fasten the screws Installing DVR into Rack To install the DVR into Rack...

Page 7: ...ife please refer to the related international standard to use the power source that provides stable voltage with less ripple interference USP power source is recommended Connect the DVR to a display P...

Page 8: ...lk output port which outputs the analog audio signal to the devices such as the sound box 7 Audio output port Outputs audio signal to the devices such as the sound box 8 Video output port Connects to...

Page 9: ...r output of the 6th alarm output port The current is 500mA Turns off power output when there is alarm output Turns on power output when the alarm is cleared 12V power output port Provides power to ext...

Page 10: ...ing up for the first time the Device Initialization interface is displayed see Figure 3 1 You need to configure the password information for the admin by default If needed you can also configure the u...

Page 11: ...answers to the questions can make you reset the password If you want to configure the email or security questions fucntion later or you want to change the configurations select Main Menu ACCOUNT USER...

Page 12: ...reserved email address the Reset the password interface is displayed See Figure 3 4 Reset the password QR code Scan the QR code on the actual interface and then follow the onscreen instructions to ge...

Page 13: ...s Click Next and then follow the onscreen instructions to complete the password resetting Adding Remote Device You can add remote devices by adding the IP address This function is available after havi...

Page 14: ...Recording Storage Schedule Select Main Menu STORAGE SCHEDULE Record the Record interface is displayed see Figure 3 7 The default setting is 24 hours recording for all channels You can modify the sett...

Page 15: ...14 Playing Back Recorded Video You can search for and play back the recorded videos saved on the DVR Select Main Menu VIDEO The video search interface is displayed See Figure 3 7...

Page 16: ...Click The system starts playing recorded video Configuring P2P Settings You can add the DVR into your cell phone client or the platform to manage For details please refer to the P2P operation manual...

Page 17: ...he interfaces after you have entered the Main Menu Use your cell phone to scan the QR code under Cell Phone Client to download the application On your cell phone open the application and then tap the...

Page 18: ...P enter a name for the DVR the username and password scan the QR code under Device SN and then tap Start Live Preview The DVR is added and displayed on the live view interface of the cell phone See Fi...

Page 19: ...rface or any interface after you have entered the Main Menu click Select Logout you will log out the DVR Select Reboot the DVR will be rebooted Select Shutdown the DVR will be turned off You can also...

Page 20: ...ount is admin The password is the one that was configured during initializing settings To security your account it is recommended to keep the password properly and change it periodically You can selec...

Reviews: