Getting Started
4
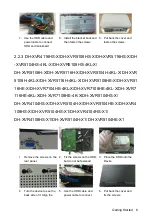
2.2.1 DH-XVR5108C-X/DH-XVR5104C-4KL-X/DH-XVR5104C-X/
DH-XVR4104C-X/DH-XVR4108C-X/DH-XVR5104C-X1/
DH-XVR4104C-X1/DH-XVR4108C-X1
1. Remove the screws to take
off the cover.
2. Fix the screws on the HDD
but do not fasten them.
3. Match the screws with
the holes on the DVR to
place the HDD.
4. Turn the DVR upside down
to see the screws and then
fasten them.
5. Use the HDD cable and
power cable to connect HDD
and mainboard.
6. Put back the cover and
fasten the screws.
Summary of Contents for XVR Cooper Series
Page 1: ...DIGITAL VIDEO RECORDER User s Manual V1 2 0 ZHEJIANG DAHUA VISION TECHNOLOGY CO LTD...
Page 45: ...Connecting Basics 32 Figure 4 2...
Page 97: ...Local Configurations 84 Figure 5 50...
Page 198: ...Local Configurations 185 Figure 5 153 Figure 5 154 Double click the video or click Step 7...
Page 203: ...Local Configurations 190 Figure 5 158 Figure 5 159...
Page 311: ...Glossary 298 Abbreviations Full term VGA Video Graphics Array WAN Wide Area Network...
Page 329: ...Earthing 316...

