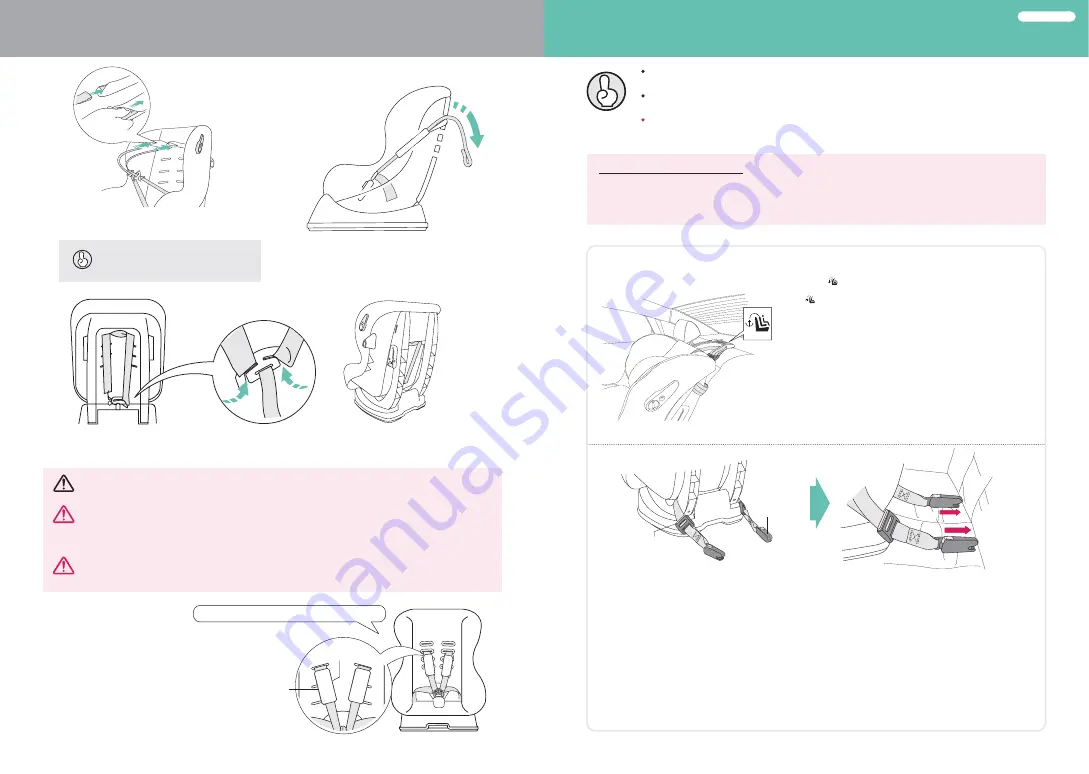
Centura pentru umeri trebuie introdusă prin pernuța pentru umeri.
The shoulder belt needs to be inserted through the shoulder pad.
După introducerea centurii pentru umeri în agățătoarea dedicată, centura trebuie introdusă în partea din spate a corpului principal.
After the shoulder belt is inserted into the shoulder belt hanger, the belt at the back side of the main body needs to be inserted.
Centura pentru umeri a scaunului auto pentru sugari, împreună
cu pernuța pentru umeri, trebuie introdusă în orificiul dedicat
centurii pentru umeri din spătar.
The shoulder belt of the infant safety seat inserted whit the shoulder pad
needs to be inserted into the shoulder belt hole at the backrest.
Centura pentru umeri trebuie împinsă lent,
folosind degetul mare.
When the shoulder belt is pushed in slowly
using a thumb.
Recomandare
Advice
Centura pentru umeri sau cureaua de reglare trebuie instalate astfel încât să nu se răsucească.
The shoulder belt, or the adjusting belt, needs to be installed into the shoulder belt in a way that no twisting occurs.
După așezarea sugarului în scaun, cureaua de reglare trebuie trasă astfel încât sugarul să fie bine fixat; consultați „Așezarea sugarului în scaun” de la pagina 10.
Centura pentru umeri se poate slăbi în anumite situații, generând pericol de moarte sau vătămare corporală gravă.
After the infant is seated onto the seat, the adjusting belt should be pulled to position the infant tightly by referring to <How to Seat an Infant> on page 10.
The shoulder belt may loosen the original function in a situation, causing people to risk their lives, or suffer serious damage.
Capacul centurii trebuie să fie introdus în timpul utilizării produsului. Centura pentru umeri se poate slăbi în anumite situații, generând pericol de moarte sau
vătămare corporală gravă.
The belt cover should be inserted for use. The shoulder belt may loosen the original function in a situation causing people to risk their lives or suffer serious damage.
Avertisment
Warning
Avertisment
Warning
Atenție
Caution
Partea interioară
Inner side
Partea exterioară
Outer side
ISOFIX [ DA-D1001D FIX ]
☆
Pictograma din imaginea din stânga se află în partea de sus a spătarului
banchetei din spate, dacă autovehiculul este compatibil cu instalarea ISOFIX.
The in the picture on the left is located on the top edge of
the rear seat backrest if the vehicle is designed to fit ISOFIX.
Recomandare
Advice
Acest punct de atașare, folosind o ancoră fixă, poate fi folosit doar pe un autovehicul proiectat pentru ISOFIX.
This attachment point using a fixed anchor can only used on a vehicle designed for ISOFIX.
Acest punct de atașare este folosit doar pentru instalarea cu orientare spre față.
This attachment point is only used for front-facing installation.
Centura ISOFIX este un produs opțional.
ISOFIX belt is an optional product.
Trageți chingile în timp ce apăsați butonul de reglare pe lungime (partea roșie)
pentru sistemul de ancorare superior, și agățați-le în cârligul sistemului de ancorare,
din spatele banchetei.
Pull the webbing while pressing the length adjustment button(red part) for upper
tether, and hook to the tether hanger behind the car seat.
ISOFIX este un dispozitiv de fixare standard interna
ț
ional pentru echipamente de siguran
ță
pentru copii
ș
i pentru instalarea pe autovehicule,
un sistem de fixare standard pentru scaune auto pentru sugari
ș
i copii. (Puncte de ata
ș
are a scaunului auto pe bancheta din spate)
ISOFIX is an international standard fastener for child safety equipment and installation for a vehicle, a standard fixing system for
infant for infant and child seat. (Child seat attachment points on the rear seat)
Ce este ISOFIX? / What is ISOFIX?
1
Fixați mecanismul de blocare în cârligul ISOFIX, amplasat sub spătar, până când auziți un „clic”, după tragerea chingilor, în timp ce apăsați butonul de reglare
pe lungime (butonul roșu).
Fasten the latch to the ISOFIX hook located under the backrest until you hear the 'click' sound after lengthening the webbing while pressing the
length adjusting buckle (red button) down.
1
Strângeți chingilor după ce ați verificat dacă scaunul auto este strâns lipit de spătar, pentru a reduce la minimum spațiul.
Tighten the webbing after checking the car seat is tightly positioned against the backrest to minimize the gap.
2
Trageți bine cureaua de ancorare, pentru întinderea chingilor, în scopul reducerii
la minimum a spațiului.
Tightly pull the tether belt to keep the webbing tight to minimize the gap.
2
Modul de conectare a sistemului de ancorare / How the Connect Upper Tether
Modul de fixare a mecanismului de blocare / How the Fasten Latch
Pentru eliberarea mecanismului de blocare din cârligul ISOFIX, trageți cureaua în timp ce apăsați butonul roșu din partea de sus
a dispozitivului de fixare al mecanismului de blocare.
To release the latch from the ISOFIX hook, pull the strap while pressing the red button down on the upper part of the latch fastener.
Modul de eliberare a mecanismului de blocare / How to Release Latch
DA-D1001F FIX
③
①
Element de reglare
Adjustor
Adaptor
Adaptor
②
27
28
Schema de finalizare / Completion diagram


