4
Set-up and installation
Installation and maintenance instructions
28
Daikin Altherma EHS(X/H)(B)-D
Heat pump (indoor unit) with integrated heat accumulator
008.1444099_01 – 11/2018 – EN
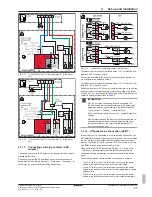
Potential-free switching contact S2S can be implemented as a nor-
mally closed or normally open switching contact.
▪ If implemented as a normally closed switching contact, the [HT/NT
contact] parameter = 1 must be set [→ Main menu → Settings
→ Inputs/Outputs]. When the electricity supply company sends
the off-peak signal, switching contact S2S is opened. The system
switches to "Mandatory OFF". If the signal is sent again, potential-
free switching contact S2S closes and the system resumes opera-
tion.
▪ If implemented as a normally open switching contact, the [HT/NT
contact] parameter = 0 must be set [→ Main menu → Settings
→ Inputs/Outputs]. When the electricity supply company sends
the off-peak signal, switching contact S2S is closed. The system
switches to "Mandatory OFF". If the signal is sent again, potential-
free switching contact S2S opens and the system resumes opera-
tion.
[HT/NT contact] = 1
[HT/NT contact] = 0
Fig. 4-44
Connection of the H/NT switch contact
Item
Designation
1
Mains connection box for low rate mains connection
2
Receiver for evaluating the HT/NT control signal
3
Power supply of the heat pump outdoor unit (see re-
spective installation instructions for the heat pump out-
door unit)
4
Potential-free switching contact for heat pump indoor
unit
Tab. 4-9
4.7.15
Connecting an intelligent controller
(Smart Grid - SG)
If the [Smart grid] parameter = 1, the function [→ Main menu → Set-
tings → Inputs/Outputs] is activated (see controller operating instruc-
tions), the heat pump is switched to normal or a mode with higher
temperatures depending on the utility company signal.
For this purpose, the SG1/SG2 floating switching contacts of the in-
telligent controller must be connected to the J8 connector, Smart
Grid and EVU connections on the RoCon BM2C printed circuit board
(see
Fig. 4-45
).
As soon as the Smart Grid function is active, the HT/NT function is
automatically deactivated. Modus Smart Grid The heat pump is op-
erated differently depending on the value of the parameter [→ Main
menu → Settings → Inputs/Outputs] (see controller operating in-
structions).
Fig. 4-45
Connecting the Smart Grid
4.8
Connection for refrigerant
INFORMATION
Follow the installation instructions for the outdoor unit.
4.8.1
Laying refrigerant lines
CAUTION
The use of refrigerant lines that have already been used
can lead to damage to the unit.
▪ Do not reuse a refrigerant line that has been used with
another refrigerant. Replace or carefully clean the refri-
gerant line.
▪ Check if an oil trap bend for the refrigerant line is necessary.
▪ Required if the indoor unit is not installed at ground level to the
external heat pump unit (
Fig. 4-46
, HO ≥ 10 m).
▪ At least one oil trap bend must be installed for every 10 m of
height difference (
Fig. 4-46
, H = distance from oil trap bend to
oil trap bend).
▪ An oil trap bend is only required in the gas line.
▪ Install lines with bending unit and an adequate clearance to elec-
trical lines.
▪ Only solder with light nitrogen flow (hard soldering only).
▪ Do not apply thermal insulation to connection points until after
commissioning (for purposes of leakage search).
▪ Make flared connections and connect to the devices (observe
tightening torque, see
Chap. 10.4
).
Summary of Contents for Altherma 3 ECH2O
Page 2: ......


