background image

10 

English

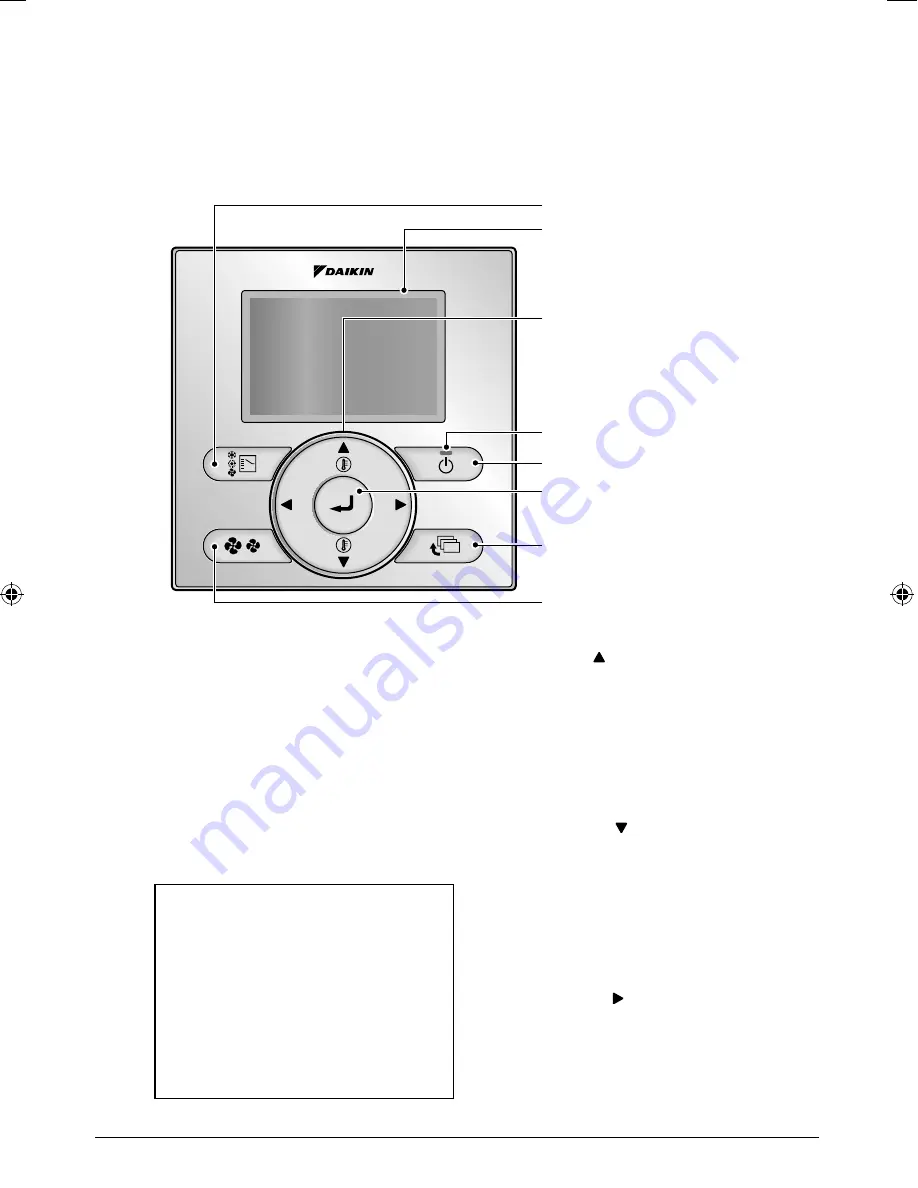
Functions and menu items of remote 

4. 

controller buttons

Functions and menu items

4-1 

Operation mode selector button

(1) 

Used to change the mode.

Fan speed control button

(2) 

Used to change the fan control.

Menu/Enter button

(3) 

Used to indicate the main menu.


(For details of main menu, see the 
operation manual.) 
Used to enter the setting item selected.


Main menu

Set temp mode changeover
Air

fl

 ow Direction

Quick Cool/Heat On/Off
Ventilation
Timer setting
Service Contact/Model Info
Convenient functions
Setting status list
Clock setting
Language changeover

Depending on connected model

Up button 

(4) 

Used to raise the set temperature.


The next items on the upper side will be 


highlighted.
(The highlighted items will be scrolled 
continuously when the button is kept 
pressed.)
Used to change the item selected.


Down button 

(5) 

Used to lower the set temperature.


The next items on the lower side will be 


highlighted.
(The highlighted items will be scrolled 
continuously when the button is kept 
pressed.)
Used to change the item selected.


Right button 

(6) 

Used to highlight the next items on the 


right-hand side.
Display contents are changed to next 


screen per page.

(1)  Operation mode selector button
(11) LCD (with backlight)

(4) Up button
(5) Down button
(6) Right button
(7) Left button

(9) Operation lamp

(8) On/Off button

(10) Cancel button

(2) Fan speed control button

(3) Menu/Enter button

01_EN_EM08A086.indd   10

01_EN_EM08A086.indd   10

4/7/2009   7:32:12 PM

4/7/2009   7:32:12 PM

Summary of Contents for BRC1E51A7

Page 1: ...Be sure to read this installation manual before conducting the installation of this product MODEL BRC1E51A7 WIRED REMOTE CONTROLLER INSTALLATION MANUAL ...

Page 2: ......

Page 3: ...ns and menu items of remote controller buttons 10 5 Power on 12 6 Field setting method 13 7 Test operation method in the case of SkyAir 16 8 Checking procedure of error record 19 9 Registration method of the service contract 20 10 Confirmation of registered details 21 11 Clock Setting 22 12 Language changeover 22 ...

Page 4: ...tallation work may result in leakage electric shocks or fire hazards Install the remote controller in accordance with the instructions in this installation manual Improper installation may result in water leakage electric shocks or fire Be sure to use only the specified accessories and parts for installation work Failure to use the specified parts may result in the unit falling water leaakage elec...

Page 5: ... pipes or soldered parts may result in refrigerant leakage Near machinery emitting electromagnetic radiation 3 Electromagnetic radiation may disturb the operation of the control system and result in a malfunction of the unit Where flammable gas may leak where there is carbon fibre or ignitable dust suspensions in the 4 air or where volatile flammables such as paint thinner or gasoline are handled ...

Page 6: ...ter of the wiring thro ugh hole on the controller lower case when making the hole F 8 10 External view of the remote controller Through hole F 8 10 Lower case Through hole 48 5 40 Remove upper case 3 3 Insert a screwdriver in the recess of lower case to remove the upper case 2 points Upper case Lower case Screwdriver Insert and twist the screwdriver lightly for removal Remote controller PC board i...

Page 7: ...or the like Upper outlet 3 4 3 Upper center outlet 3 4 4 Cut off thin area hatched area with nippers or the like and then remove burr with a file or the like Cut off thin area hatched area with nippers or the like and then remove burr with a file or the like Conduct wiring 3 5 1 Switch box and transmission wiring are not attached Do not directly touch the remote controller PC board 2 CAUTION Wirin...

Page 8: ...stripping length Ca 150mm for upper outlet Ca 200mm for upper center outlet Connect the terminals P P1 N P2 of the remote controller upper case with the terminals P1 P2 of the indoor unit P1 and P2 have no polarities Back outlet 3 5 1 Wiring fixing guideline Lower case P1 Indoor unit P2 Upper case PC board Clamp Wiring fixing point Cross section Secure the wiring at the wiring fixing point by usin...

Page 9: ... 3 5 3 Install attached wiring retainer to prevent wiring pinch according to left figure PC board Indoor unit Wiring retainer Wiring retainer Upper case Lower case Upper case Wiring Cross section P1P2 Upper center outlet 3 5 4 PC board Indoor unit Wiring retainer Upper case Lower case P1P2 ...

Page 10: ...of wiring center upward drawing or rearward drawing see wiring procedure first as wiring with the case is needed before fixing In the case of installation on the wall 3 6 1 Secure by using attached wood screws 2 pcs Wood screws F3 5 16 In the case of installation on the switch box 3 6 2 Secure by using attached small screws 2 pcs Small screws M4 16 Switch box field supply Use optional accessory KJ...

Page 11: ...installation face as possible And do not tighten the installation screws too much not to deform the lower case CAUTION Install the upper case as original condition 3 7 Align the upper case with tabs of the lower case 6 points inset and install the upper case Install the wiring with care to prevent the pinch Peel off a protective seal which is attached on the upper case ...

Page 12: ...cted model Up button 4 Used to raise the set temperature The next items on the upper side will be highlighted The highlighted items will be scrolled continuously when the button is kept pressed Used to change the item selected Down button 5 Used to lower the set temperature The next items on the lower side will be highlighted The highlighted items will be scrolled continuously when the button is k...

Page 13: ... Airnet No set Outdoor unit Airnet No set Error record Indoor status display Outdoor status display Fan forced operation ON Main Sub changeover Filter element sign OFF Depending on connected model Operate the button during backlight lit However On Off may be operated concurrently with backlight lit When 1 indoor unit is controlled by 2 remote controllers a remote controller backlight which is oper...

Page 14: ... sub remote controller by pressing the Operation mode selector button of either one of the remote controllers for 4 seconds or longer If the basic screen is not displayed more than 2 minutes after sub remote controller display shut off the power supply and check the wiring CAUTION When selecting a different language refer to 12 Language changeover See page 22 NOTE Main remote controller Sub remote...

Page 15: ...d SECOND CODE NO by using Up Down button Multiple identical mode number settings are available In the case of group total setting all of SECOND CODE NO which may be set are displayed as is changed to SECOND CODE NO to be set And SECOND CODE NO means no function Basic screen 1 6 Set temperature 28 C Fan Return Press the menu button Press and hold Cancel button for 4 seconds or longer during backlig...

Page 16: ... Filter Contamination Heavy Light Setting for spacing time of display time to clean air filter Setting for when filter contamination is heavy and spacing time of display time to clean air filter is to be halved Ultra long life filter Light Approx 10 000 hrs Heavy Approx 5 000 hrs Long life filter Approx 2 500 hrs Approx 1 250 hrs Standard filter Approx 200 hrs Approx 100 hrs 1 Long life filter typ...

Page 17: ...nnected duct resistance for FHYK follow the high ceiling setting Normal Normal High static pressure High ceiling Low static pressure 15 25 3 Drain pump operation with humidifying Equipped Not equipped 1c 1 Thermostat sensor in remote controller for limit operation and Home leave function only Not use Use 3 Permission level setting Level 2 Level 3 1e 2 Home leave function Not permitted Permitted No...

Page 18: ...ressure may not rise even though the stop valve is opened The reason is that refriger ant system of the outdoor unit is blocked by electrical expansion valve or the like Operation is no problem Set the operation mode to cooling by 7 3 using the remote controller Press and hold Cancel button for 7 4 4 seconds or longer Field setting menu is displayed Select 7 5 Test operation ON OFF in the field se...

Page 19: ...13 installed shut off the power supply after the test operation finishes If interior work is not completed after the test operation finish explain to the customer that operation should not be performed until the interior work comple tion to protect the indoor unit If the operation is performed the indoor unit may be contaminated with the materials which arise from paints or adhesives during the in...

Page 20: ...press and hold On Off button for 4 seconds or longer in the Service Contact Model Info screen to erase the error code record Failure diagnosis method When the remote controller displays any item in following table inspect the details in the table If a error occurs code is displayed in the LCD like right figure Conduct the failure analysis referring to Error code list in the installation manual of ...

Page 21: ...tting menu is dis played Select 8 2 Error record in the field setting menu and press Menu Enter button The error record menu screen is displayed Select 8 3 Remote controller record in the error record menu and press Menu Enter button Error codes and unit No can be confirmed in the error record display screen In the error record 10 items from the 8 4 latest are displayed in order Press Cancel butto...

Page 22: ...ress Menu Enter button Setting details are determined and field setting menu screen returns Press Cancel button once 9 7 The basic screen returns 1 9 Basic screen Field setting menu screen 2 9 Return Setting Field setting Test operation ON OFF Register Service Contract Field setting list Group No setting Indoor unit Airnet No set Outdoor unit Airnet No set 1 2 Press Menu Enter button 3 9 Return Se...

Page 23: ...he basic screen returns Basic screen 1 10 Set temperature 28 C Cool Return Setting Press Menu Enter button Main menu screen Return Setting MainMenu Set temp mode changeover Airflow Direction Quick Cool Heat On Off Ventilation Timer setting Service Contact Model Info 1 2 Press Menu Enter button Return Setting Service Contact Model info Indoor unit 000 Outdoor unit 000 Contact address 0123 4567 8900...

Page 24: ...Select Language changeover in the main menu press Menu Enter button Press 12 2 Up Down buttons to select Language on the language change over screen English Deutsch Français Español Italiano Eλληνικά Nederlands Portugues Pyccĸий Тürkçe Pressing Menu Enter button Setting details are confirmed and basic screen returns Basic screen Main menu screen 1 11 Return Setting MainMenu Convenient functions Se...

Page 25: ......

Page 26: ...EM08A086 0903 HT ...

Reviews: