background image

17 

For installation

1.  SAFETY PRECAUTIONS

Please read these “SAFETY PRECAUTIONS” 
carefully before installing air conditioning 
equipment and be sure to install it correctly.

This manual classifies the precautions into 

WARNINGS and CAUTIONS. 
Be sure to follow all the precautions below.  
They are all important for ensuring safety.

 WARNING ......  

Indicates a potentially 
hazardous situation which, 
if not avoided, could result 
in death or serious injury.

 CAUTION ......  

Indicates a potentially 
hazardous situation which, 
if not avoided, may result in 
minor or moderate injury. 
It may also be used to alert 
against unsafe practices.

After the installation is completed, test the air 
conditioner and check if the air conditioner operates 
properly. Give the user adequate instructions 
concerning the use and cleaning of the indoor unit 
according to the operation manual. Ask the user to 
keep this manual in a handy place for future reference.

 WARNING

• 

Make sure to turn off the power supply 

before starting the installation.

• 

Due to high voltage, do not open control 

box lid for ten minutes after the safety 

breaker is switched off.

• 

Do not touch live parts when carrying out 

this work.

 CAUTION

• 

Refer also to the installation manual attached 

to the indoor unit and the installation manual 

attached to the decoration panel.

• 

Confirm that following conditions are 

satisfied prior to installation position of this 

kit into the decoration panel.

-  Ensure that nothing interrupts the operation of 

the wireless remote controller. (Ensure that 

there is neither a source of light nor fluorescent 

lamp near the receiver. Also, ensure that the 

receiver is not exposed of direct sunlight.)

-  Ensure that the operation indicator lamp and 

other indicators are easy to see.

-  Ensure that the signal from the remote 

controller can easily be transmitted.

• 

The wireless remote controller kit is not intended 

for use in a potentially explosive atmosphere.

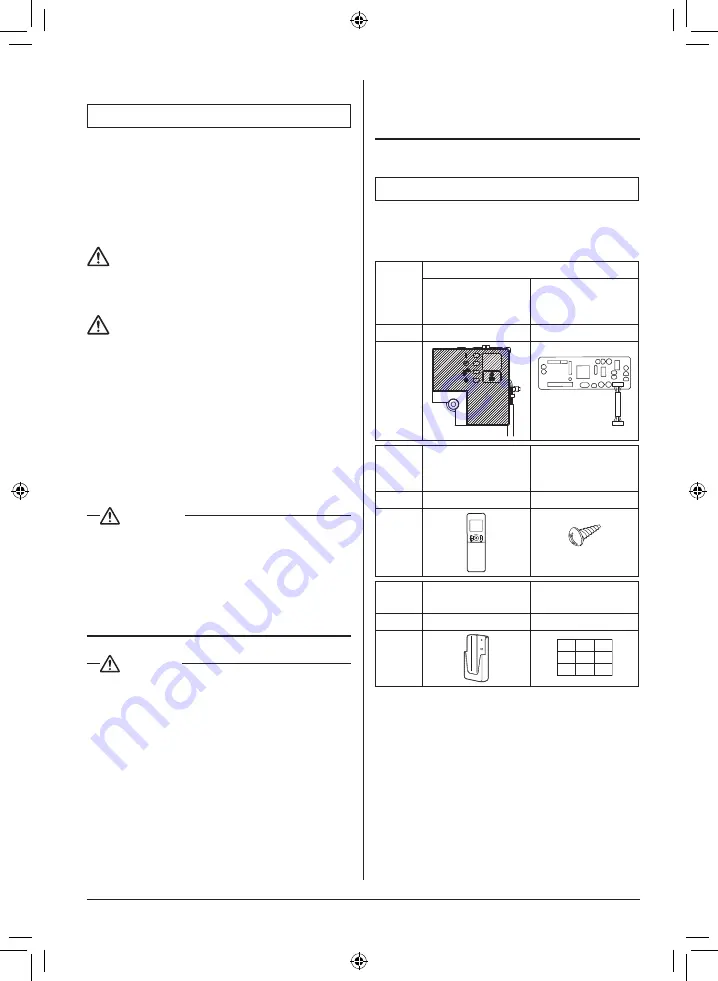
2.  BEFORE INSTALLATION

2-1  ACCESSORIES

Check if the following accessories are 

attached to this kit.

Name

Receiver

(1)  Receiver 

assembly

(2)  Transmission  

printed circuit 
board assembly

Quantity

1 set

1 pc.

Shape

AM

<

Name

Wireless remote 
controller

Screw for 
installing remote 
controller holder

Quantity

1 pc.

2 pcs.

Shape

M3.5×16

Name

Remote controller 
holder

(3) Unit No. label

Quantity

1 pc.

1 pc.

Shape

1

1

1

2

2

2

3

3

3

Summary of Contents for BRC7M530W

Page 1: ...S BRC7M530W BRC7M531W Thank you for purchasing this product Carefully read this manual to ensure proper operation and installation After reading the manual file it away for future reference Furthermor...

Page 2: ...1 13 2 6 1 3 7 8 12 10 9 11 4 5 18 14 19 17 20 15 16 Fig 1 1 Fig 1 2 Fig 1 3 27 28 COOL HEAT CHANGEOVER REMOTE CONTROL SWITCH Fig 2 24 21 22 25 26 23...

Page 3: ...e printed beneath the symbol This chemical symbol means that the battery contains a heavy metal above a certain concentration Possible chemical symbols are Pb lead 0 004 Do not try to dismantle the sy...

Page 4: ...on farms or for commercial use by lay persons This appliance can be used by children aged from 8 years and above and persons with reduced physical sensory or mental capabilities or lack of experience...

Page 5: ...r cooker it may generate hazardous compounds Turn off the air conditioner and call your local dealer Turn on the air conditioner after the qualified service person makes sure to confirm that the leaka...

Page 6: ...operate with wet hands Never touch the internal parts of the remote controller Touching certain internal parts will cause electric shocks and damage to the remote controller Consult your local dealer...

Page 7: ...TIME This display shows PROGRAMMED TIME of the air conditioner start or stop 6 DISPLAY SWING FLAP Refer to page 9 10 7 DISPLAY FAN SPEED The display shows the set fan speed 8 DISPLAY INSPECTION When...

Page 8: ...discolored and may fail to display information CAUTIONS Make sure to turn off the unit and disconnect the power supply breaker when taking care of the air conditioner Unless the power supply is disco...

Page 9: ...the indoor unit is under centralized control it is necessary to switch the remote controller s setting In this case contact your local dealer 5 OPERATION RANGE If the temperature or the humidity is b...

Page 10: ...d the system starts or stops OPERATION The fan may keep on running for about 1 minute after the heating operation stops for removing the heat in the indoor unit NOTE Do not turn OFF power immediately...

Page 11: ...PERATION LAMP on the light receiving unit indicator lights Leave it as it stands and wait for a while The remote controller displays the fan speed that is set The air discharge direction becomes horiz...

Page 12: ...h time this button is pressed set temperature lowers 1 C Temperature cannot be set in FAN OPERATION and PROGRAM DRY OPERATION modes In case of AUTOMATIC OPERATION In AUTOMATIC OPERATION mode the relat...

Page 13: ...outdoor unit Description of airflow direction settings and operation The range of movement of the airflow direction blades varies by indoor unit model Consult the dealer of purchase for details Airfl...

Page 14: ...ou want to cancel again and then cancel it For example When the timer is programmed to stop the system after 3 hours and start the air conditioner after 4 hours the air conditioner will stop after 3 h...

Page 15: ...ations for other units to a indoor unit Outdoor unit Indoor unit Assign cool heat selection privilege to an indoor unit Outdoor unit Indoor unit Assign cool heat selection privilege to an indoor unit...

Page 16: ...ntrol one remote controller controls one indoor unit system Confirm the following if your system is of the following control system type Group control system One remote controller controls up to 16 in...

Page 17: ...lown from the unit There is nothing wrong with the equipment The outdoor unit stops Because the room temperature reaches to the set temperature The indoor unit goes into fan operation II COOLING AND H...

Page 18: ...e set temperature is not proper Refer to page 9 Check if the FAN SPEED is set to LOW SPEED Refer to page 9 Check if the airflow direction is not proper Refer to page 9 10 If the problem is not solved...

Page 19: ...the indoor unit makes a long beep The malfunction code is fixed when the indoor unit makes a long beep 7 Reset of the display Press the OPERATION MODE SELECTOR button to get the display back to the no...

Page 20: ...minutes after the safety breaker is switched off Do not touch live parts when carrying out this work CAUTION Refer also to the installation manual attached to the indoor unit and the installation manu...

Page 21: ...be exposed to moisture or direct sunlight When operating point the transmitting part of the remote controller in the direction of the receiver Refer to the operation manual attached to this kit The ma...

Page 22: ...battery insertion 2 Check the model name of the model nameplate which is stuck on the indoor unit body Refer to the following table to find the corresponding 4 digit initial setting value Indoor unit...

Page 23: ...or the receiver and the wireless remote controller This includes an individual remote controller control using the group operation For the wiring for the group operation please refer to the installati...

Page 24: ...by an external control such as centralized control Since the setting acceptance is hard to discriminate with such circumstances there are two setting options provided to enable discriminating by a be...

Page 25: ...remote controller operation Set the Unit No of the receiver and the wireless remote controller to be equal If the settings differs the signal from the remote controller cannot be transmitted 3 Instal...

Page 26: ...ribed in manual supplied with the decoration panel The corner where the wireless kit belongs is set by the two square marks Then remove the plastic corner cover 2 Break off the plastic cover from back...

Page 27: ...ting can be changed to half the time between 2 filter cleaning display indications Long life filter Light 2 500 hrs Heavy 1 250 hrs 3 Setting for display of time between 2 filter cleaning display indi...

Page 28: ...3 Turn the power on at least 6 hours before operating the unit 4 Set to the cooling operation using the remote controller and then start the operation by pressing the ON OFF button 5 Press the button...

Page 29: ...26 NOTE...

Page 30: ...27 NOTE...

Page 31: ......

Page 32: ...P 57 7P M19N117 2006 HT The two dimensional bar code is a manufacturing code The two dimensional bar code is a manufacturing code...

Reviews: