background image

3P225748-4G        English

4

6. Right button 


• Used to highlight the next items on the right-

hand side.


• Each screen is scrolled in the right-hand 

direction.

7. Left button 


• Used to highlight the next items on the left-hand 

side.


• Each screen is scrolled in the left-hand 

direction.

8. On/Off button


• Push this button and system will start.


• Push this button again to stop the system.

9. Operation lamp


• This lamp illuminates solid green during normal 

operation.


• This lamp flashes if an error occurs.

10.  Cancel button


• Used to return to the previous screen.

11. 

LCD (with backlight)


• The backlight will be illuminated for 

approximately 30 seconds by pushing any 
button. 


• If two remote controllers are used to control a 

single indoor unit, only the controller accessed 
first will have backlight functionality.

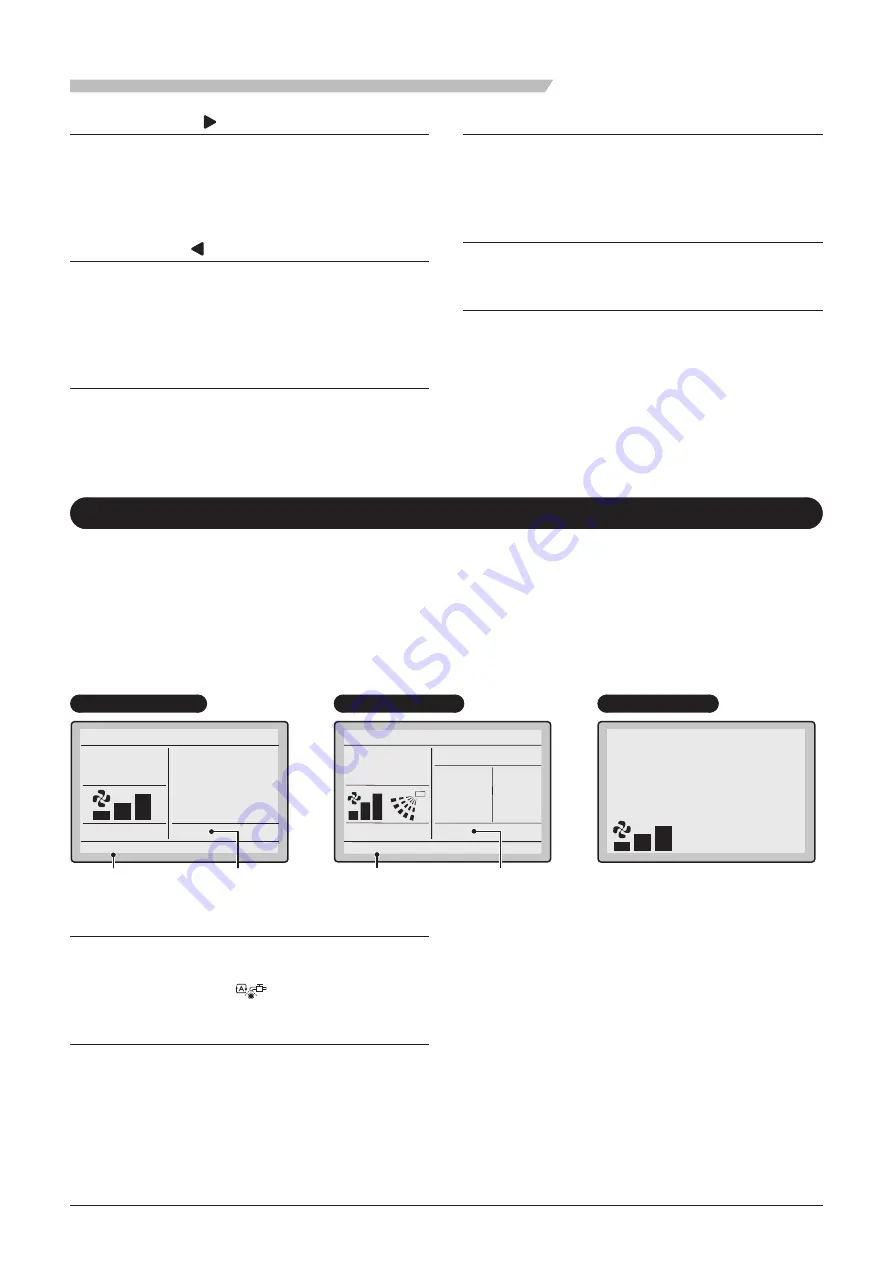
1. “Filter auto-cleaning” display


• Displayed while the product is performing filter 

auto-cleaning. 
* In some models “ 

 ” might appear instead.

2. Message

The following message will appear.
“Error: Push Menu Button.”
“Warning: Push Menu Button.”


• Displayed if the error or warning is detected. 

(Refer to page 16)

The messages “Collect dust.” and “Warning: Push 
Menu Button.” will appear alternately.


• Displayed when the time to collect the dust in 

the dust box has come. (Refer to page 10) 

“Set clock from menu”


• Displayed to inform that the clock needs settings 

again. (Refer to page 7)


• The product will not start filter auto-cleaning at 

the designated period unless settings are made 
again.

Liquid Crystal Display


• Three types of display mode (Standard, Detailed and Simple) are available. 


• Standard display is set by default.


• Detailed and Simple displays can be selected in the main menu. 

For details, refer to the operation manual provided with the wired remote controller.


• Each of the following screens explains the state of the LCD display regarding filter auto-cleaning function. 

For the contents of the LCD displays while the product is not in filter auto-cleaning operation, refer to the 
operation manual provided with the wired remote controller.

  Standard display  

  Detailed display  

  Simple display  

Set to

Cool

Heat

83

F

68

F

Auto

Cool

Collect dust

AUTO CLN

FILTER

2. Message

1. “Filter auto-cleaning” display

Cool
Heat

83

F

68

F

Room

Fri

11:00

A

Set to

68

F

Return

Setting

Auto

Cool

Collect dust

2. Message

1. “Filter auto-cleaning” display

AUTO CLN

FILTER

68

F

68

F

83

F

Auto

Cool

Room

Set to

Heat Cool

Names and Functions

Summary of Contents for BYCQ125BGW1

Page 1: ...g the use of the product Read this manual carefully and be sure you understand the information provided before attempting to use the product Keep this manual where it is readily accessible after reading If another user operates the product in the future be sure to hand over this manual to the new user This operation manual is dedicated to the decoration panel provided with a filter auto cleaning f...

Page 2: ...intenance may result in water leakage electric shock and fire Only use accesso ries made by Daikin that are specifically designed for use with the equipment and have them installed by a professional Contact your dealer to move and reinstall the air conditioner or heat pump Incomplete installation may result in water leakage electric shock and fire Never let the indoor unit or the remote controller...

Page 3: ...nit due to the heat Do not expose the controller to direct sunlight The LCD display can become discolored and may fail to display the data Do not wipe the controller operation panel with benzene thinner chemical dust cloth etc The panel may get discolored or the coating can peel off If it is heavily dirty soak a cloth in water diluted neutral detergent squeeze it well and wipe the panel clean Then...

Page 4: ...3P225748 4G English 1 Contents Safety Considerations i Names and Functions 2 Filter Auto cleaning 5 Dust Collection from Dust Box 10 Filter Maintenance 14 Useful Information 15 ...

Page 5: ...rvals The dust box is full and filter auto cleaning is unavailable The occurrence of malfunctioning during filter auto cleaning The product is factory set not to indicate these items NOTE The product requires periodic maintenance Refer to page 14 Do not use the product in the following places Otherwise dust adhering to the filter may not be removed and a malfunction may result because the dust can...

Page 6: ... item below the current selection will be highlighted The highlighted items will be scrolled continuously when the button is continuously pushed Used to change the selected item Functions other than basic operation items i e On Off Operation Mode Fan Speed and Setpoint are set from the menu screen NOTE Do not install the remote controller in places exposed to direct sunlight the LCD will be damage...

Page 7: ...essages Collect dust and Warning Push Menu Button will appear alternately Displayed when the time to collect the dust in the dust box has come Refer to page 10 Set clock from menu Displayed to inform that the clock needs settings again Refer to page 7 The product will not start filter auto cleaning at the designated period unless settings are made again Liquid Crystal Display Three types of displa...

Page 8: ...uto cleaning Specify the desired period from eight periods NOTE The correct clock settings are necessary The product will perform filter auto cleaning from 12 00A to 3 00A as factory default if the period for filter auto cleaning is not specified The product will perform filter auto cleaning at non prescribed time if clock settings are not made Method of Specifying Start Time Operation Method 1 Se...

Page 9: ...g first hour or when cooling or heating demand is rather low during the third hour the unit forces execution of the cleaning function even when the unit is operating After completion of the cleaning function the unit will start normal operation again The unit will try to perform the cleaning function during the next scheduled time slot of 3 hours in case it was not executed If the unit in case of ...

Page 10: ... for 48 hours or longer The product may generate a little noise when the filter rotates or the dust is scraped with the brush The fan rotates automatically during filter auto cleaning Clock Calendar Setting the clock Operation Method 1 Cool Return Setting Set to 83F Basic screen Push Menu OK button 2 Setting Main Menu Airflow Direction Individual Airflow Direction Quick Start Schedule Off Timer Cels...

Page 11: ...ith buttons Input the hour with buttons Holding down the button causes the number to change continuously 8 Date Time Year 2015 Month 2 Day 11 Wednesday 12 20A Setting Select Minute with buttons Input the minute with buttons Holding down the button causes the number to change continuously Push Menu OK button The settings confirmation screen will appear 9 Save the settings Date Time Yes No Setting P...

Page 12: ...e Display Item Filter Auto Clean PO Disable Disable Standard Room 12A 03A A list showing the current setting status will appear Push buttons to go to the next item Pushing Cancel button takes you back to the main menu screen Airflow Direction Display Mode Schedule Display Item Off Timer Filter Auto Clean Display items Display items may differ depending on the model Only the items that can be set a...

Page 13: ...n sign 2 Collection sign 3 Collection sign 4 Remote controller LCD The messages Collect dust and Push Menu Button will appear alternately AH error sign will appear Operation lamp No indication The operation lamp will flash Decorative corner cover Indicator red No indication The indicator will flash at long intervals The indicator will flash at short intervals PREPARATION Promptly collect the dust ...

Page 14: ...ecting pipe Vacuum cleaner pipe with an inner diameter of 1 1 4 32 to 1 1 2 38 Vacuum cleaner pipe with an inner diameter of 1 1 2 38 to 1 5 8 42 Vacuum cleaner pipe Attachment Connecting pipe in mm NOTE A vacuum cleaner pipe with an air leaking hole midway or with no round end i e a stand type or handheld type cannot be used Make sure that the vacuum cleaner has a suction power of 300 W or over D...

Page 15: ...he suction power set to maximum power and vacuum the dust 5 If the indicator on the decorative corner cover is flashing red the indicator will be turned off or lit green on completion of dust collection It may take a maximum of 30 seconds for the indicator flashing red to be turned off or lit green Dust Collection from Dust Box ...

Page 16: ...m the dust collection inlet will appear Refer to Dust Collection with Vacuum Cleaner on page 11 After understanding the method of dust collection push the Menu OK button at the time of this state 3 Setting Dust collected Dust Collection Method Yes No Set to Cool Heat 83F 63F Auto Cool After vacuuming the dust in the dust box push buttons on the collection confirmation screen and select Yes Push th...

Page 17: ...ed standard operating hours 2 500 hours year 15 hours day x 365 days in operation 5 475 hours year the filter would need to be replaced sooner The product may require maintenance i e filter cleaning or replacement in one to two year intervals Use the above information for reference Keep in mind that the above replacement intervals do not indicate the guarantee period of the filter For filter inspe...

Page 18: ... models might appear instead Check before requesting servicing Symptom Probable cause Remedy Dust sticks to the air filter dust falls The room has a large quantity of dust temporarily as a result of the cleaning of the room Stop the operation of the air conditioner until the cleaning of the room is finished The dust box is full Vacuum the dust Refer to page 11 The display AH will appear on screen ...

Page 19: ...Menu Button The operation indicator will blink Warning Push Menu Button The operation indicator will not blink Check the error codes Refer to chapter below Error code Display Operation Method 1 Cool Set to Error Push Menu button 83F If an error occurs either one of the following items will blink in the basic screen Error Push Menu Button The operation indicator will blink Warning Push Menu Button ...

Page 20: ...n use a wide range of air conditioner functions Specify Daikin genuine products at the time of purchasing the parts For details contact your dealer Replacement optional accessory Optional accessory Replacement filter KAFP554A160 L shaped extension pipe KKHAP55A160 Connecting pipe KKHAP55B160 ...

Page 21: ...st free Guarantee Repair Period Contact your dealer Daikin will conduct paid repairs if the product is repairable with its functions maintained Stock Period of Performance Spare Parts Performance spare parts are components that are required to maintain the function of the product Daikin has a stock of performance spare parts for the air conditioner for nine years after the stoppage of producing th...

Page 22: ...nspection and maintenance frequencies may be shorter than those specified in the table depending on the content of the maintenance inspection contract 3 The product requires regular inspection if the product is used in buildings to which the Law for Maintenance of Sanitation in Buildings applies 4 The maintenance and replacement frequencies of each part must be shortened under tough operating cond...

Page 23: ...t your dealer because the same requires a specialized technique in the case of relocating and reinstalling the air conditioner for some reason e g the movement of the site Inquiry Contact your dealer for after sale services Useful Information ...

Page 24: ...3P225748 4G EM13A020A 1506 FS 5151 San Felipe Suite 500 Houston TX 77056 ...

Reviews: