Outdoor Unit
Si18-525B
410
Removal Procedure
4
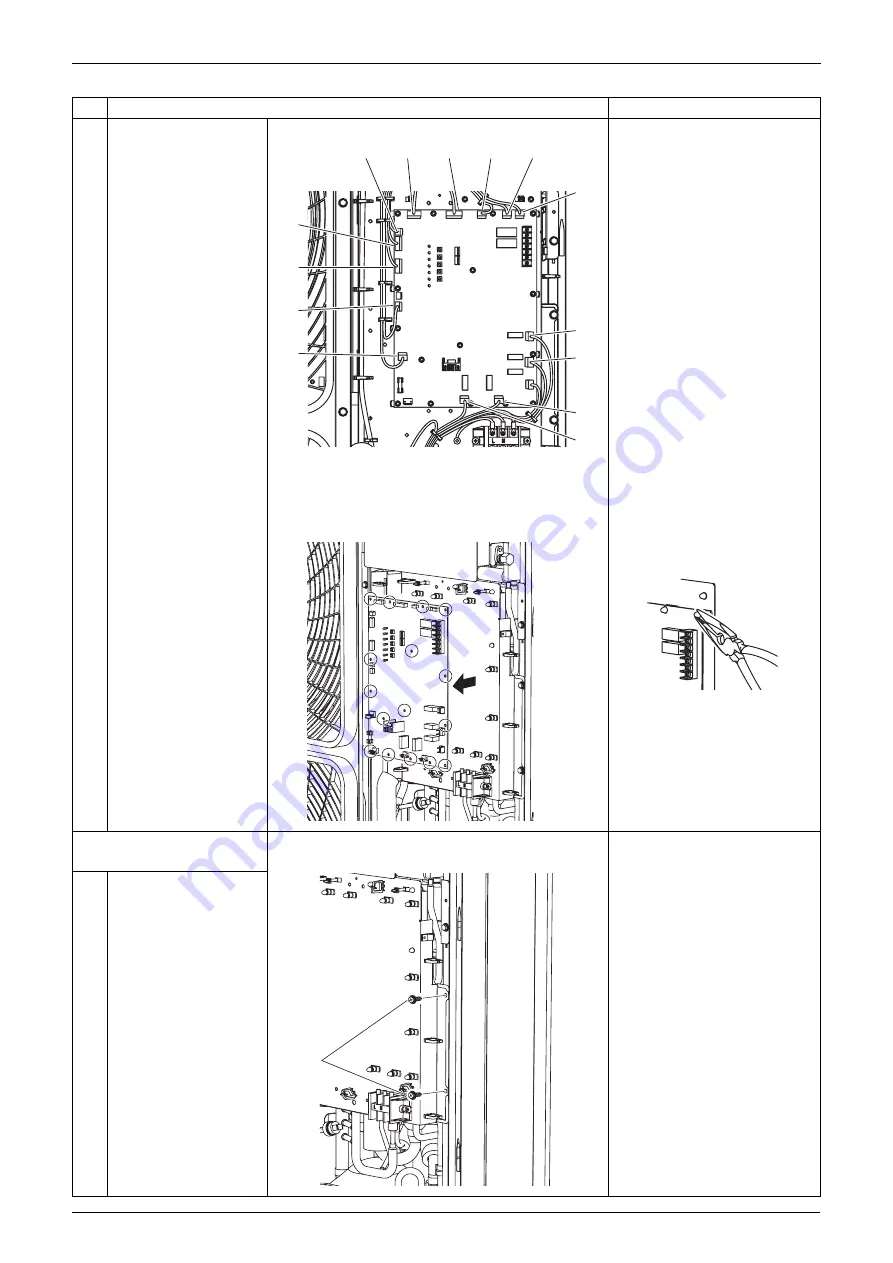
Disconnect the
connectors one by one.
X2A Solenoid valve (Hot gas)
X3A Solenoid valve
(Receiver gas purge)
X5A Solenoid valve
(4 way valve)
X6A Crankcase heater
X22A Transformer
X23A Transformer
X25A Connector for [X250A]
X26A Electronic expansion
valve(Main)
X28A Electronic expansion
valve(Sub cool)
X34A Discharge pipe thermistor
X37A Heat exchanger
thermistor
X44 Air thermistor
X45A Pressure sensor (Low)
X46A Pressure sensor (High)
5
Detach the 16 locking
guard spacers.
Preferably use long nose pliers
in removing the locking guard
spacers.
6
Remove the control
PCB.
2. Removing the control
PCB mounting plate.
1
Remove the 2 screws.
Step
Procedure
Points
X25A
X34A
X37A
X44A
X45A
X46A
X6A
X5A
X3A
X2A
X28A
X26A
X23A
X22A
(Q0464)
(Q0465)
(Q0466)
Screws
(Q0467)
Summary of Contents for D-Series
Page 1: ...Si18 525B Applied Models Super Multi Plus Cooling only Super Multi Plus Heat Pump D Series ...
Page 33: ...List of Functions Si18 525B 20 List of Functions ...
Page 71: ...Specifications Si18 525B 58 Specifications ...
Page 117: ...Refrigerant Flow for Each Operation Mode Si18 525B 104 Refrigerant Circuit ...
Page 171: ...Indoor Unit SkyAir Models Si18 525B 158 Function ...
Page 207: ...Test Operation and Field Setting for RA Indoor Unit Si18 525B 194 Test Operation ...
Page 336: ...Si18 525B Service Check Function Troubleshooting 323 ...
Page 469: ...Wiring Diagrams Si18 525B 456 Appendix ...
Page 475: ...Si18 525B vi Index ...


