background image

2

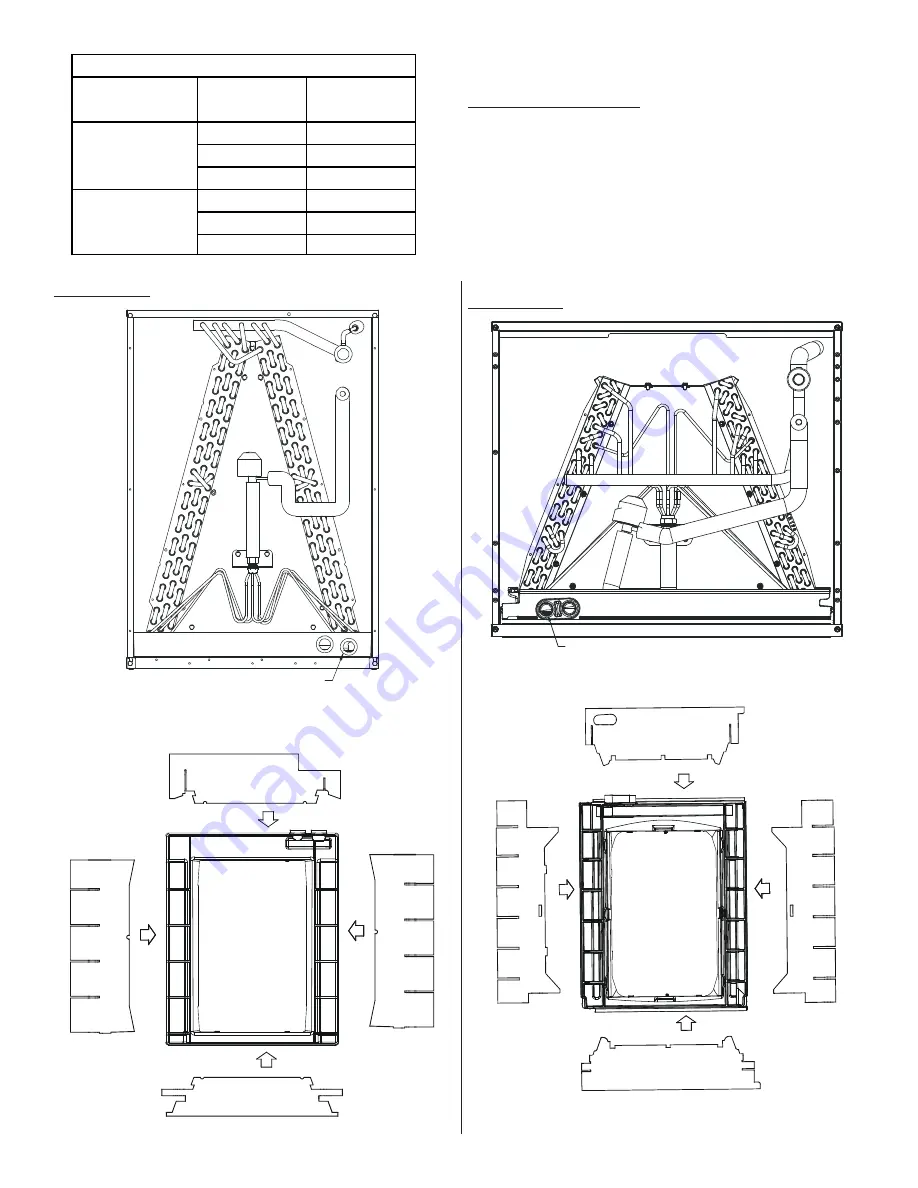
FOR DPICX-*B

Drain ports located on left.

Figure 2

Insulation B

Insulation D

D

B

C

A

In

s

u

la

ti

o

n

 C

In

s

u

la

ti

o

n

 A

Figure 4 - Bottom View of Drain Pan

17.5"

DPICX-BA

21.0"

DPICX-CA

24.5"

DPICX-DA

17.5"

DPICX-BB

21.0"

DPICX-CB

24.5"

DPICX-DB

INSULATION KIT SELECTION TABLE

Right

(Figure 1)

Drain Port

Location

Cabinet Width Insulation Kit

Left

(Figure 2)

FOR DPICX-*A

Drain ports located on right.

Figure 1

Insulation D

Insulation B

D

B

C

A

In

s

u

la

ti

on C

In

su

la

ti

on A

K

IT

 I

NSTRUCTIONS

:

DRAIN PAN INSULATION:

1.

To ensure proper adhesion, clean all surfaces of drain pan
so they are clear of oil, dust, and moisture.

2.

Identify sides A, B, C, and D of the insulation and drain
pan as shown in Figure 3 or 4. (Side D is wider than side B)

3.

Each shape of insulation and drain pan link each other.
For example, Insulation A is applied onto side A of drain
pan.

Figure 3 - Bottom View of Drain Pan

Summary of Contents for DPICX A Series

Page 1: ...onsible for any injury or property damage arising from improper service or service procedures If you service this unit you assume responsibility for any injury or propertydamagewhich mayresult In addi...

Page 2: ...Figure 2 FOR DPICX A Drain ports located on right Figure 1 Insulation D Insulation B D B C A Insulation C Insulation A KIT INSTRUCTIONS DRAIN PAN INSULATION 1 To ensure proper adhesion clean all surf...

Page 3: ...n and drain pan See Section F F of Figure 5 Condensation may be generated in that area Insulation C Attach the insulation along the surface of drain pan E F F Section F F For DPICX B View E Flush edge...

Page 4: ...p bubble between insulation and drain pan See Section J J and Section K K of Figure 6 and 7 G H H Insulation B Section H H View G For DPICX A Flush edge of insulation with edge of drain pan Attach the...

Page 5: ...rain pan Figure 7 J Section K K View J K K Take out drain port grommet before applying the insulation D Reinstall the grommet after completing insulation D application Insulation D For DPICX B Flush e...

Page 6: ...nsulation 3 Apply the second piece of insulation tape in a similar manner to the right edge of the top plate See Figure 9 If you still see exposed width of top plate is wider than insulation tape repe...

Page 7: ...7 THIS PAGE LEFT INTENTIONALLY BLANK...

Page 8: ...com PRODUCT REGISTRATION Thank you for your recent purchase Though not required to get the protection of the standard warranty registering your product is a relatively short process and entitles you...

Reviews: