3
x
Installation
EKSV21P/EKSV26P/EKSH26P
Solar panels on-roof installation
008.1618444_00 – 12/2012
Installation instructions
23
13.
Replace the row of roof tiles.
14.
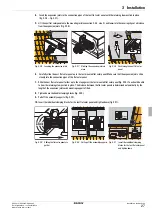
Mark the transition points of the roof ties on the roof tiles (fig. 3-13).
15.
Knock out the lower tile webs at the marked transition points for the mounting brackets, or remove them with the tile cutter
(fig. 3-14).
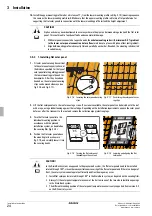
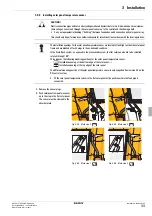
Fig. 3-9
Securely screw the profiles on the
on-roof tie top section
Fig. 3-10 Align the profiles parallel to the
roof tile edge
Fig. 3-11 Height adjustment of the mounting
bracket
12.
Adjust the height of the mounting profile rail (fig. 3-11 to fig. 3-12).
–
With connections on both sides
(always recommended), align the mount-
ing profile rail with a slight gradient to the return flow connection (water
feed to the lower solar panel connection). A negative gradient should be
avoided at all costs.
–
With same-side connection
(up to max. 3 solar panels) the mounting pro-
file rail must be aligned exactly horizontally. However, we recommend
always placing the connection on opposite sides (Ensuring automatic solar
panel venting or draining the flat solar panel when the pump is at a stand-
still).
Fig. 3-12 After connection, align the profiles
horizontally or with a slight gradi-
ent
CAUTION!
Siphon action may never be allowed to occur anywhere in the pipe run between storage tank and the flat solar
panel. This could lead to functional faults and even material damage.
• With solar panels connected at opposite ends, the
whole mounting rails
with
minimum 0.5 % gradient
to the lower solar panel connection (return flow)
must be set up to avoid Siphon-effect (anti-gradient).
Fig. 3-13 Mark the position of the on-roof
tie
Fig. 3-14 Mark the transition points of
the roof ties on the roof tiles
and remove the tile webs
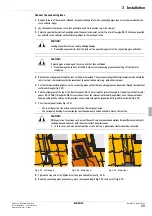
Fig. 3-15 Mounting the upper rails
(see tab. 3-2 for dimension)
Summary of Contents for EKSV21P
Page 2: ......


