3
x
Installation
Installation instructions
26
EKSV21P/EKSV26P/EKSH26P
Solar panels on-roof installation
008.1618444_00 – 12/2012
3.4.4 Installing additional flat solar panels
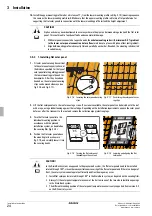
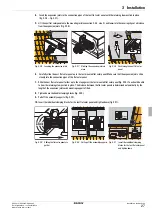
1.
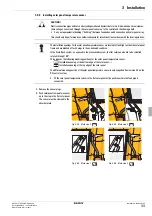
Insert the double clamping blocks in the upper and lower mounting profile rail, push down with the Allen key placed on the
bolt and turn it clockwise by approx. 45° (so that the bottom clamping profile moves to the clamping position) (fig. 3-23).
2.
Check the position of the bottom clamping profile (fig. 3-24).
3.
Slide the double clamping blocks onto the last mounted flat solar panel until the clamping profile clicks into place into the
solar panel profile (fig. 3-25).
CAUTION!
If the retaining clips do not clip in place audibly, the DAIKIN Solar system system can develop leaks and thus
restrict the operational safety.
Reasons for the retaining clamps not engaging:
– Flat solar panels not completely pushed together.
– Absorber position moved (push the absorber into the connections on the opposite side in the correct posi-
tion, wearing protective gloves).
CAUTION!
If the connections on the flat solar panel (FIX-VBP) are not fitted with extreme caution, the seal ring can get
damaged. This causes leaks in the system.
• Always fit the expansion joints to the flat solar panels with extreme caution.
• Bring the next flat solar panel in alignment with the connection pipes of the previous flat solar panel when
pushing together.
CAUTION!
In the Drain-Back system, as opposed to the pressurised system, the flat solar panels need to be installed
rotated through 180°, since otherwise partial snow covering of the flat solar panel and if there is a danger of
frost, the solar system cannot operate efficiently and frost damage may occur.
• Install flat solar panels rotated through 180° in the Drain-Back system, as depicted on the covering film.
• Always fit the solar panel temperature sensor at the bottom in one of the two side installation openings
in the Drain-Back system.
• The different mounting position of the solar panel temperature sensor is only supported from version 4.2
on the R3 control system.
Fig. 3-23 Inserting double clamping block
Fig. 3-24 Check the position of the bottom
clamping profile
.
Fig. 3-25 Positioning of the double clamping
block
CAUTION!
Careless handling can damage the components, resulting in difficulties during installation.
• Never crush or squash the expansion joints on the solar panel connections.
• Check connection pipes of the flat solar panels for burrs and de-burr if necessary.
Summary of Contents for EKSV21P
Page 2: ......


