3
x
Installation
EKSV21P/EKSV26P/EKSH26P
Solar panels on-roof installation
008.1618444_00 – 12/2012
Installation instructions
27
4.
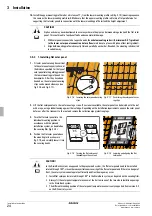
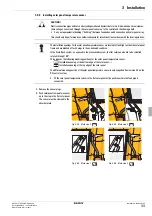
Insert the expansion joints in the connection pipes of the last flat solar panel until the retaining clamps click in place
(fig. 3-26 + fig. 3-27).
5.
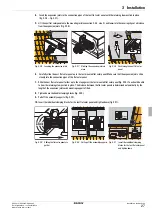
Lift the next flat solar panel onto the mounting rails (see section 3.4.3, step 2), and lower into the securing clips at a distance
from the expansion joints (fig. 3-28).
6.
Carefully slide the next flat solar panel up to the last mounted flat solar panel. Make sure that the expansion joints slide
cleanly into the connection pipes of the flat solar panel.
7.
Slide the next flat solar panel further up to the stop against the last mounted flat solar panel (fig. 3-29). You should be able
to hear the retaining clamps click in place. The distance between the flat solar panels is determined automatically by the
length of the expansion joints with mounting supports fitted.
8.
Tighten down the double clamping blocks (fig. 3-30).
9.
Pull off the assembly supports (fig. 3-30).
10.
Insert the individual clamping blocks for the last flat solar panel and tighten down (fig. 3-31).
Fig. 3-26 Inserting the expansion joints
Fig. 3-27 Clicking the expansion joints in
place
Fig. 3-28 Positioning the next flat solar
panel
Fig. 3-29 Sliding the flat solar panels to-
gether
Fig. 3-30 Pulling off the assembly supports Fig. 3-31 Insert the individual clamping
blocks for the last flat solar panel
and tighten down
Summary of Contents for EKSV21P
Page 2: ......


