3
x
Installation
EKSV21P/EKSV26P/EKSH26P
Solar panels on-roof installation
008.1618444_00 – 12/2012
Installation instructions
29
Connect the connecting lines
1.
Remove three roof tiles at each intended roof penetration points for the connecting pipes (one or two tile rows below the
lower collector edge).
2.
Lay the connection pipes up to the roof penetration and fix in position (e.g. with clamps).
3.
Carefully open the thermal roof insulation under the penetration point, so that the return flow pipe (VA 18 Solar) can be pulled
out and laid to the collector with sufficient gradient to the roof penetration.
4.
Run the connecting pipes through the roof at the points provided. To ensure uninterrupted thermal insulation (also within the
roof structure), the insulation must be resealed at the penetration points (e.g. with adhesive tape).
5.
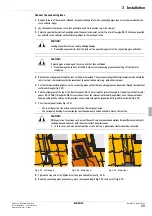
Cut the thermal insulating sleeves on the connecting pipes so that the connecting pipes can be passed through the individual
roof breakthroughs (fig. 3-32).
6.
Pull the inflow pipe (at the top of the flat solar panel / VA 15 Solar) and the return flow pipe (at the bottom of the flat solar
panel / VA 18 Solar) through the M32 screw connection of the relevant roof breakthrough. Next, push the equipotential
bonding cable and the solar panel temperature sensor cable through the respective M 16 glands from inside (fig. 3-33).
7.
Cover the roof penetrations (fig. 3-34).
– The roof tiles at the side and above must overlap the roof penetration.
– The corrugated flashing must overlap the roof tile underneath and be shaped to match the roof tile.
8.
Tighten the ring nuts of the M glands for the pipes and cables (see fig. 3-35).
9.
Bend the connecting pipes as necessary, mark the required length (fig. 3-36), and cut off (fig. 3-37).
CAUTION!
Leaking vapour barriers can lead to building damage.
• Reseal the vapour barrier from the inside at the penetration points of the connecting pipes and cable.
CAUTION!
If plastic pipes are damaged, there is a risk that they will break.
• Never damage the surface of the VA Solar system connecting pipes when cutting off the thermal
insulation.
CAUTION!
With special roof coverings, such as roof tiles with very pronounced undulations (large differences in height),
sealing problems can occur with the universal roof penetration box.
• In such cases, and also with plane tiles or slate roofing, a professional roofer should be consulted.
Fig. 3-32 Work step 5
Fig. 3-33 Work step 6
Fig. 3-34 Work step 7
Summary of Contents for EKSV21P
Page 2: ......


