Installation manual
12
ERX125~250A7W1B
Inverter condensing unit
4PW30064-1D
1.
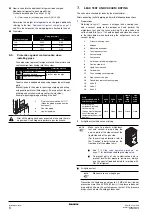
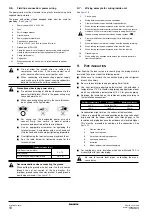
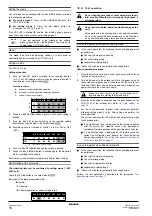
Remove the cap and turn the valve counterclockwise with the
hexagon wrench.
2.
Turn it until the shaft stops.
3.
Make sure to tighten the cap securely. Refer to the table below
Closing stop valve
1.
Remove the cap and turn the valve clockwise with the hexagon
wrench.
2.
Securely tighten the valve until the shaft contacts the main body
seal.
3.
Make sure to tighten the cap securely.
For the tightening torque, refer to the table above.
11.4. Additional refrigerant charge
Follow the procedures below.
1
Adding additional refrigerant
■
Charge with the outdoor unit at standstill
1.
Calculate how much refrigerant to be added using the formula
explained in the chapter
"4.2 How to calculate the additional
refrigerant to be charged" on page 6
2.
Open valve C (valves A and B and the stop valves must be left
closed) and charge the required amount of refrigerant through
the liquid side stop valve service port.
■
When the required amount of refrigerant is fully charged,
close valve C. Record, with a permanent marker, the amount
of refrigerant that was added on the wiring diagram attached
on the inside of the switch box.
Perform the test procedure as described in
refrigerant was added at standstill" on page 16
■
When the additional charging is not complete, perform the
procedure explained in the chapter
■
Charge with operating outdoor unit
Charge the refrigerant through valve A.
1.
Start of charging refrigerant manually
-
Open the liquid and gas side stop valves and the service port
stop valve. (Valves A, B and C must be closed.)
-
Close all front panels except the electric box front panel and
turn the power ON.
-
Make sure the control box and evaporator unit are operating.
-
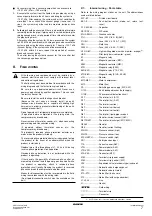
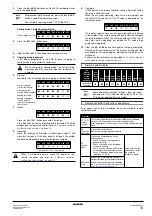
If the H2P LED is not flashing (in 12 minutes time after
turning on the power), make sure it is displayed as shown
below.
If the H2P LED is flashing, check the malfunction code on the
remote controller
"3 Remote controller malfunction code
Do not apply excessive force to the stop valve. Doing
so may break the valve body, as the valve is not a
backseat type. Always use the special tool.
Stop valve size
Tightening torque N•m (Turn clockwise to close)
Shaft
Cap (valve lid)
Service port
Valve body
Hexagonal
wrench
Ø9.5
5.4~6.6
4 mm
13.5~16.5
11.5~13.9
Ø15.9
13.5~16.5
6 mm
23.0~27.0
Ø19.1
27.0~33.0
8 mm
22.5~27.5
Ø25.4
■
When charging a system, charging over the
permissible quantity can cause liquid hammer.
■
Always use protective gloves and protect your eyes
when charging refrigerant.
■
When the refrigerant charging procedure is done or
when pausing, close the valve of the refrigerant tank
immediately. If the tank is left with the valve open, the
amount of refrigerant which is properly charged may
get off point. More refrigerant may be charged by any
remaining pressure after the unit has stopped.
Electric shock warning
■
Close the electric box lid before turning on the main
power.
■
Perform the settings on the circuit board (A1P) of the
outdoor unit and check the LED display after the
power is on via the service lid which is in the lid of the
electric box.
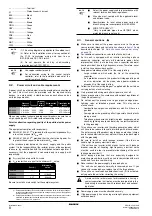
Operate switches with an insulated
stick (such as a ball-point pen) to
avoid touching the life parts.
Make sure to re-attach the
inspection cover into the switch box cover after the job
is finished.
■
If the power of some units is turned off, the charging
procedure can not be finished properly.
■
Make sure to turn ON the power 6 hours before
starting the operation. This is necessary to warm the
crankcase by the electric heater.
■
If operation is performed within 12 minutes after the
indoor and outdoor units are turned on, the H2P-led
will be lit and the compressor will not operate.
NOTE
■
See
"11.3. Stop valve operation procedure" on
for details on how to handle stop valves.
■
The refrigerant charging port is connected to the
piping inside the unit.
The unit's internal piping is already factory
charged with refrigerant, so be careful when
connecting the charge hose.
■
After adding the refrigerant, do not forget to close
the lid of the refrigerant charging port.
The tightening torque for the lid is 11.5 to
13.9 N•m.
■
In order to ensure uniform refrigerant distribution,
it may take the compressor ±10 minutes to start
up after the unit has started operation. This is not
a malfunction.
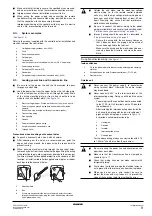
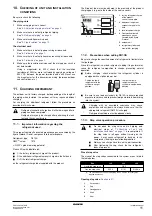
1
Measuring instrument
2
Tank (siphon system)
3
Charge hose
4
Liquid line stop valve
5
Gas line stop valve
6
Stop valve service port
7
Valve B
8
Valve C
9
Valve A
10
Outdoor unit
11
Refrigerant charge port
12
To air handling unit
13
Inter-unit piping
14
Refrigerant flow

