D-EIMWC01206-15EN - 10/20
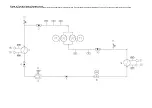
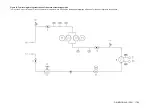
Refer to the specific wiring diagram for the unit
purchased. Should the wiring diagram not be on the unit
or should it have been lost, please contact the
manufacturer representative who will send you a copy.
In case of discrepancy between the wiring diagram and
the visual check of the electric wires of the command
and control panel, contact the manufacturer
representative.
Use only copper conductors to avoid overheating or
corrosion in the connection points, with resulting risk of
damage to the unit.
To avoid interference, all the command and control
cables must be connected separately from the power
ones, using several raceways for this purpose.
Before performing service operations on the unit, open
the general disconnection switch located on the main
power supply.
CAUTION: If the unit is off but the disconnection switch
is in the closed position, the circuits not being used will
still be active.
Never open the terminal board of the compressors
without having disconnected the main switch of the
machine.
Simultaneous mono and three-phase loads and
imbalance between the phases can cause leakage
towards earth up to 150mA during the normal operation
of the unit.
The protections for the power supply system must be
designed based on the values mentioned above.
Wiring at the installation location
The operations of wiring at the installation
location and possibly other components must be
performed by an authorized technician and must
comply with the current national and European laws on
the subject.
The on-site wiring must be done in conformity with the
wiring diagram supplied with the machine and the
instructions listed below.
Make sure to use a dedicated electric circuit. Never use
a power supply shared with other equipment.
NOTE
- Verify on the wiring diagram all the operations
listed below in order to better understand how the
equipment operates.
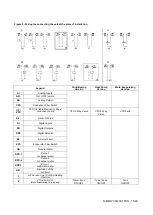
Components table:
F1, 2
Main fuses of the equipment
L1, 2, 3
Main power supply terminals
PE
Main earth terminal
FS
Switch
Q10
Main insulator switch
---
On-site wiring
Electric circuit and wiring requirements
1. The power supply to the unit must be prepared
so that it can be turned on and off
independently from that of other components
of the system or other appliances in general.
2. Plan an electrical circuit for the connection of
the unit. This circuit must be protected with the
necessary safety devices, that is a main
switch, an SB fuse on each phase and a
leakage towards earth detector. The
recommended fuses are listed in the wiring
diagram provided with the unit.
Turn off the switch of the main insulator before
performing any connection (turn off the switch, remove
or disable the fuses).
Connection of the power supply
ofthe unit
Using the suitable wire, connect the power circuit to the
terminals L1, L2 and L3 of the electric panel.
CAUTION: Never twist, pull or apply weight to the
terminals of the main switch. The wires of the power
supply line must be supported by adequate systems.
The wires connected to the switch must respect the
elevated insulation distance and the distance of surface
insulation between the active conductors and the mass,
in accordance with IEC 61439-1, Table 1 and 2 and
local national laws.The wires connected to the main
switch must be tightening using a wrench torque and
complying with the unified tightening values relative to
the quality of the screws of the washers and the nuts
used.
2 Connect the earthing conductor (yellow/green) to the
PE earthing terminal.
Interconnecting wires
Usually the appliance does not work without
flow, thanks to the flow meter installed standard,
however, to be doubly safe, it is compulsory that a
status contact of the water pump be installed in series
with the contact of the flow meter/s in order to prevent
the unit from operating if the pump has not started.
If the unit starts operating without flow, very serious
damage occurs (freezing of the evaporator).
Clean contacts
The controller has some clean contacts to indicate
the status of the unit. These contacts can be wired as
shown in the wiring diagram. The maximum current
allowed is 2 A.
Remote inputs
In addition to the clean contacts, it is also possible
to install remote inputs. For installation check the
wiring diagram.
Before start-up
The unit must be started for the first time
ONLY by DAIKIN authorised personnel.
The unit must absolutely not be started, even for a very
short period of time, without having checked it in minute
detail filling out the following list at the same time.
Checks to be performed before starting
the unit
1
Check for exterior damage
2
Open all the
closing valves


