13
A
B
A
A
B
1.
3.
2.
5.
G
G
6. NO
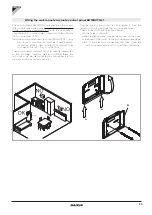
1. Use the paper template shown in full scale on the next
page and trace the position of the two fixing brackets
on the wall.
2. Drill a hole using a proper tip and insert the plugs (2
per bracket) then attach the two brackets. Do not
over-tighten the screws so that you can adjust them
with a spirit level.
3. Firmly fasten the brackets by tightening the four
screws.
4. Check stability by moving the brackets to the right
and left, up and down.
5. Assemble the unit, making sure it fastens properly
onto the brackets and that it is stable.
6. Make sure the tilt angle of the cooler-radiator matches
the measure shown in the figure below.
plugs
brackets
6. OK, max tilt 1°
toward hydraulic parts
Hydraulic
parts side


