


Installation
EDUS391300-F9
40
FXZQ-MVJU9
3P184443-12N
18
3P184443-12N
English
CAUTION
r #TTCPIGVJGYKTGUCPFƂZCEQXGTƂTON[UQVJCVVJGEQXGTFQGUPQVƃQCVFWTKPIYKTKPIYQTM
r
Do not clamp remote controller wiring and transmission wiring together with power supply wiring.
Doing so may cause malfunction.
r 4GOQVGEQPVTQNNGTYKTKPICPFVTCPUOKUUKQPYKTKPIUJQWNFDGNQECVGFCVNGCUV|KPHTQORQYGTUWRRN[
wiring. Not following this guideline may result in malfunction due to electrical noise.
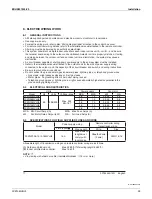
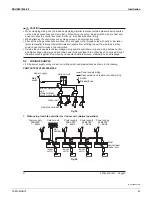
9. WIRING EXAMPLE AND HOW TO SET THE REMOTE CONTROLLER
9-1 HOW
TO
CONNECT
WIRINGS
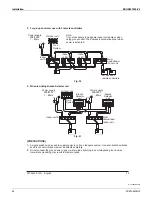
Methods of wiring power supply, connecting transmission and remote controller wiring
r
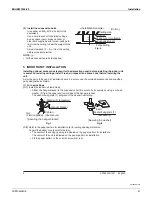
Power supply wiring and ground wire
4GOQXGVJGEQPVTQNDQZEQXGT%QPPGEVYKTGUVQVJGRQYGTUWRRN[VGTOKPCNDNQEM2KPUKFGCPFVJG
ITQWPFYKTGVQVJGVGTOKPCNDNQEM6JGPHCUVGPCEQPFWKVVQVJGEQPFWKVOQWPVKPIRNCVGYKVJC
NQEMPWVUPFQKPIVJKURWNNVJGYKTGUKPUKFGVJTQWIJVJGJQNGCPFƂZVJGYKTGUUGEWTGN[YKVJVJG
KPENWFGFENCOR
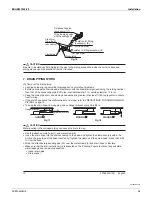
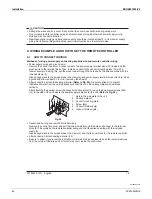
)KXGGPQWIJUNCEMVQVJGYKTGUDGVYGGPVJGENCORCPFRQYGTUWRRN[VGTOKPCNDNQEM7UG(KICU
a guide and allow at least 3-1/4 in. for removing the sheath.)
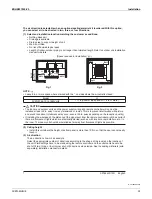
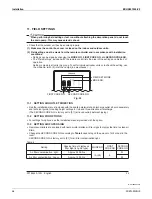
r
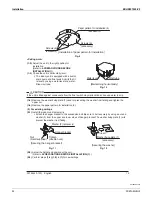
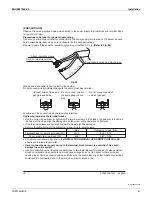
After connection, attach the sealing material.
(Refer to Fig. 25)
. Be sure to attach it to prevent
KPƂNVTCVKQPQHYCVGTHTQOVJGQWVUKFG/CMGUWTGVJCVVJGUNKVKPVJGUGCNKPIOCVGTKCNKURQUKVKQPGF
vertically.
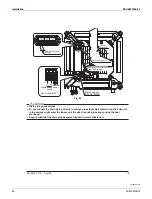
#HVGTCVVCEJKPIVJGUGCNKPIUETGYVJGEQPFWKVOQWPVKPIRNCVGWUKPIVJGFGNKXGTGFUETGYU/
VQVJGUKFGQHVJGWPKVYJGTGVJGRQYGTUWRRN[ECDNGUGPVGTVJGWPKV
(Refer to Fig. 25)
.
2
1
3
4
6
5
1. Hole in the side plate of the unit
2. Sealing
material
3. Conduit mounting plate
4.
5ETGY/
5.
%QPFWKV(KGNFUWRRN[
6.
.QEMPWV(KGNFUWRRN[
Fig. 25
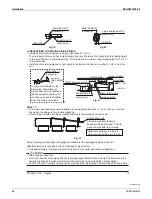
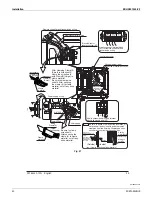
r
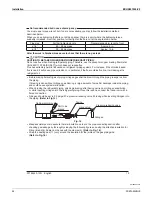
Transmission wiring and remote controller wiring
4GOQXGVJGEQPVTQNDQZEQXGTCPFRWNNVJGYKTGUKPUKFGVJTQWIJVJGJQNGCPFEQPPGEVVQVJGVGTOKPCN
DNQEM25GEWTGN[ƂZVJGTGOQVGEQPVTQNNGTYKTKPICPFVJGVTCPUOKUUKQPYKTKPIYKVJVJGKPENWFGF
ENCOR
)KXGGPQWIJUNCEMVQVJGYKTGUDGVYGGPVJGENCORCPFVJGVGTOKPCNDNQEMHQTVJGTGOQVGEQPVTQNNGT
r #HVGTEQPPGEVKQPCVVCEJUGCNKPIOCVGTKCN
r $GUWTGVQCVVCEJKVVQRTGXGPVVJGKPƂNVTCVKQPQHYCVGTCUYGNNCUCP[KPUGEVUCPFQVJGTUOCNNETGCVWTGU
HTQOVJGQWVUKFG1VJGTYKUGCUJQTVEKTEWKVOC[QEEWTKPUKFGVJGEQPVTQNDQZ
Summary of Contents for FXZQ-MVJU9
Page 1: ...EDUS391300 F9 FXZQ MVJU9 4 Way Ceiling Mounted Cassette Unit 2 2 ...
Page 2: ......
Page 10: ...Electric Characteristics EDUS391300 F9 8 FXZQ MVJU9 5 Electric Characteristics 4D080464 ...
Page 23: ...EDUS391300 F9 Sound Levels Reference FXZQ MVJU9 21 FXZQ15MVJU9 FXZQ18MVJU9 4D080467 4D080468 ...
Page 51: ......


